Imagine being able to transform ordinary household items into extraordinary creations, breathing new life into the familiar. Upcycling is more than just creative problem-solving – it’s an art form that celebrates resourcefulness and sustainability. And the best part? You already have a treasure trove of materials at your fingertips. Whether you’re a self-proclaimed crafter or simply looking for innovative ways to reuse what you have, the possibilities are endless.
Here, we’ll spark your imagination with 47 inspiring projects that showcase the magic of upcycling and repurposing.
Scented Candles
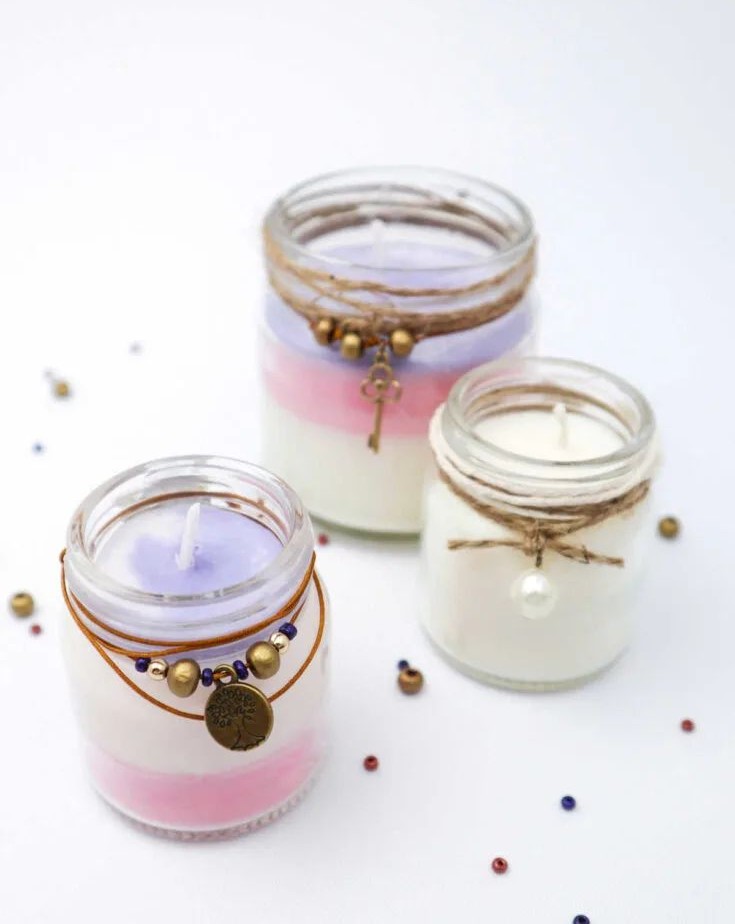
Transforming a space with the warm glow of scented candles is an art form. The soft light and inviting aromas can instantly elevate the ambiance of any room. However, purchasing candles can be costly and may not always fit within your budget. Fortunately, making your own candles at home is a simple and cost-effective solution.
To get started, gather some basic materials: mason jars from your recycling bin for upcycling into candle jars, beeswax or soy wax flakes for the candle base, candle wicks, dyes, and essential oils to add your desired fragrance.
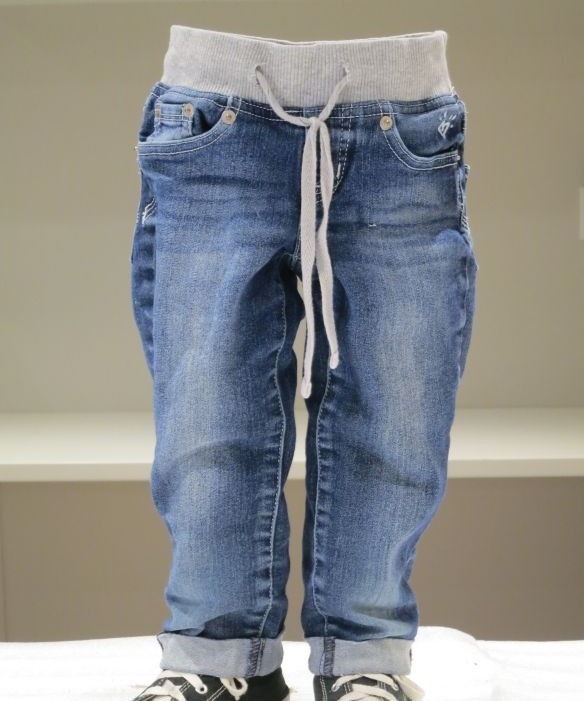
Denim Storage Bins
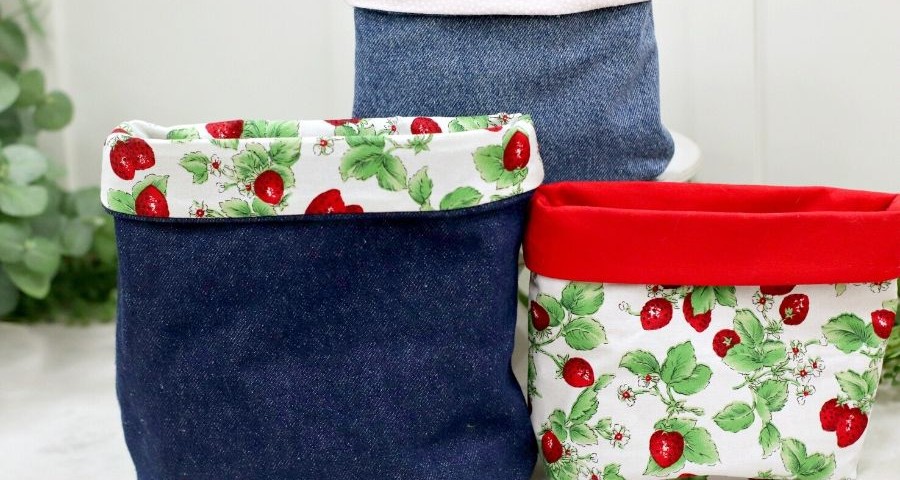
Before discarding worn-out jeans that are no longer wearable, consider upcycling them instead. This eco-friendly approach can lead to a multitude of creative projects. One example is transforming old jeans into practical storage bins. To give your creations a polished finish, use leftover fabric from your stash to line the edges and add decorative cuffs.
The size you choose will determine what items you can store in these bins, making them perfect for organizing yarn, craft supplies, sewing materials, and more. For inspiration, explore this extensive list of 47 DIY scrap fabric projects that showcase innovative ways to reuse materials.
DIY Phone Holder
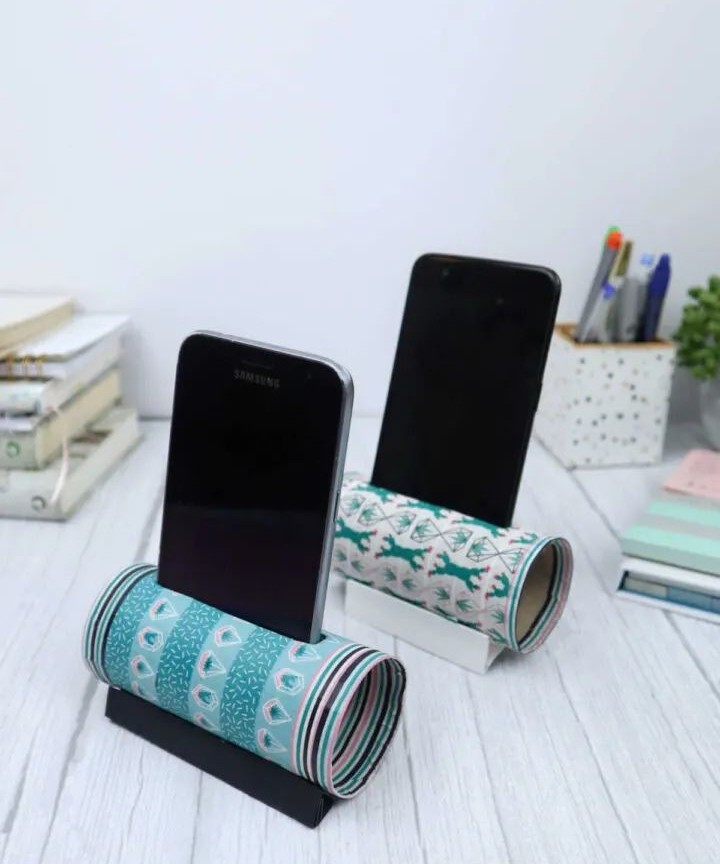
While online purchases are convenient, it’s hard to beat the charm of a handmade phone holder made from unexpected materials. I’m thrilled to share that these adorable holders were crafted from humble toilet paper rolls! Not only are they ridiculously easy to make, but they’re also visually appealing and budget-friendly since you likely already have all the necessary supplies on hand.
The key to success lies in selecting the perfect washi tape for your phone holder.
The pattern and design will directly depend on the tape you choose, so feel free to explore the options available.
Children’s Dress Up Wardrobe DIY
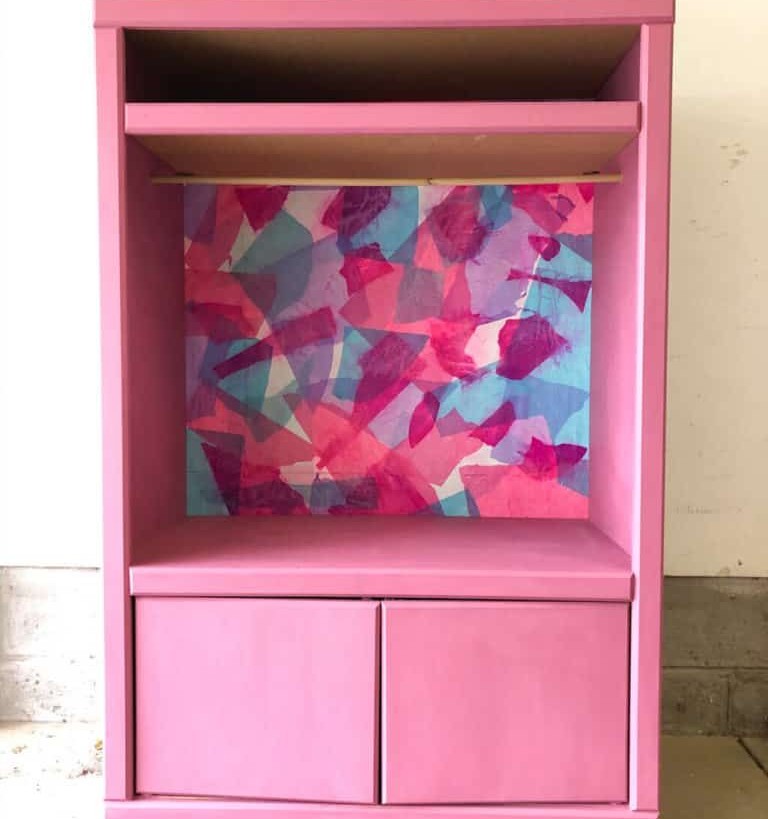
If you’re an avid flea market shopper, chances are you’ve stumbled upon an old wood wardrobe or dresser that needs some TLC. When you find one that catches your eye, don’t hesitate to take it home and give it a makeover. Consider transforming it into a unique and functional piece for your child’s room.
To get started, grab some paint cans and give the dresser a few coats of fresh color. Feel free to experiment with different hues by mixing your own paint or purchasing a unique shade.
When working with chalk-finish paint, remember to mix equal parts plaster, water, and paint for a one-of-a-kind finish.
To avoid any messy mishaps, lay out newspapers before starting the painting process to catch any stray drips or splatters.
DIY Wooden Shape Puzzles
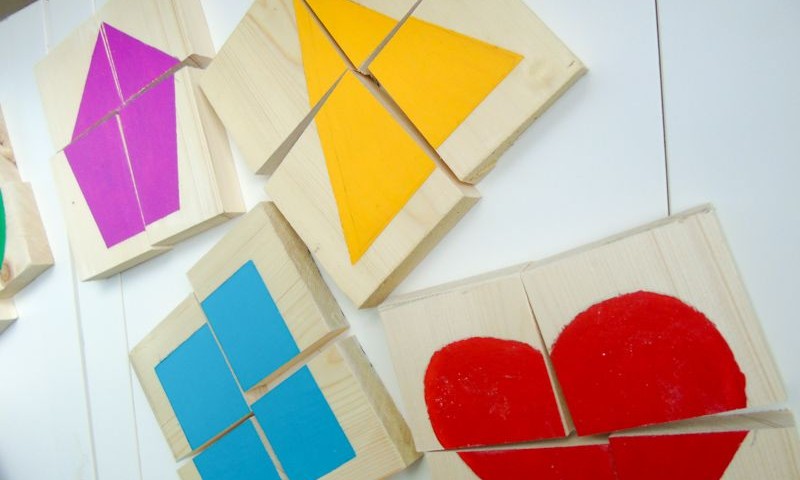
When it comes to nurturing your child’s development, interactive playtime is crucial. By incorporating activities that challenge their motor skills and cognitive abilities, you can create a stimulating environment that fosters growth and exploration. One way to achieve this is by crafting shape puzzles using repurposed wooden blocks or scrap wood from previous projects. To get started, gather your toolkit, including a saw, sander, acrylic paint, clear varnish, and painter’s tape.
Begin by sanding the wood to smooth out any rough edges, then use paint to bring different shapes to life. This hands-on activity not only provides entertainment for your little ones but also helps develop their problem-solving skills and hand-eye coordination.
No-Sew T-shirt

Transform an old tee into a fresh, new look by upcycling it – no sewing required! Start by grabbing one of those forgotten tees lurking in your closet. You can breathe new life into it with just a pair of fabric scissors and some simple design work. Use a chalk pencil or tailor’s chalk to create the desired pattern, then cut out the marked areas. Next, stretch each strip before looping them into ties, giving your shirt a playful twist.
Rainbow Crayons
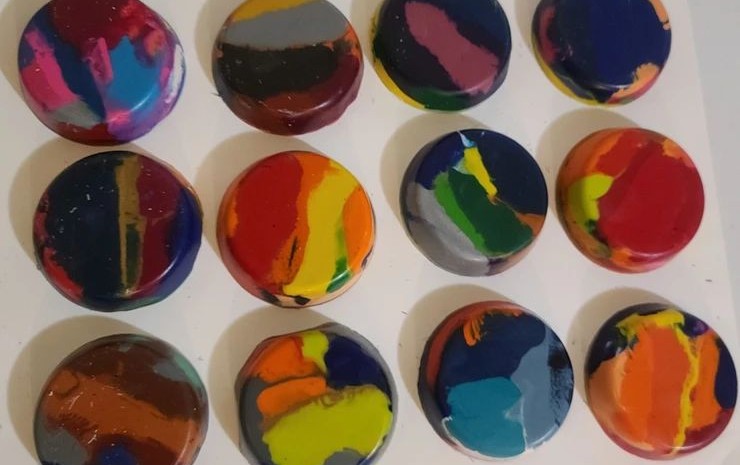
The perpetual frustration of dealing with broken crayons is a common problem many of us face. The feeling of helplessness as we watch our once-vibrant crayon stash slowly disintegrate is indeed an annoying nuisance. Rather than letting these broken crayons gather dust, why not transform them into something new and exciting? One creative solution is to collect all the broken crayons and remove their paper wrappings.
This will give you a treasure trove of colorful materials just waiting to be reimagined.
To get started, grab an old muffin tray and fill each cup with your gathered crayon fragments. You can choose to create a marbled rainbow effect by mixing different colors together or opt for a more uniform look by grouping similar hues in each cup – the choice is yours.
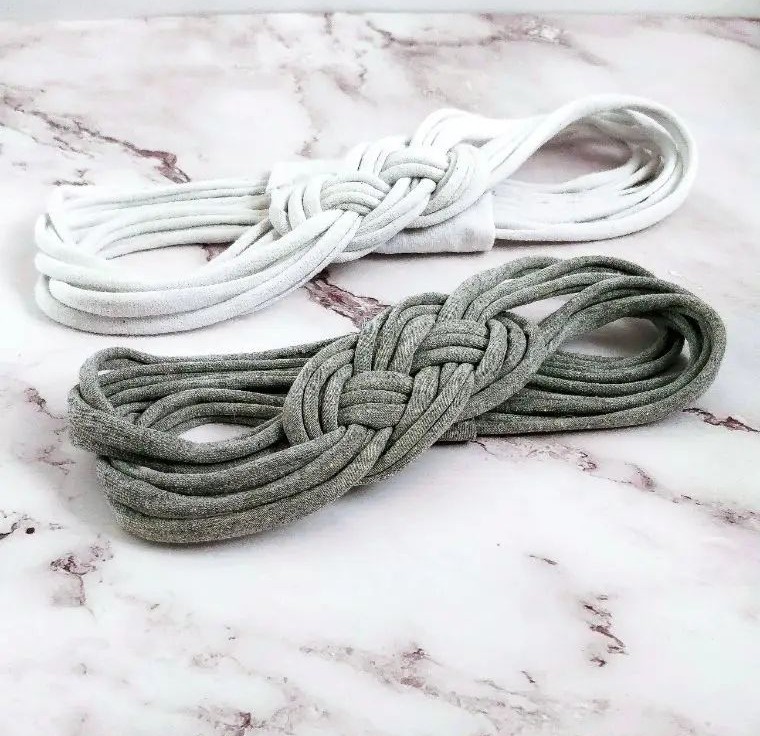
DIY Bracelet from Shoelaces
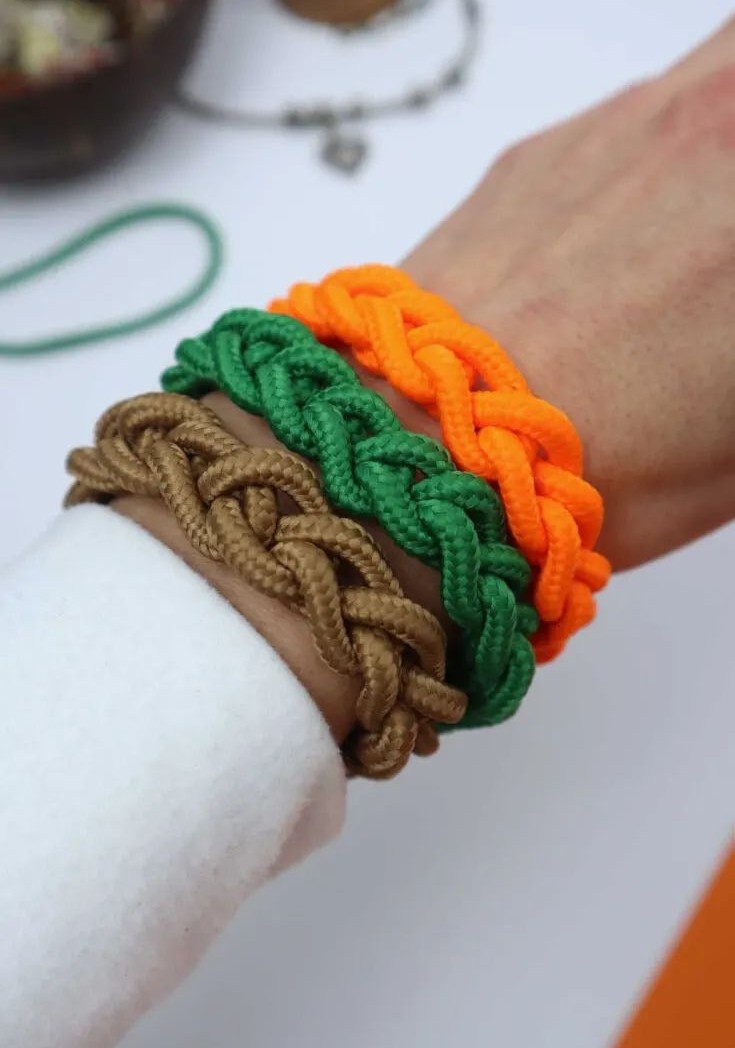
As a teenager, I used to craft unique accessories from everyday materials, including twist ties and embroidery floss. This creative endeavor was all about experimenting with unconventional techniques to create one-of-a-kind pieces.
Fast-forwarding to the present, it’s exciting to rediscover this enthusiasm for DIY projects. Take, for instance, the humble shoelace – a ubiquitous item that can be transformed into a stylish bracelet. The best part?
This project is accessible to people of all ages, requiring minimal materials and effort.
To get started, grab some shoelaces in your favorite colors. You’ll need just one key ingredient to create this charming accessory.
Now, it’s time to put your DIY skills into action! Follow the simple steps outlined below to craft your very own shoelace bracelet.
Upcycled Old Vases with Paint
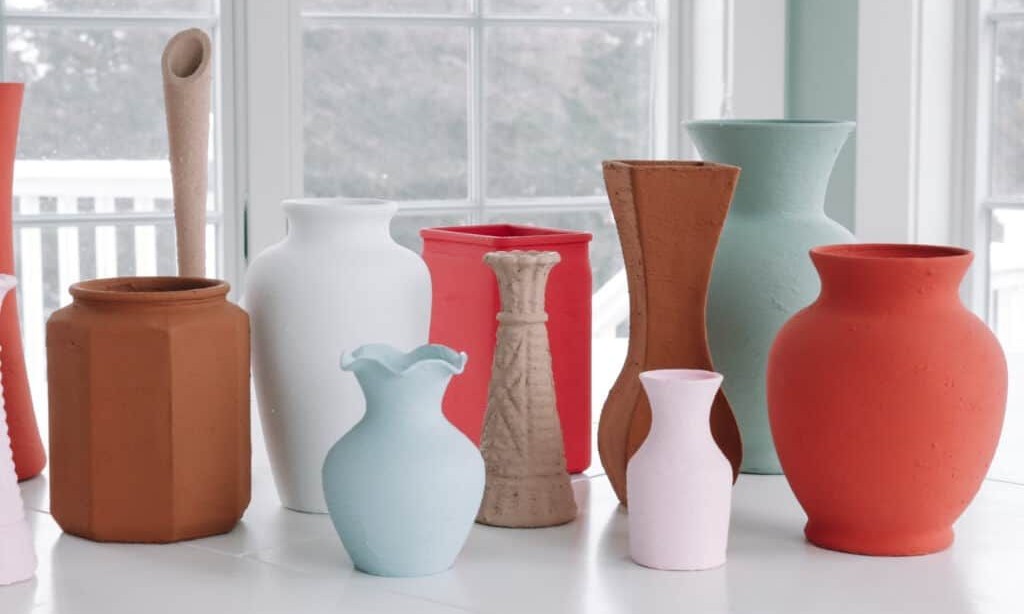
While a vase full of vibrant flowers can instantly elevate a room’s ambiance, it’s equally important not to overlook the humble vessel itself. A beautiful arrangement can be greatly diminished by an unremarkable vase. This DIY project aims to breathe new life into old vases, transforming them into one-of-a-kind masterpieces.
To begin, gather your materials: chalk paint from a trusted supplier, foam brushes for smooth application, a drop cloth for mess containment, and paper plates for customizing the paint’s hue. Before you dip your brush in creativity, ensure your vases are squeaky clean and completely dry. Any residual dirt, grease, or oils will prevent the paint from adhering properly, rendering the entire effort futile.
Christmas Card Holder
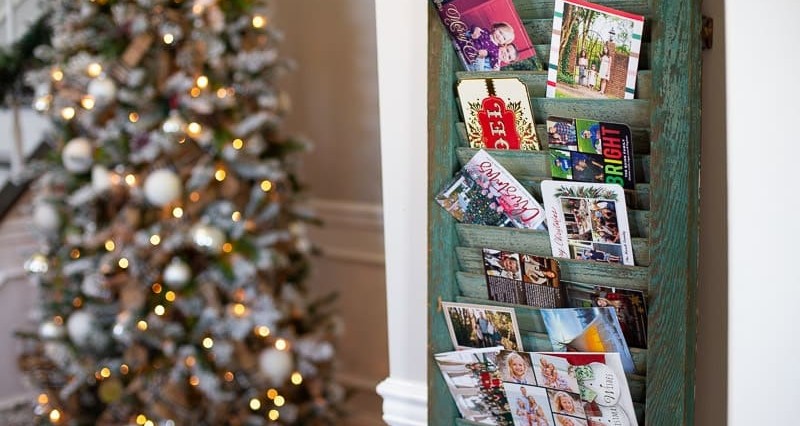
You may be accustomed to storing your Christmas cards in a haphazard pile or relegating them to a dusty drawer until it’s time for a post-holiday clean-up. However, these treasured keepsakes deserve more than just a fleeting glance or temporary storage. They deserve to be proudly displayed and cherished, which is where this ingenious upcycled card holder comes into play.
This unique creation takes the form of an old vintage shutter, transformed from a discarded relic to a functional piece of art that can hold your most beloved holiday cards.
Wine Cork Ornaments
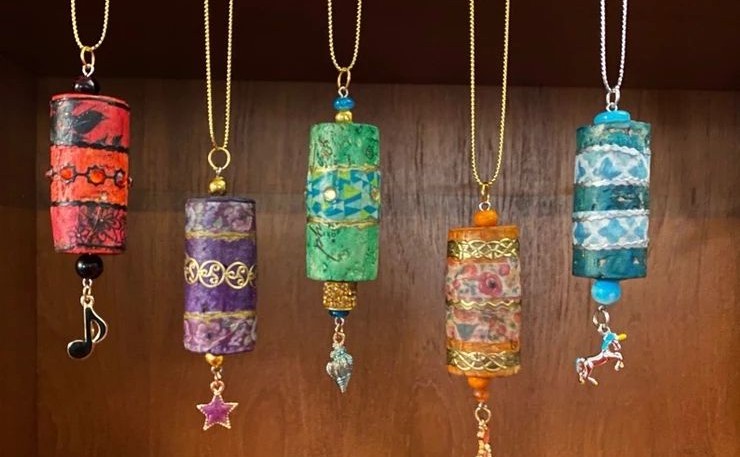
Wine bottle craft projects are a delightful way to repurpose discarded bottles and corks. The process of collecting the empty bottles and saving their corks can be just as enjoyable as creating the final ornaments. When it comes time to transform the corks into charming decorations, you’ll need some washi tape – ideally, a few rolls to ensure you have enough for the project. Twine or string is also essential for hanging the finished ornaments from their new perches.
Feel free to supplement your materials with embellishments of your choice, adding a personal touch to each ornament as you see fit. By suspending them from below, as depicted here, you can create visually appealing decorations that double as mementos of your creative endeavors.
For further inspiration and ideas, explore the world of wine bottle crafts and discover what other treasures you can craft with these versatile materials.
Thrift Store Painting
When scouring for creative and budget-friendly ideas, I find myself frequenting dollar stores, flea markets, and thrift shops. The treasure trove of affordable materials is unparalleled. Take the thrift store painting project, for instance. Begin by selecting a canvas or painting that sparks your creativity. Next, acquire a few cans of spray paint, some masking tape, and vinyl letter stickers. Position the vinyl letters onto your chosen design to convey your desired quote or phrase.
Ensure they’re securely fastened to prevent any slippage. As an added touch, you can experiment with color blocking to preserve the original artwork’s essence.
Unicorn Toilet Roll Craft
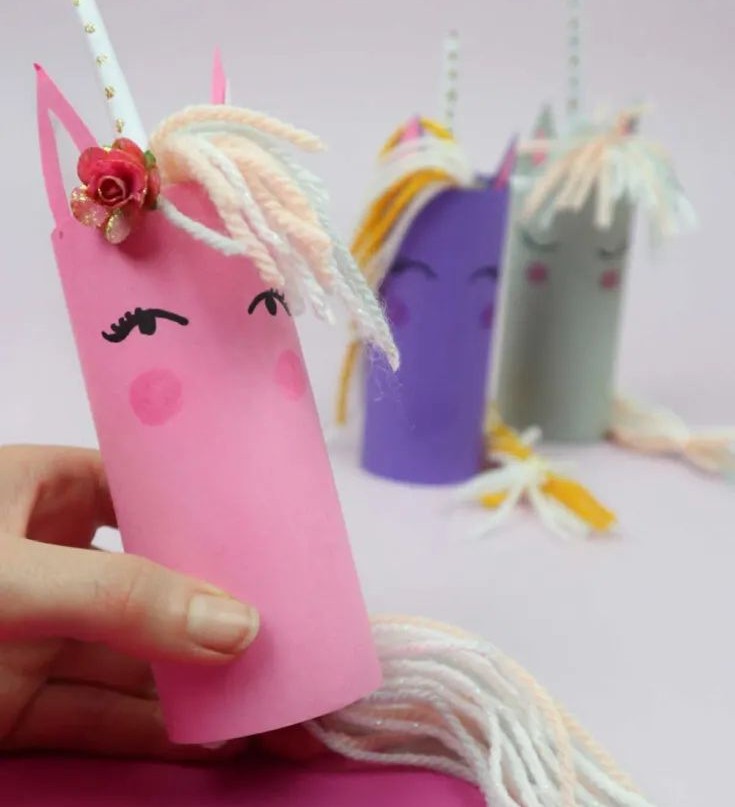
I’m thrilled to share yet another creative DIY project that repurposes toilet paper rolls in a truly magical way. Who would have thought that something as ordinary as cardboard tubes could be transformed into vibrant and whimsical creations? The result is nothing short of enchanting, don’t you agree? This project is sure to delight kids (and let’s be honest, adults too!) and spark their imagination. It’s the perfect excuse to gather around for a fun craft session.
And if you’re looking for even more inspiration, I encourage you to explore these 27 delightful unicorn crafts and get ready to unleash your inner creativity!
Bread Pan Planter
Bread pans are an incredibly versatile material for craft projects, particularly when repurposed as planters. Their unique shape makes them an ideal fit for window sill planters, providing a charming addition to any room. But their uses don’t stop there – they can also be used as centerpieces, adding a rustic touch to your porch, steps, or garden path. The possibilities are endless! Simply pair each bread pan with a few large wooden beads, which serve as stands to elevate the planter.
A hot glue gun is all you need to secure them in place. With a little creativity, the potential for upcycled bread pan planters is limitless – and who knows, maybe you’ll even discover a new business opportunity?
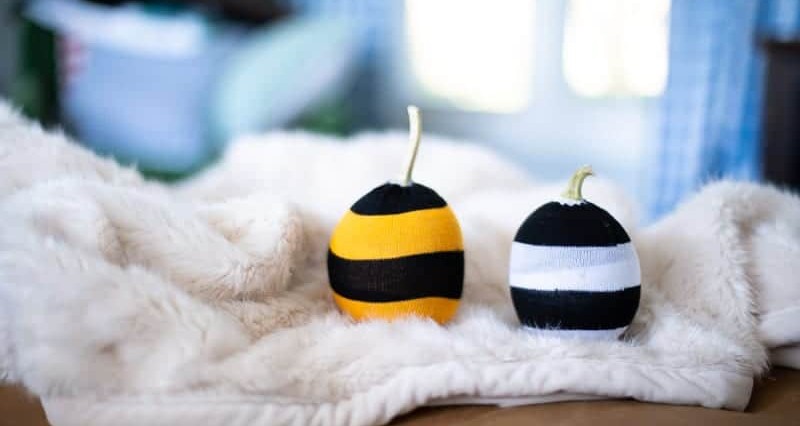
Embroidery Hoop Pumpkin
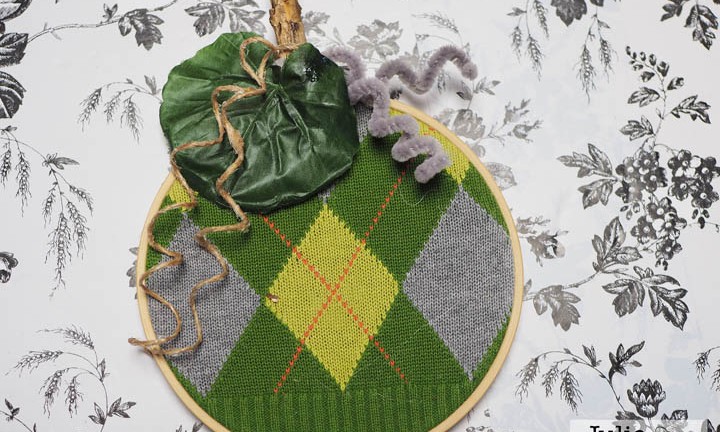
The pumpkin’s dignified appearance is hard to ignore, with its sweater vest-inspired print making it resemble a professor in costume. This unique design is actually achieved by upcycling old sweaters that have seen better days – perhaps they’ve been shrunk in the wash or developed holes? Whatever their backstory, they’re perfect for repurposing into this charming pumpkin creation.
To get started, grab one of these worn-out sweaters and pair it with some embroidery hoops.
The vine tendrils can be fashioned from pipe cleaners, adding a playful touch to your design. For even more inspiration, take a look at our 27 Thanksgiving crafts for adults and discover a world of pumpkin-themed ideas.
DIY Headband
Get creative with that extra t-shirt and upcycle it into a stylish DIY headband! Building on our previous no-sew DIY t-shirt project, we’re taking it to the next level by adding some Celtic flair. To make these personalized and chic headbands, you’ll need fabric scissors, a hot glue gun, and of course, that trusty old tee. When selecting your upcycle material, opt for soft, stretchy, and moisture-absorbing fabrics that will provide comfort against your skin.
Next, cut the bottom of the tee into three long strips, leaving the seams intact to create a looped effect. The larger your starting tee, the bigger your finished headband will be, so don’t be afraid to get creative with those scissors!
Toilet Paper Seedling Pots
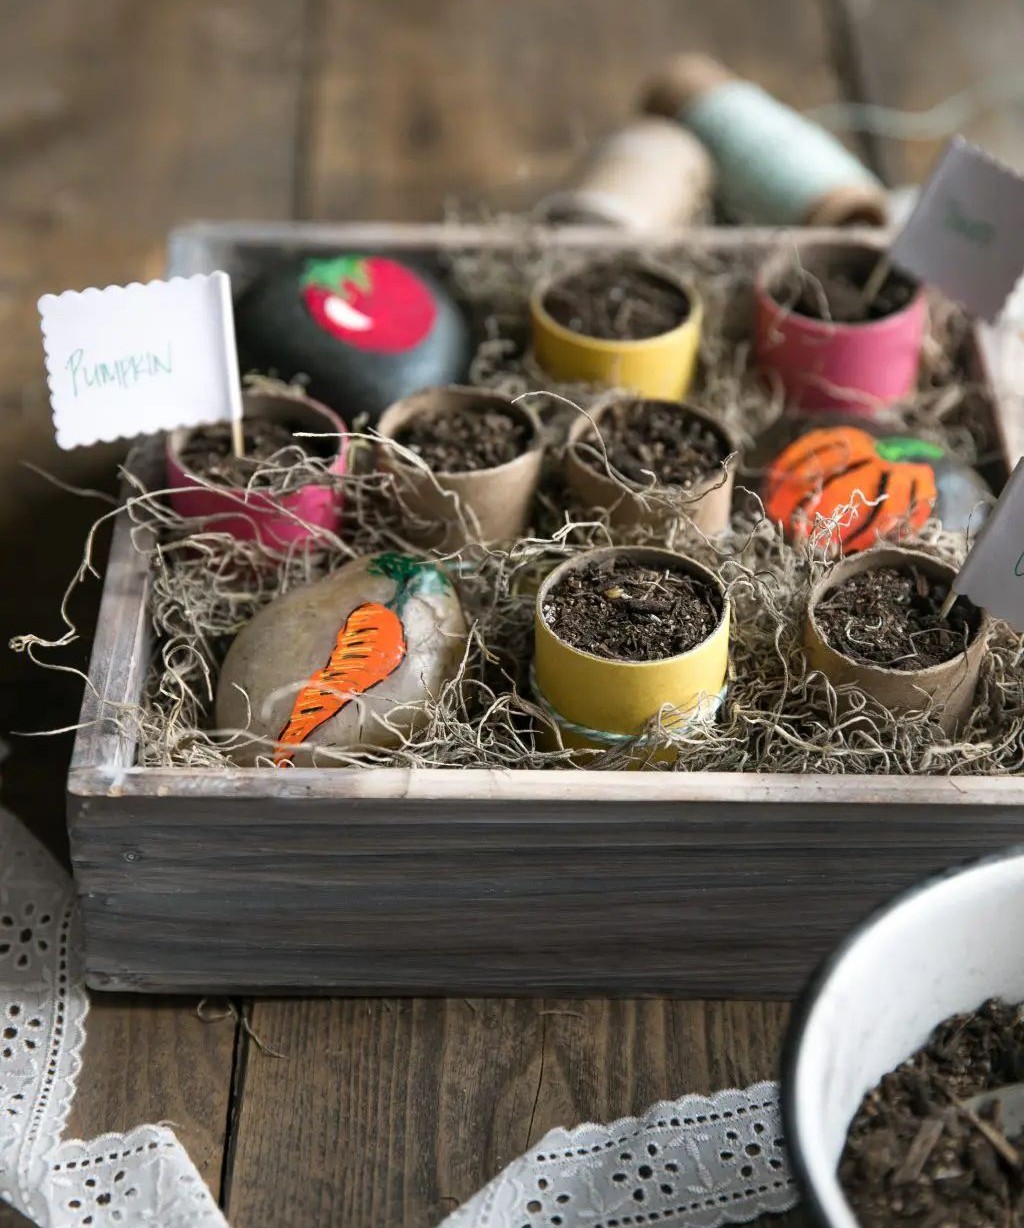
Indoor gardening just got an unexpected twist! Reusing toilet paper rolls into seedling pots is not only eco-friendly but also a great way to bond with your kids. This project offers a fantastic opportunity to teach children about the value of sustainable living, the life cycle of plants, and the joy of growing their own food. To add a touch of personality to your toilet roll pots, simply decorate them with washi tape or ribbons before planting.
It’s a fun family activity that’s sure to spark imagination and creativity.
Socks Pumpkin Craft
Building on our upcycling skills, let’s breathe new life into those mismatched socks hiding in the back of your drawer. It’s time to get creative and transform them into adorable sock pumpkins! To start, gather your materials: fluffy Polyfil, rubber bands for binding, a sturdy stick for the stem, and a trusty hot glue gun. Don’t be limited by traditional orange hues – think outside the box and create quirky socks with vibrant colors and playful patterns. The possibilities are endless!
DIY Pencil Case
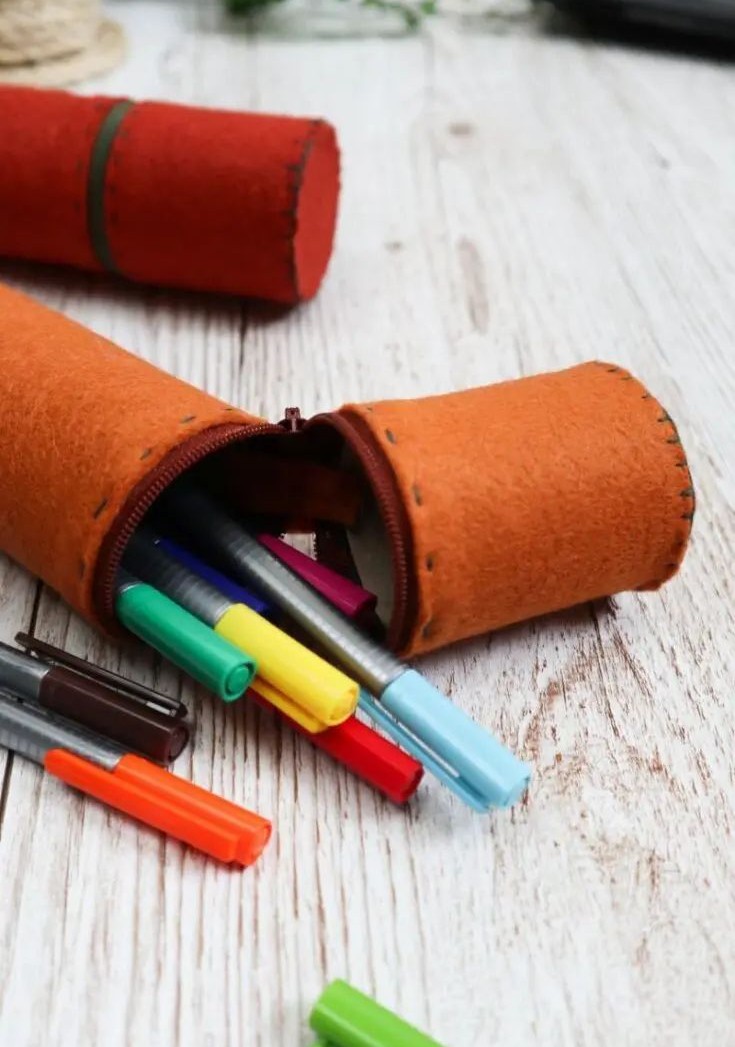
We’ve had an abundance of creative endeavors with upcycled toilet paper rolls, haven’t we? One such project stands out in terms of functionality – a DIY pencil case that not only looks great but also serves a purpose. Let’s dive into the details! To get started, gather your materials: nylon zips, a needle, colored thread, cardboard, a hot glue gun, scotch tape, and a craft knife. The most appealing aspect of these pencil cases is their tactile nature – they feel like a luxurious treat to hold.
And the best part? You can easily swap out the felt for alternative materials such as fabric, leather, or suede swatches and scraps.
Yoghurt Container Flower Pot
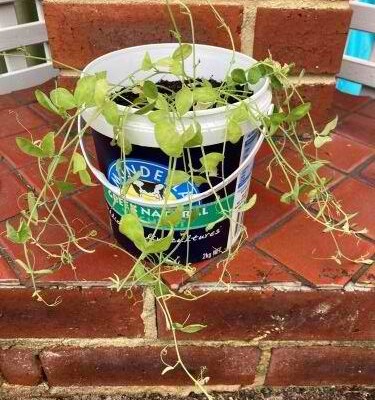
Yogurt – a creamy delight that deserves our affection. Who can resist the allure of its velvety texture and delectable taste? The larger-than-life cartons, complete with sturdy handles, only add to its appeal. But what happens when those containers are empty? Instead of discarding them, why not breathe new life into them by transforming them into flower pots? Yes, you read that right – flower pots!
Before embarking on this creative journey, make sure to give the buckets a thorough cleaning and drying. This will enable you to decorate them with ease, as any residual yogurt residue is banished.
Money Tissue Box
While I adore receiving thoughtful gifts on my birthday, there’s no denying that cash is always a welcome surprise. In fact, having some extra money to spare can be incredibly convenient. One creative way to give the gift of cash is by transforming a traditional tissue box into a unique and festive ‘money box.’ This innovative idea is perfect for occasions like graduations, birthdays, and weddings, especially if the recipients prefer financial windfalls over physical presents.
To create this special gift, you’ll need a tissue box, dollar bills, paper, scissors, and double-sided tape. Feel free to get creative with decorations, using items like confetti, tissue paper, or other embellishments to make it an even more memorable present.
DIY Dollar Tree Lantern
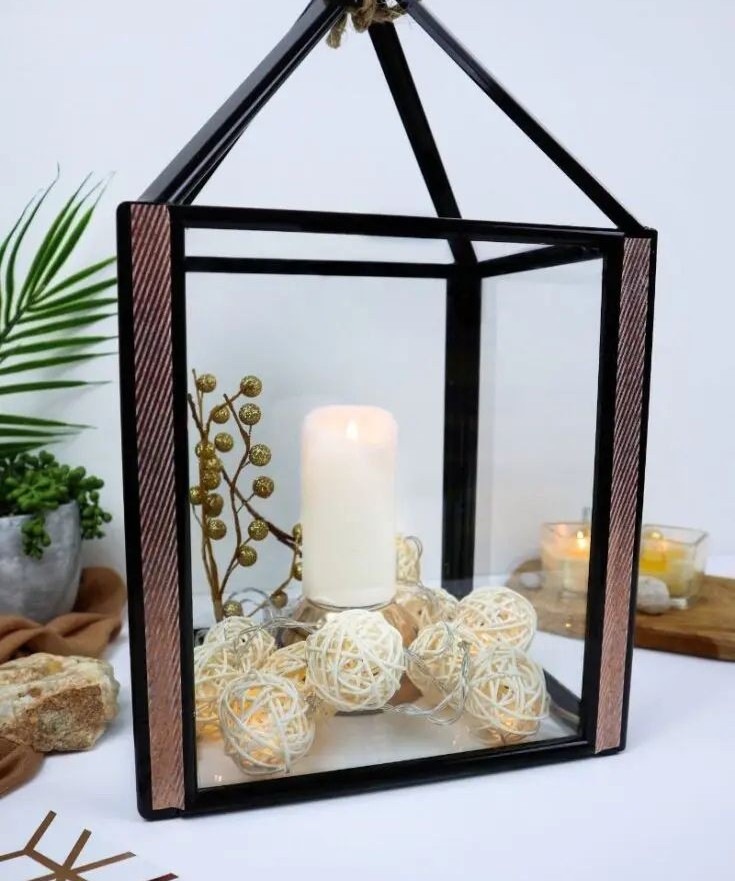
I’m a huge fan of creative lighting around my home, which is why I’m obsessed with this DIY dollar tree lantern. What’s even better is that you can create your own stunning lanterns without breaking the bank! By using cost-effective materials and items from your local dollar store, you can avoid overspending on fancy lanterns at the store or online. To get started, simply grab a few simple dollar tree frames and disassemble them.
You can then repurpose these frames to give your lantern a unique touch. Once you’ve completed the project and allowed the glue to dry, all that’s left to do is insert an electric pillar candle and add some decorative balls for a finishing touch. For more DIY inspiration, be sure to check out our collection of projects designed specifically for teens.
Early Learning Recycled Project
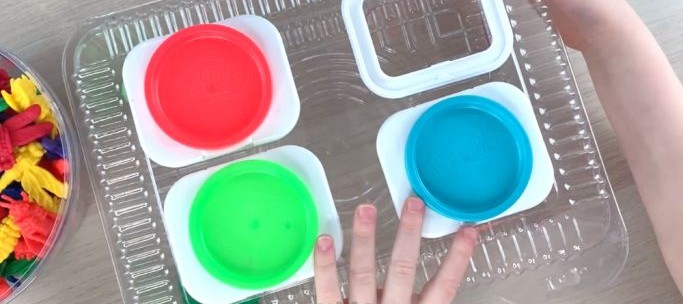
Incorporating upcycling and recycling into a fun learning toy, this project is an innovative way to repurpose materials while fostering creativity. The mix-and-match approach provides a learning opportunity at every turn.
Start by taking a plastic container and using a craft knife to create four holes. Next, hot glue the recycled baby wipe opener onto these holes. Then, attach the playdough container tops to the openers using hot glue, allowing the different colors to be easily distinguished.
Important note: before moving on to each step of this project, make sure all components are completely dry to ensure a smooth and successful outcome.
Fire Chair Makeover
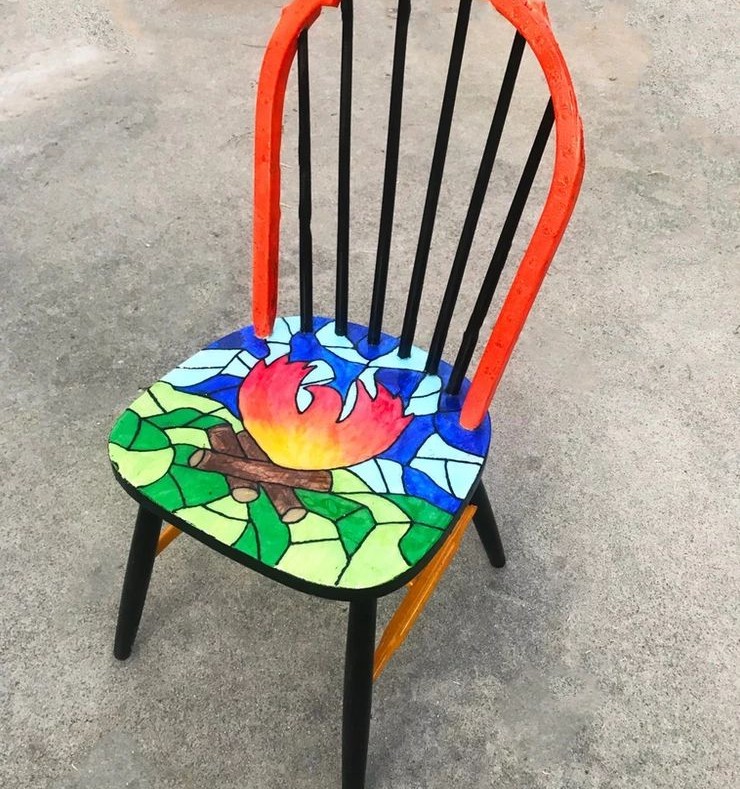
Before sending your old dining room chairs to their demise in the wood chipper, consider giving them a makeover instead. This approach allows you to breathe new life into the pieces while still maintaining their original charm. You can stick with the campfire-inspired theme, transforming them into rustic seating for a cozy gathering around a real bonfire. Alternatively, feel free to get creative with unique patterns and designs.
Once you’ve finished revamping your chairs, simply apply a few coats of sealant to protect your handiwork and voila! You’ll be enjoying your newly refurbished seats in no time.
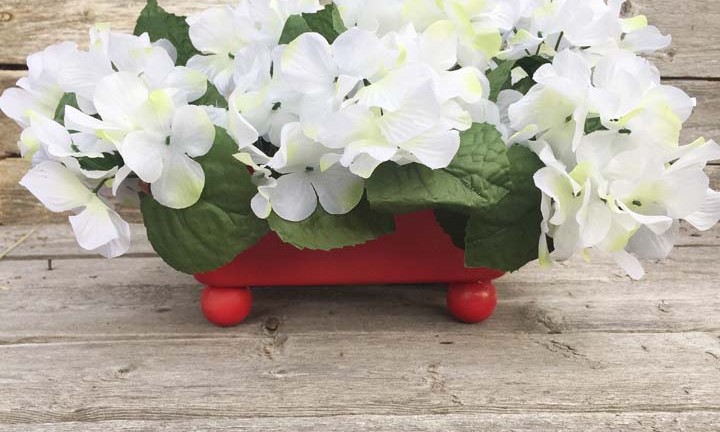
DIY Leaf Candle Holder
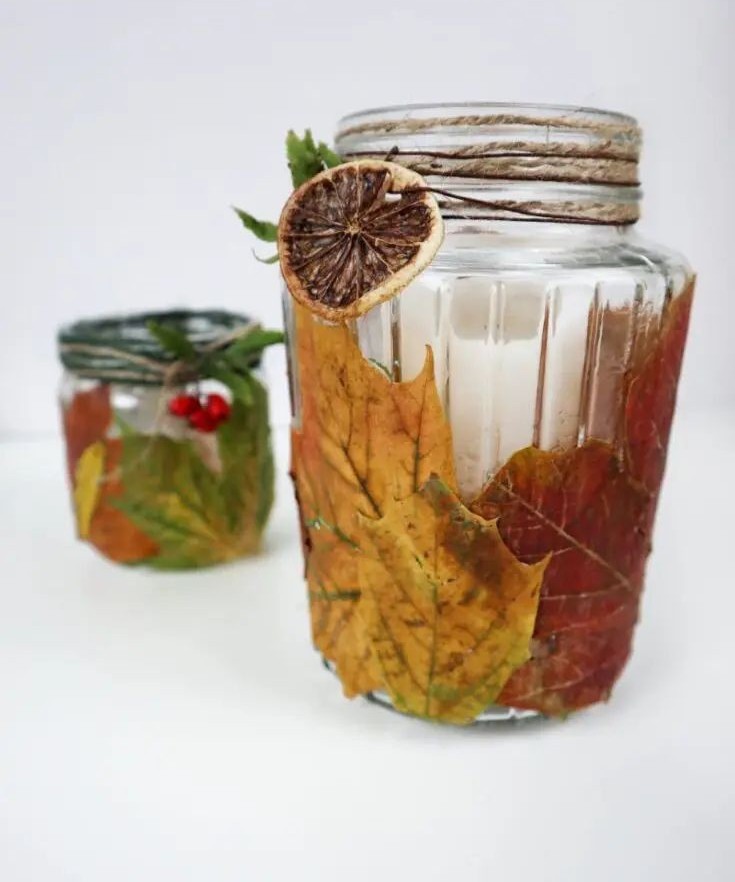
While scented candles can indeed evoke a cozy atmosphere, it’s crucial not to overlook the vessel that holds them. A thoughtfully chosen container can elevate the overall ambiance of a room, much like this charming DIY leaf holder does. The warm, inviting aroma of a candle is further amplified when paired with a jar that evokes the vibrant hues of fall.
Imagine the delightful scent of spices and citrus wafting through your space from a beautiful, rustic-inspired container adorned with dried orange peels, cinnamon sticks, or cranberries. By incorporating these natural elements, you’ll be able to craft a truly unique and captivating centerpiece.
Recycled Batteries Container
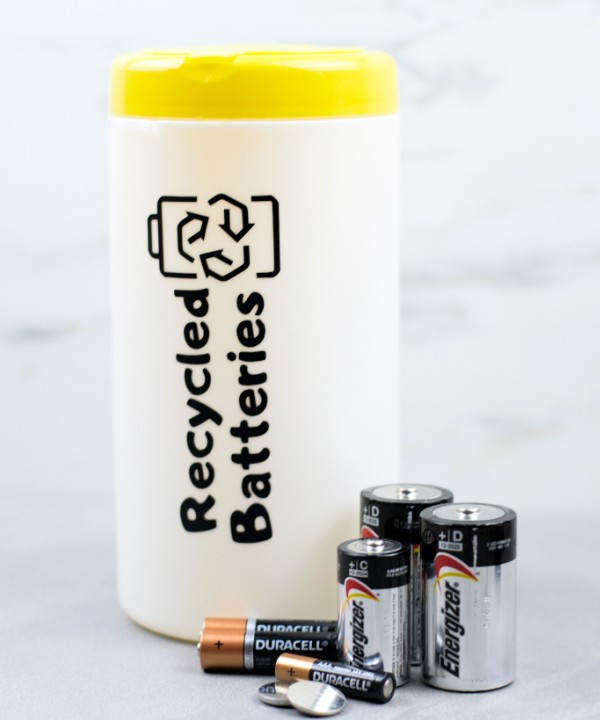
Properly disposing of used batteries is crucial for environmental well-being. Ditching them in the trash without a second thought can have devastating consequences. Used batteries are filled with hazardous materials like sulphuric acid and lead, which require specialized handling. So, what’s the solution? With a little creativity, you can transform an old disinfectant or cleaning wipes container into a unique recycled battery container.
Before getting creative, make sure to thoroughly clean out the container to remove any lingering residue.
DIY Bottle Cap Candles
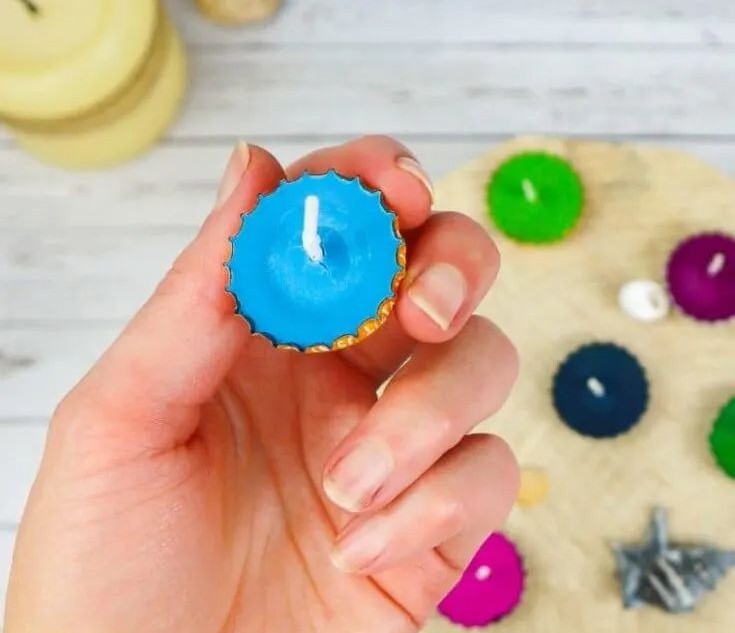
While there are countless creative bottle cap projects out there, one that truly stands out is transforming these humble caps into unique candle vessels. It’s amazing what a little creativity can do! Before diving in, make sure to thoroughly clean and dry each cap. For this project, you’ll need beeswax or soy wax, as well as candle wicks. If the wicks are too large for your desired vessel size, simply trim them down with scissors.
To take it to the next level, consider adding a few drops of candle dye and essential oil, giving your candles an extra boost of fragrance and character.
DIY Bathroom Vanity

Imagine a bathroom vanity that truly stands out from the crowd. One that sparks conversation and inspiration. That’s exactly what this unique upcycled vanity delivers. And the best part? You can create it by repurposing an old suitcase you no longer need, giving new life to something that would otherwise gather dust in your attic.
Not only will it add a touch of personality to your bathroom, but it’ll also provide a convenient and organized space for storing all your essentials – from toiletries to hair accessories. By incorporating this creative solution into your bathroom design, you’ll not only eliminate clutter but also create a visually appealing focal point that’s sure to impress.
Knotted T-shirt Headband
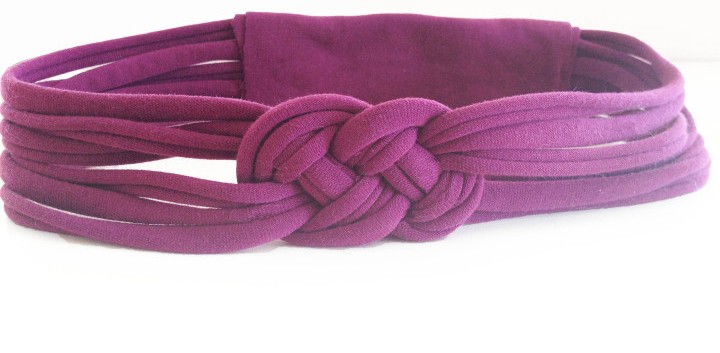
Who else remembers whipping up a trendy headband from an old tee? Today, we’re revisiting that creative process and taking it to the next level with another fabulous no-sew DIY project. Grab an unwanted tee and a pair of scissors – you know the drill! Cut long, looped strips as instructed, and before you know it, you’ll be rocking your very own knotted tee headband.
And if you’re feeling extra crafty, be sure to check out these innovative DIY t-shirt ideas for even more inspiration on upcycling old tees.
Upcycled Drawers Wall Unit
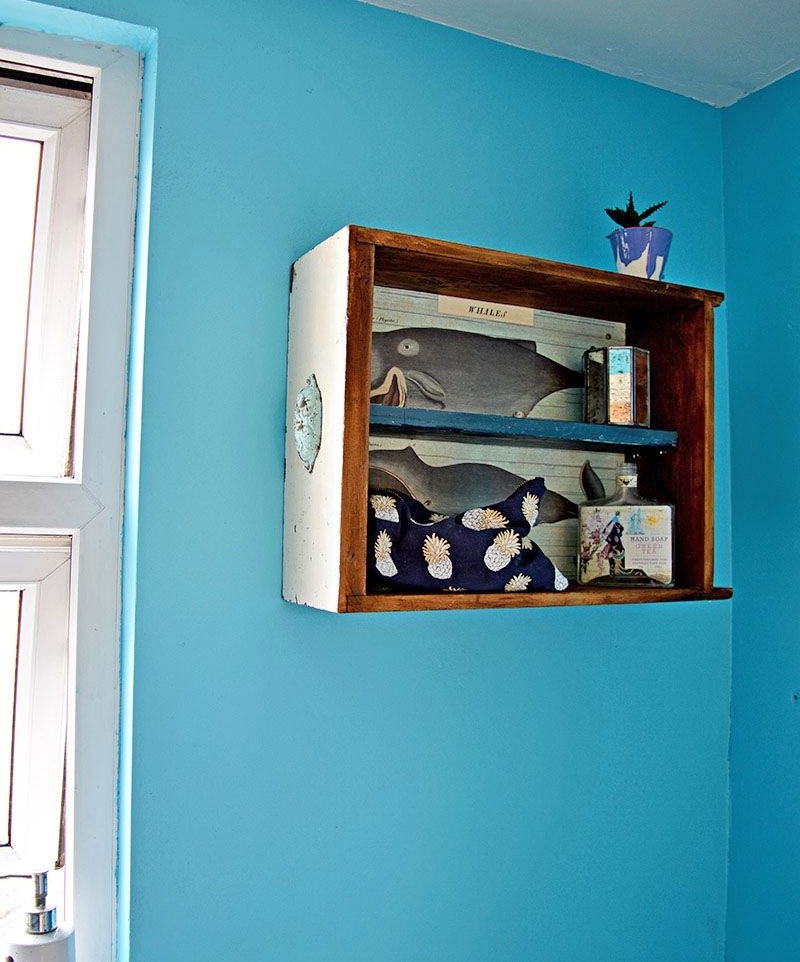
Considering a storage upgrade for your bathroom? You don’t necessarily need to break the bank on a fancy new drawer unit. Instead, why not give an old drawer a second life by upcycling it into a unique shelving solution? A trip to your local skip, dumpster, or flea market should yield plenty of suitable candidates. To transform this thrifted treasure, start by giving it some visual flair with decoupage featuring printed napkins.
Once you’ve finished painting and refurbishing the drawer, take your pick from a selection of ornate handles to add that extra touch of elegance.
Tin Can Piggy Bank
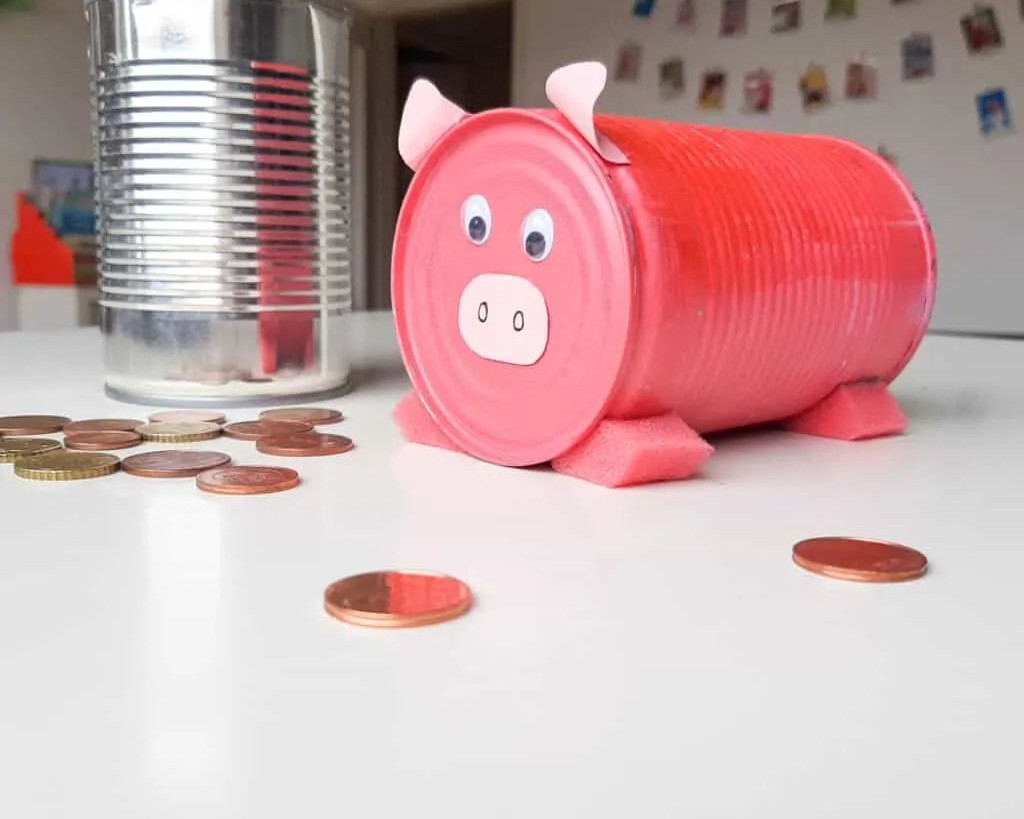
Transforming a humble tin can into a charming piggy bank is an excellent starting point for any crafting adventure. Begin by giving the tin can a metallic makeover with a couple of coats of paint. Next, gather a few essential supplies: googly eyes, pink cardstock, and pink sponges to serve as the stands. Use a hot glue gun to securely attach each component to the can, allowing ample time for it to dry completely before use.
Don’t forget to add a convenient slot on the lid for effortless penny deposits! If you’re enamored with this craft, be sure to explore these additional Dollar Tree crafts for further creative inspiration.
Eco Friendly Wrapping Paper
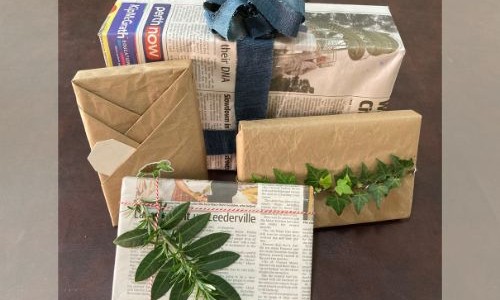
While textured patterned wrapping paper may be trendy, I’m happy to stick with eco-friendly options like newspaper or brown paper. Not only is it better for the environment, but you can also get creative with plain old brown paper using various techniques and styles. With some experimentation, a few simple tucks and folds can give your gift a professional finish.
To really make it pop, add some colorful embellishments like string, ribbon, or twine, pressed leaves and flowers, stickers, and more – the possibilities are endless!
Christmas Glitter Jars
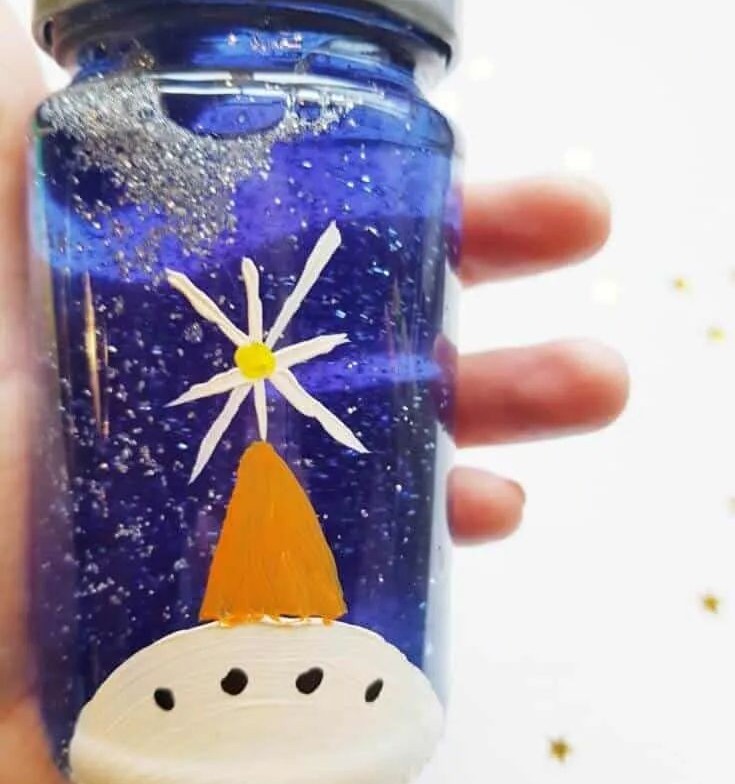
Transform ordinary glass bottles into mesmerizing sensory glitter jars that captivate both children and adults alike. These DIY wonders are not only an effective way to keep little ones engaged for extended periods but also a creative outlet for adults seeking a relaxing activity. The best part? You can repurpose old glass containers or jars you’d otherwise recycle, giving new life to discarded materials.
To get started, simply gather some basic supplies: glitter, water, confetti, food coloring, paint, and brushes – odds are you already have most of these items stocked in your craft supplies at home. With your materials in hand, follow the simple instructions to create your very own calming Christmas-themed sensory jars.
Scrap Wood Sculptures for Kids
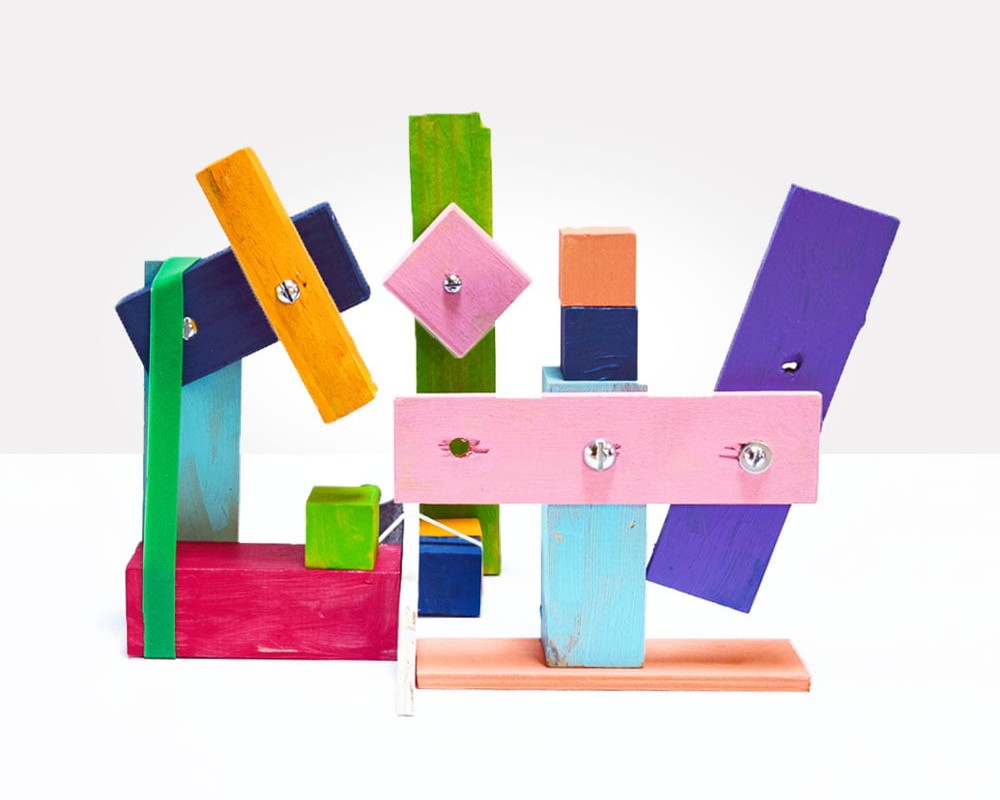
Transforming scrap wood into creative projects is an exciting endeavor, offering countless opportunities for innovation. One such example is creating intricate sculptures with kids. This hands-on approach not only fosters a love for building but also provides a unique way to introduce young minds to the fundamentals of architecture and design principles.
By engaging in these activities during playtime, children can develop a deeper understanding of spatial reasoning, problem-solving, and critical thinking skills.
Repurposed Light Parts Angel
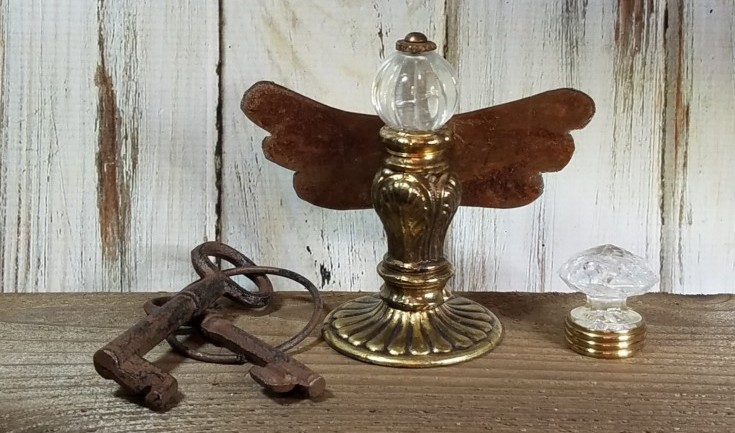
Imagine transforming discarded light fixtures into a radiant angel that illuminates your space with an ethereal glow. It’s only fitting, isn’t it, to harness the power of repurposing old components to craft a heavenly luminary? To get started, scour thrift stores or salvage parts from outdated furniture for a crystal knob. Alternatively, you can fashion makeshift wings using felt cutouts, wire manipulation, or even repurpose metal scraps.
Once your angel’s wings are in place, simply connect the lighting fixture to an electrical outlet and follow the previous wiring instructions to bring it to life.
Cutting Board and Grater
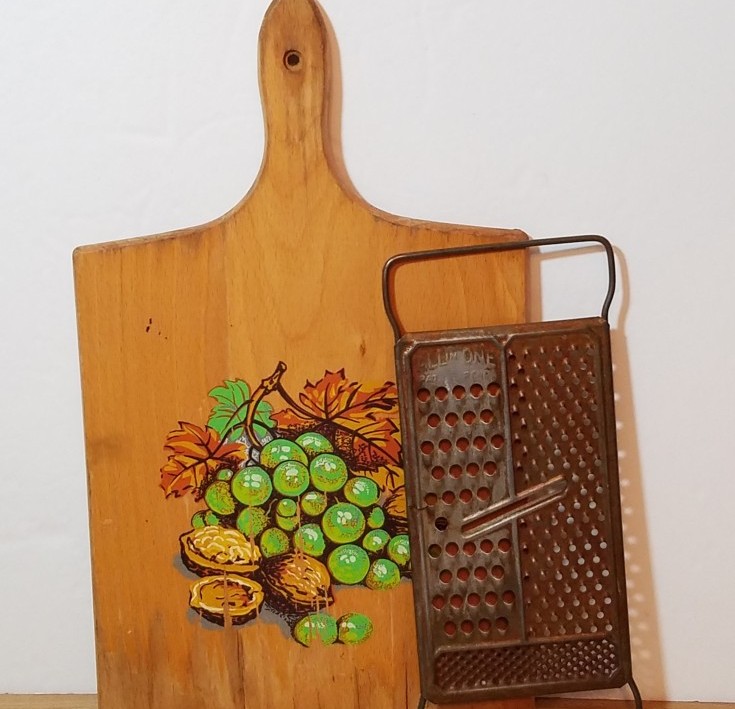
Transform your old and rusty grate and cutting board into a unique photo or recipe display by upcycling them. Chances are you have these items collecting dust in the back of your pantry, just waiting for a creative makeover. To complete this project, you’ll need to gather some additional materials: a wrought iron coat hook with screws, wire, wire cutters, screwdriver, pliers, round magnets, and adhesive.
Before getting started, don’t forget to wear protective gloves to ensure your safety while working with the rusty items.
Chair Back Kitchen Storage
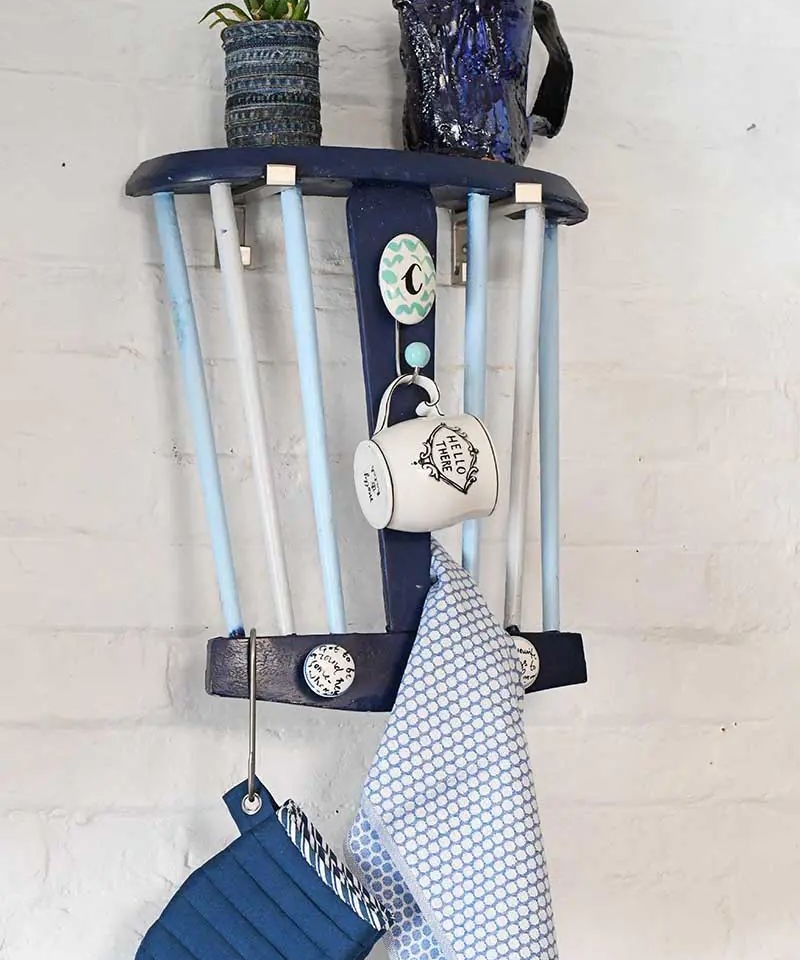
To create a unique kitchen rack, start by sourcing the back of a chair from a scrap yard or second-hand store. Next, use a hand saw or reciprocating saw to carefully cut off the top and back of the chair, taking care not to damage any internal structures. Once you’ve severed the piece, give it a fresh coat of spray paint to add some personality to your design. To further enhance the aesthetic appeal of your rack, consider adding decorative knobs for a touch of whimsy.
Meanwhile, grab a couple of shelf brackets from a hardware store like IKEA and attach them to the newly crafted piece. Finally, hang your creation on your kitchen wall, where it can add a dash of rustic charm to your cooking space.
Wire Lampshade Frames into Plant Stands
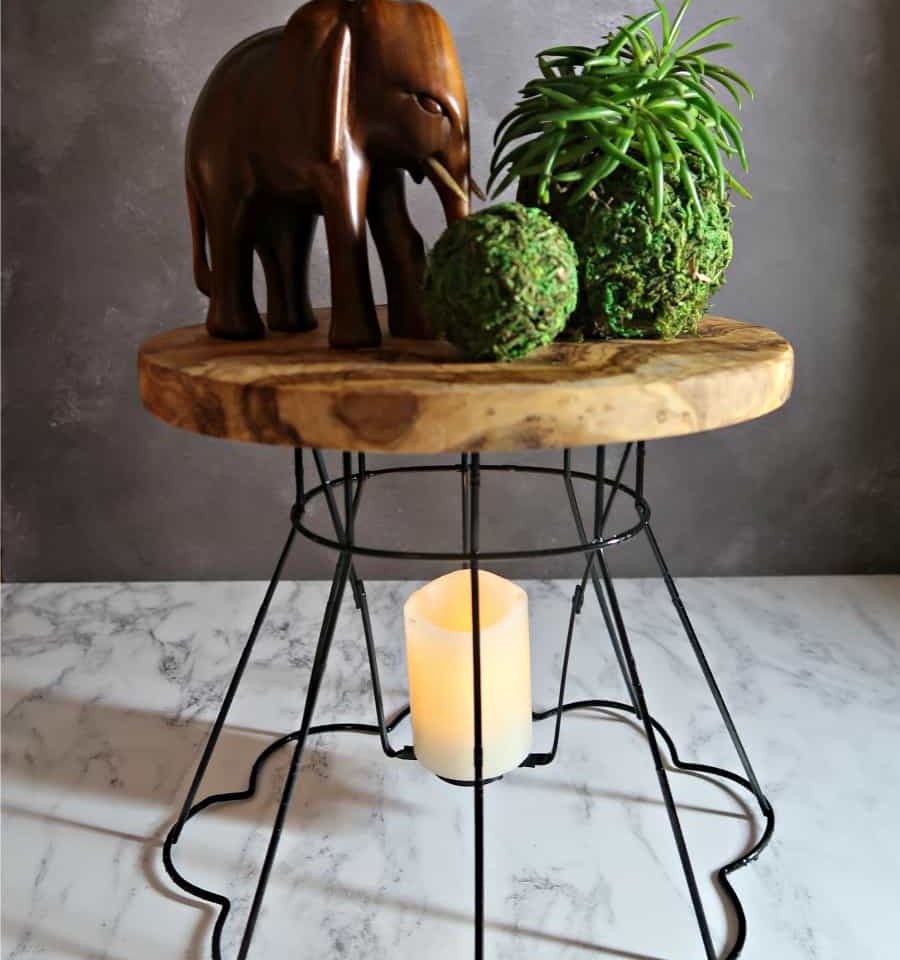
When disposing of a non-repairable lamp at a junkyard, consider salvaging its spare parts before letting it go. The metal frame of the vintage-inspired lampshade, in particular, is often surprisingly versatile and can be repurposed as a base for other DIY projects – like transforming it into a plant stand. Vintage lampshades boast intricate patterns and designs that will add a touch of elegance to your upcycling project.
If you’re not lucky enough to have one lying around, thrift stores are an excellent place to start searching for the perfect piece. Begin by removing any removable materials or fabrics from the frame using scissors, and if desired, set aside the salvageable fabric scraps for future use.
Nature Explorer Shoebox Trunk
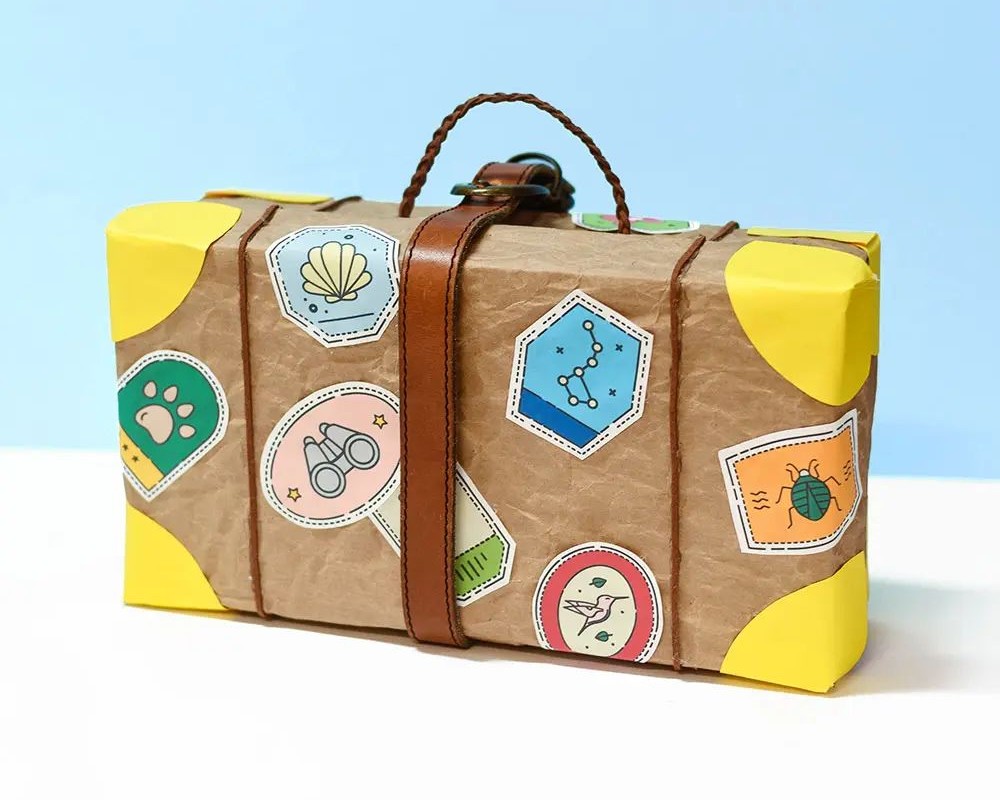
Transforming a humble shoebox into a unique collectible trunk is an intriguing concept. Essentially, you’ll be repurposing an old box to store your cherished mementos, which can range from small trinkets gathered during travels to natural wonders like shells and stones collected on hikes or beachcombing excursions. To create this one-of-a-kind trunk, you’ll need some basic materials – scrap cardboard and a utility knife will do the trick.
Once you’ve crafted your trunk’s shape, feel free to get creative with decorations. Wrap it in brown paper for a rustic touch, add an old leather belt for a vintage flair, and don’t forget to adorn it with travel stickers and other embellishments to make it truly yours.
Blue Jean Planter
As we revisit earlier upcycling projects, such as transforming old jeans into jean bins, it’s time to get creative with another innovative project – turning those same denim jeans into planters. This endeavor may require a bit more effort and materials, but the end result will be well worth the investment when you display your one-of-a-kind denim planters.
The versatility of this project is truly impressive, allowing you to switch up the contents from flowers to a bowl of candy for an unforgettable Halloween prop. Just imagine a pair of denim-clad legs suspended alone – it’s sure to send shivers down the spine! For more unique planter ideas using affordable materials from the Dollar Store, be sure to check out our related content.
Cardboard Tube Lamb
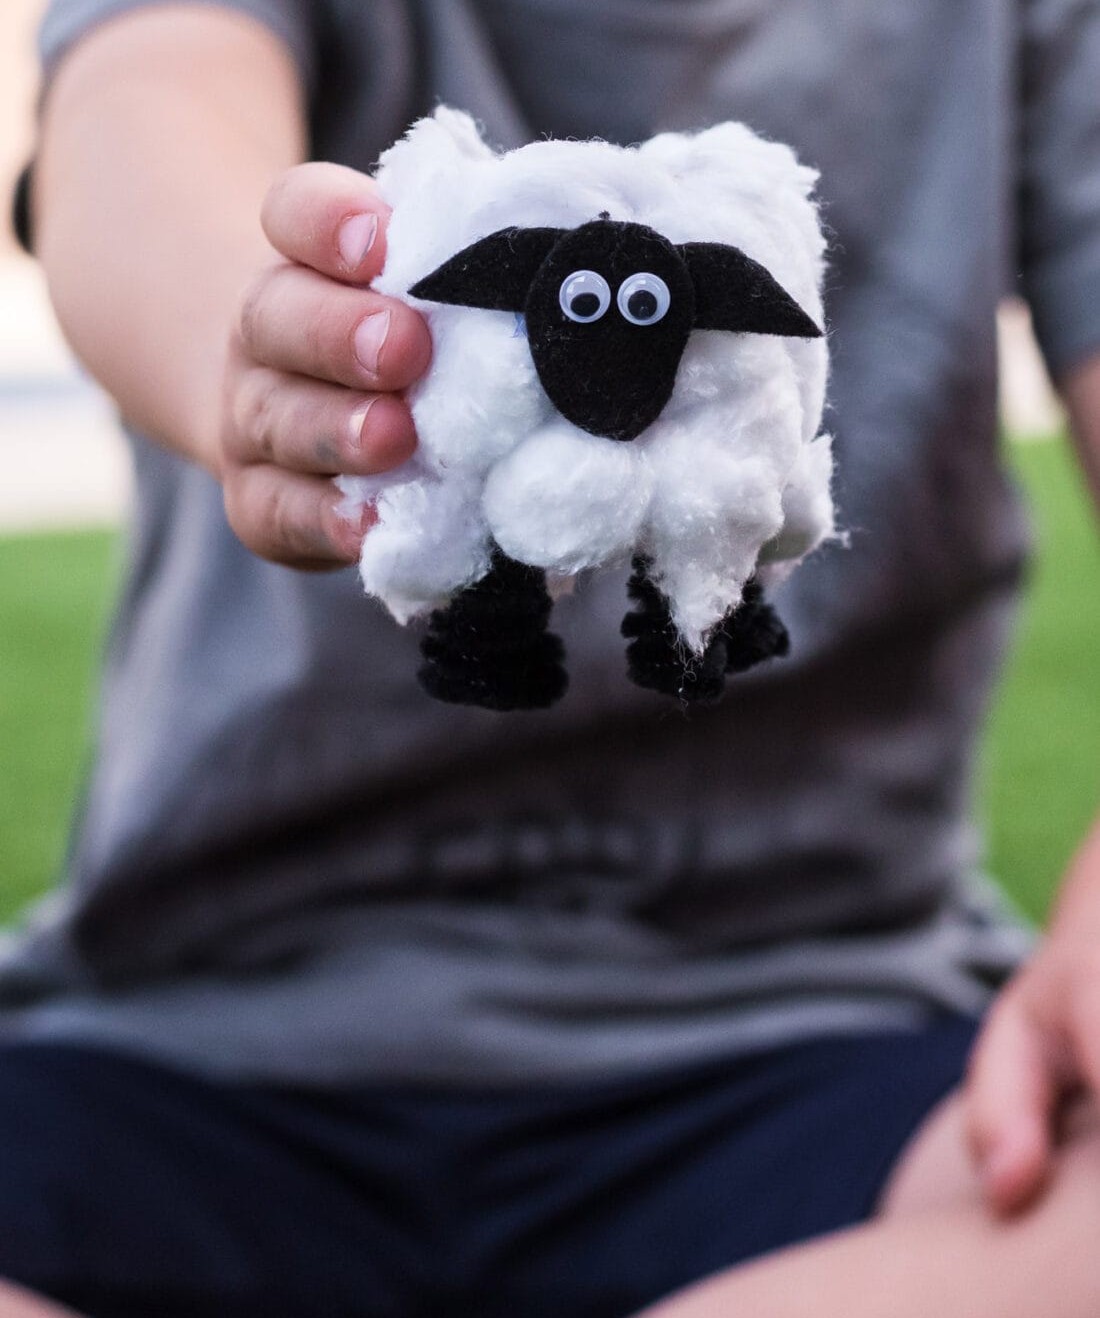
Turn the humble cardboard tube into an irresistibly cute DIY lamb that’s almost too soft to handle. Made from nothing but cardboard, this fluffy friend may not be cuddly in the classical sense, but it’s certainly a charming decorative piece. As Christmas approaches, why not use your cardboard lamb as part of your holiday decorations? It would make a unique addition to any manger scene.
But don’t just limit yourself to seasonal decor – this project is also perfect for classroom use with younger students. Gather your supplies, including cotton swabs, felt, and pipe cleaners, and get ready to create a memorable learning experience. If you’re looking for more inspiration, check out our collection of 27 classroom crafts for a wealth of creative ideas.
Bunny Doll Pattern
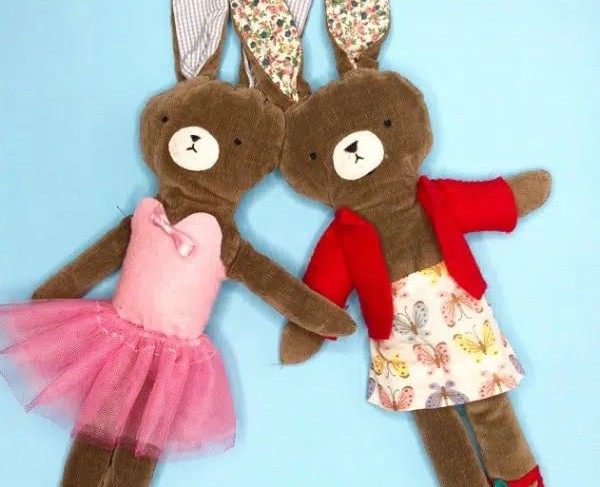
The idea of creating adorable bunnies after crafting fluffy sheep is a natural progression. This could lead to an impressive collection of upcycled animals. These bunnies can be incorporated into Easter-themed decor, making them a delightful project for kids to participate in and enjoy. Furthermore, the various fabric scraps used for the ears and outfits provide a great opportunity to hone one’s needlework skills, adding an extra layer of creativity to the overall process.
Christmas Gift Tags
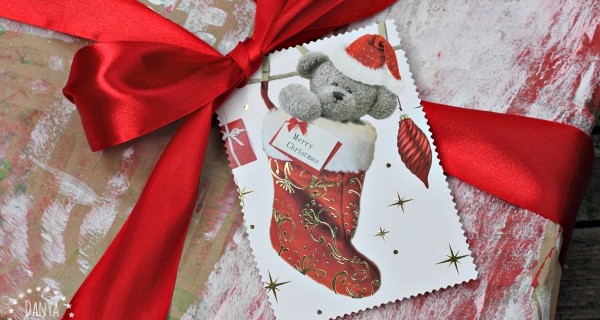
The quintessential Christmas gift isn’t complete without the iconic red bow and a thoughtful gift tag to match. Not only is it an opportunity to add the recipient’s name, but also to express your gratitude with a personal message. This small touch can make all the difference in showing you care. And did you know that achieving the same decorative edging on your paper is easier than ever? Simply grab hold of some decorative scissors and let your creativity shine.
Wooden Wall Art
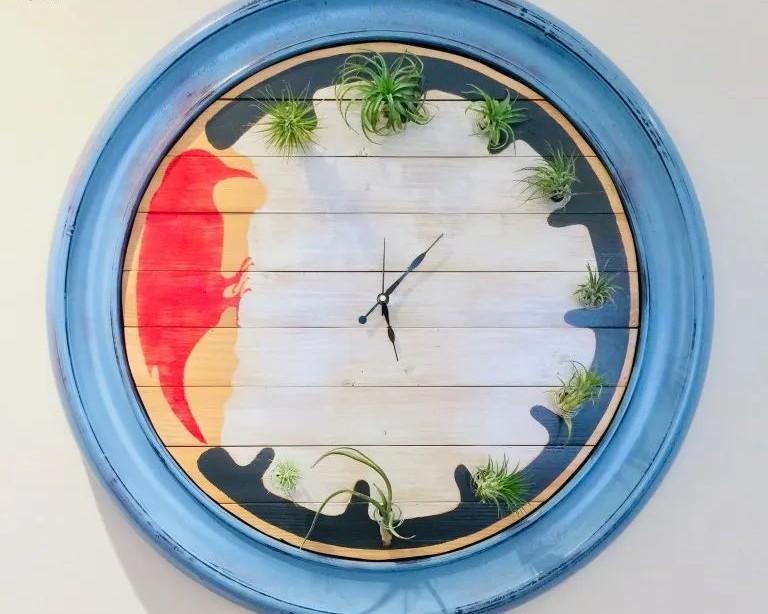
Transform your space with timeless wall art that never loses its charm! To give it a unique twist, consider repurposing old wooden crates or wood pallets. Get creative and unleash your inner decorator by adding the finishing touches to make it truly special. For an added layer of functionality, why not turn this beautiful piece into a functional wall clock? Simply acquire a wall mechanism from a trusted supplier and voila! Your space will now be both visually appealing and punctual.
DIY Beach Dollhouse from Scrap Wood
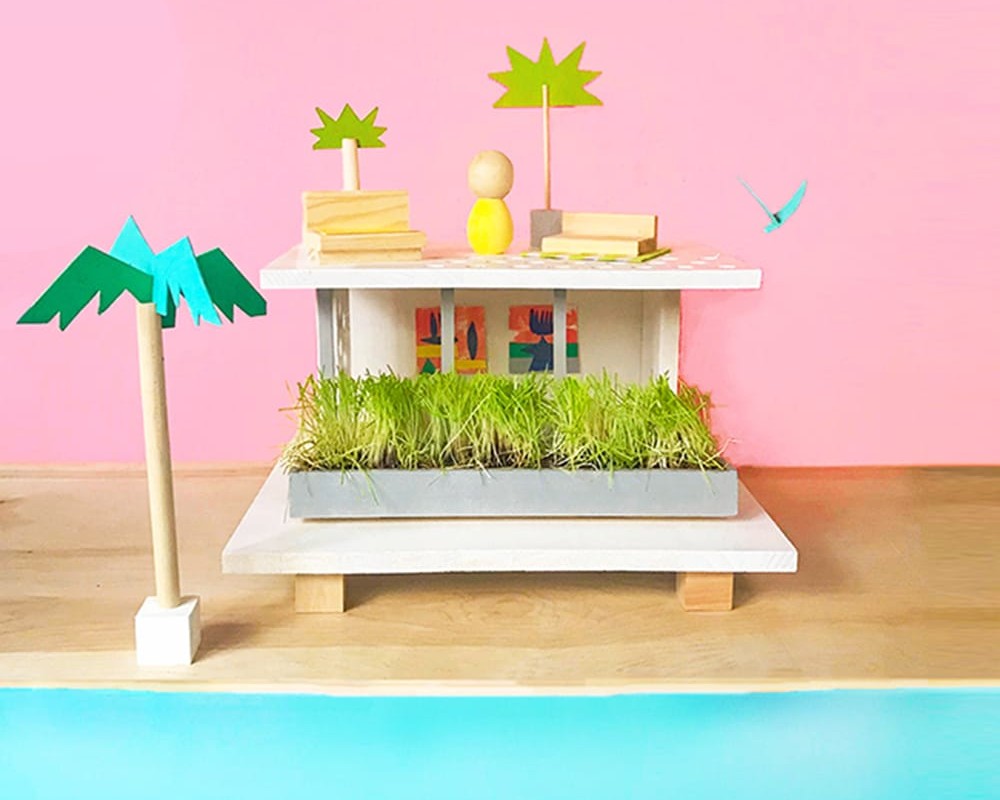
Imagine having a beach dollhouse that’s so idyllic, you’d want to shrink yourself down to doll size just to live there! That’s exactly what this DIY project offers. What’s remarkable is that every single element, from the furniture to the porch, is crafted entirely from scratch using upcycled or repurposed materials. To get started, gather a few basic supplies like wood dowels, paint cans, and some wheatgrass for the shrubbery.
DIY Bathroom Cabinet
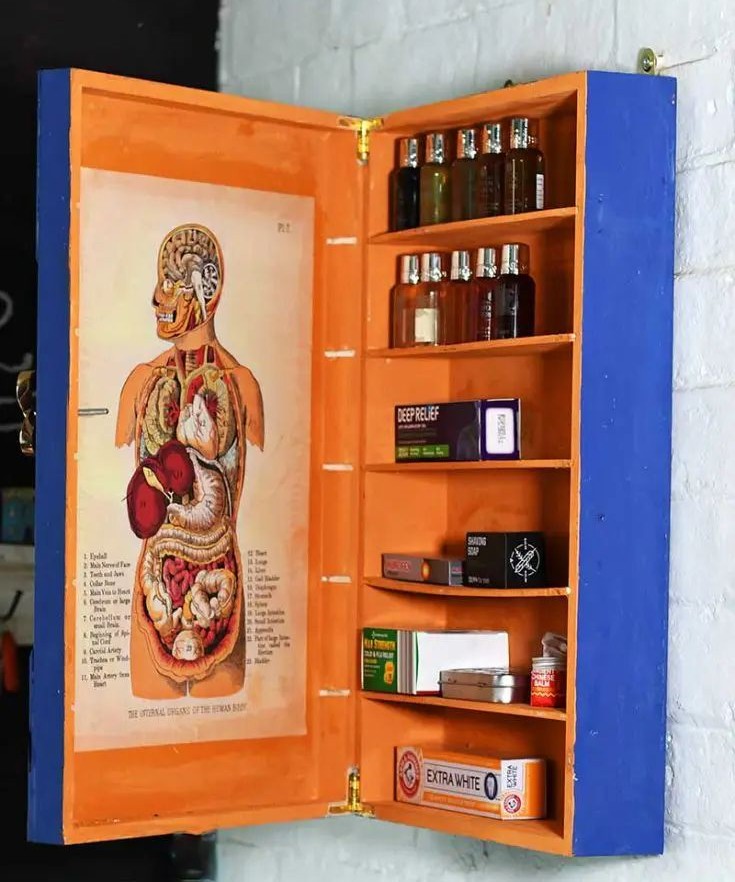
The impact of clutter on a room’s ambiance is astonishing. By removing visual distractions from your bathroom counter and streamlining them into a purpose-built storage solution, such as a DIY bathroom cabinet, you’ll be struck by the transformative effect. The often-overlooked packaging that accompanies fine wine bottles can be cleverly repurposed to create a functional and organized space in your bathroom.
With some creative modifications, like adding compartments and dividers, this seemingly disposable box can become a stylish and practical storage solution.
