Transform your used tins into functional masterpieces with these innovative DIY projects! Rather than letting them accumulate in the recycling bin, breathe new life into old containers. From clever storage solutions to delightful bird feeders and unique candle holders, the possibilities are endless.
I’m sure you’re familiar with the pesky pile of tin cans accumulating in your pantry, just waiting to be tackled. Well, it’s time to unleash your creative genius and give those tins a new purpose.
To get started, simply clean, wash, and dry each can thoroughly. That’s really all there is to it. Then, let your imagination run wild and explore the 37 amazing tin can crafts that await you.
Upcycled Tin cans
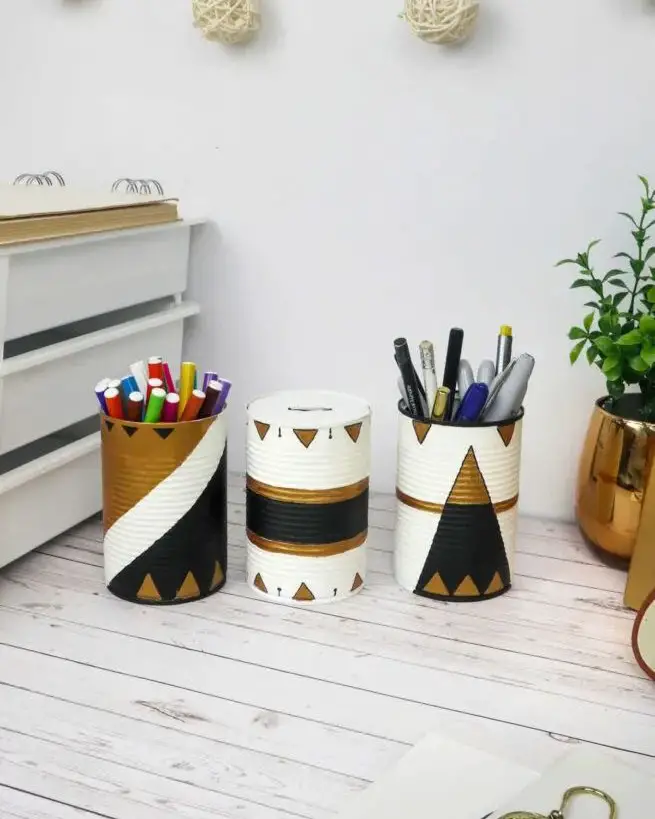
Transforming tin cans into functional desk organizers is a great way to spend a lazy afternoon, and this project is no exception. Not only will you end up with three unique organizers for storing pens, pencils, and other office supplies, but you’ll also have the option to repurpose one as a mini planter for your cactus or succulent. To get started, simply gather some metallic paints and get creative with your upcycling endeavors.
Tin Can Lanterns
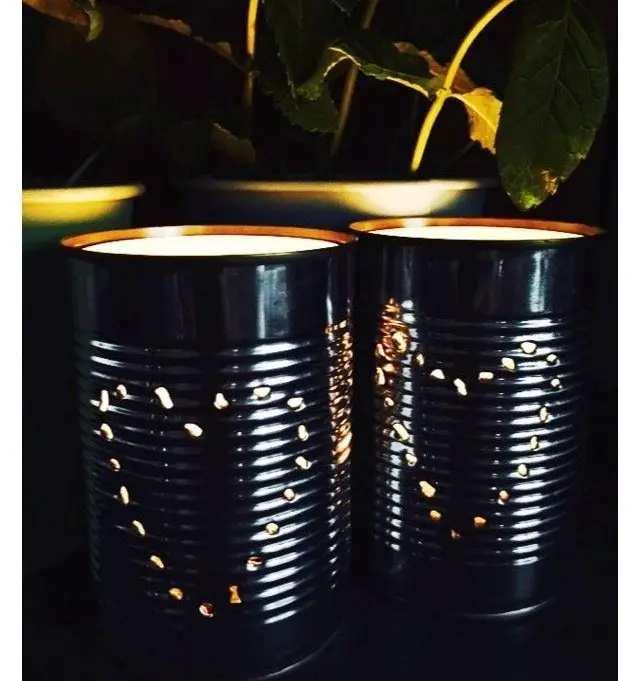
These nifty lanterns are incredibly quick to set up – you can literally set a timer and have them ready in under 15 minutes! Their unique, urban design features a scrappy and edgy finish that’s been gaining popularity lately. To temper this rough-around-the-edges aesthetic, simply poke a few holes into a heart or flower shape. As the light filters through these designs, it will create a lovely ambiance perfect for your garden or porch. Simply grab a piercing tool to get started!
DIY Upcycled Tin Cans
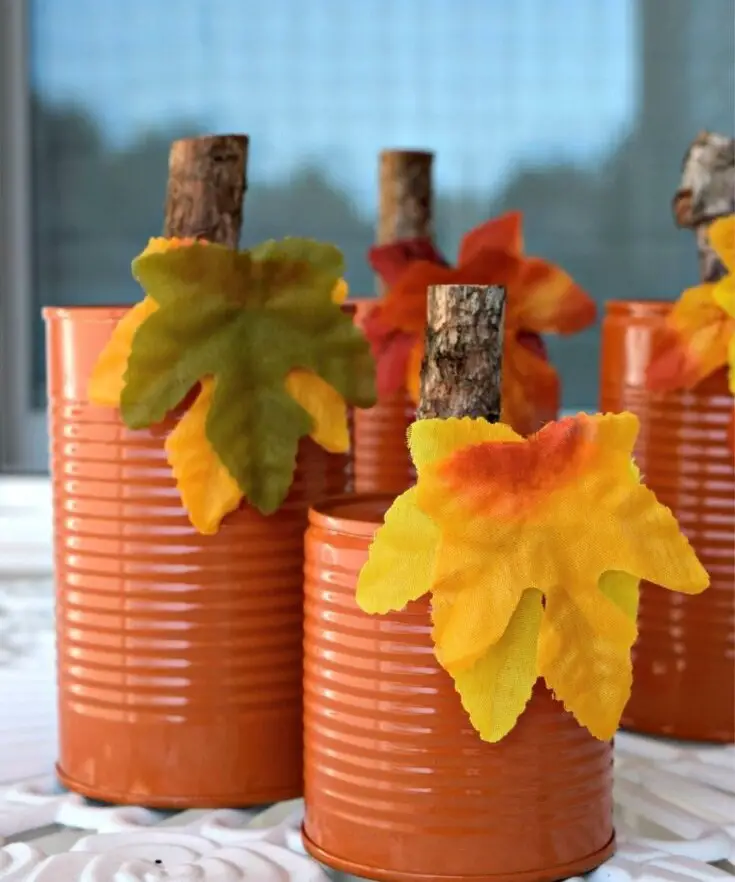
As the fall season reaches its peak, it’s time to get creative with upcycled tin crafts. One project that’s sure to impress is a beautiful orange decorative holder. To start, gather some faux fall florals – maple leaves work perfectly well – as well as sticky dots, wood glue, orange spray paint, scrap paper, and a large stick. Once you have all your supplies in order, it’s time to get building.
When painting the tin can, don’t forget to lay out newspapers first.
You wouldn’t want any accidental splatters of orange paint ruining your furniture. With these simple steps, you’ll be well on your way to creating a stunning decorative holder that will add a pop of color to any room.
Monster Pencil Holder
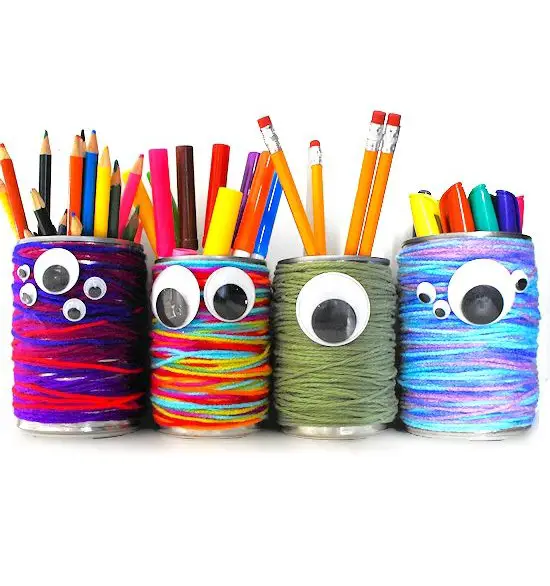
Are you a fan of repurposing materials? You’re in luck because this project is all about giving old yarn new life. Take a trip down memory lane and gather up those scraps from past projects – the ones that might have otherwise ended up in the trash heap. Now, grab your trusty hot glue gun and a couple of tin cans to get started. Begin by attaching the yarn end to one of the cans using a small dollop of hot glue. Then, start wrapping that yarn around the can in smooth, even strokes.
Keep an eye out for any stray drips from the glue as you work. Once you’ve got your can nicely wrapped, it’s time to add some personality with those fun googly eyes. And just like that, you’ll have a one-of-a-kind monster pencil holder to call your own. For more creative ideas on giving new life to old materials, be sure to check out our DIY paper pencil holder and toilet roll pencil case tutorials.
Tin Can Owls
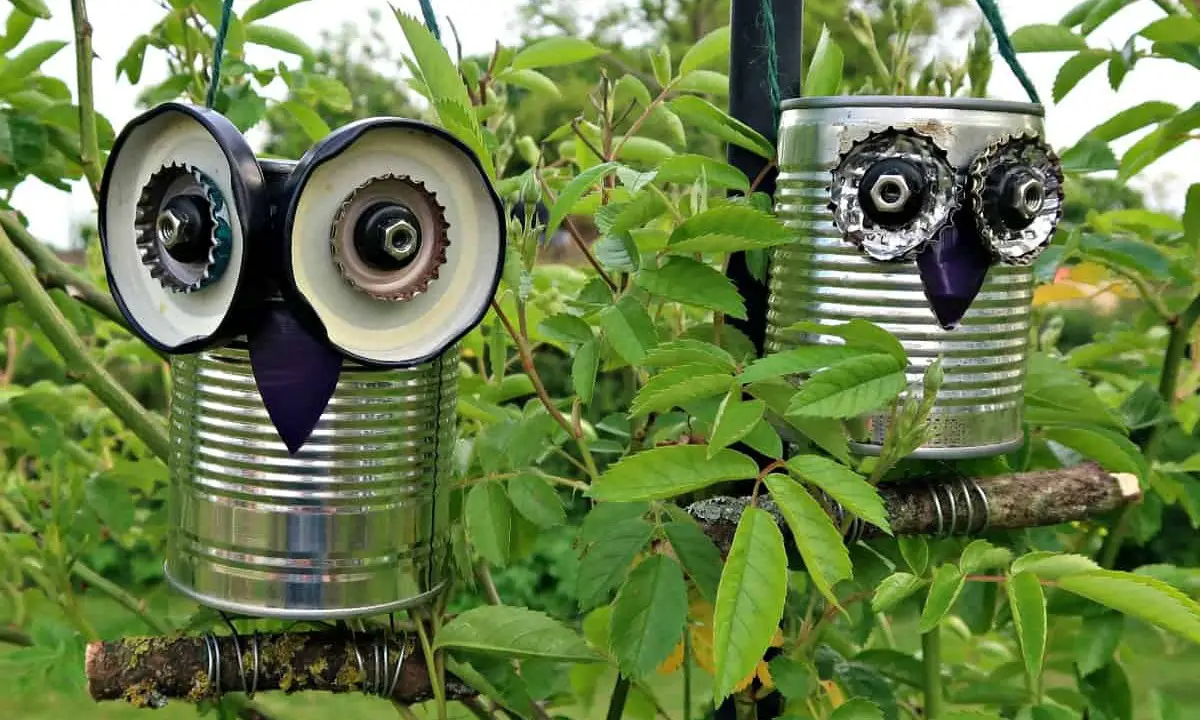
One of the most fascinating aspects of owl-themed projects is their capacity for creativity and innovation. The owl’s endearing appearance and symbolic significance make them an excellent source of inspiration for crafty endeavors. Take, for instance, upcycling tin cans into owls – a project that showcases the versatility of recycled materials. By combining glass jar lids for eyes with bottle caps and a bolt, you can create a truly one-of-a-kind piece.
The final touch is adding some wire to perch the owls on a wooden branch, bringing the entire composition together in a beautiful harmony.
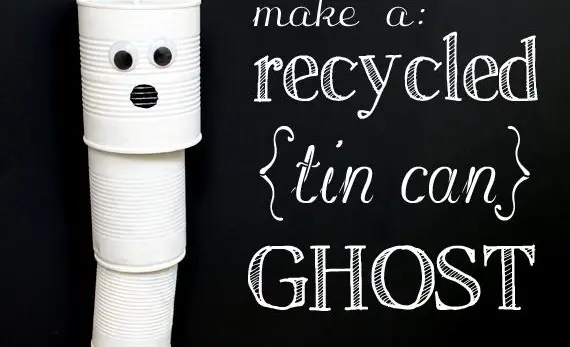
Tin Can Robot
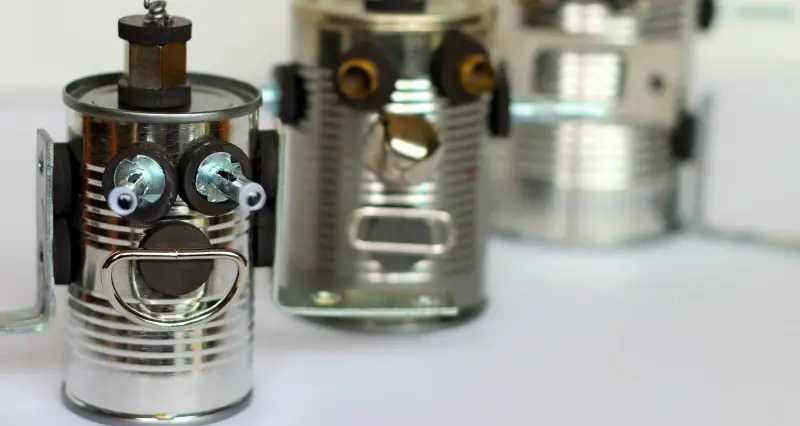
The conversation about robots and tin cans is an interesting one. The idea of using tin cans as building blocks for robotics is not only creative but also practical. Think back to the Tin Man from ‘The Wizard of Oz’ – a character made entirely out of tin. To create your own tin robot, start by gathering materials such as hot glue, magnets, and metal fixtures or scraps. This can include items like nuts, screws, bolts, brackets, fasteners, and more.
Once you have all the necessary parts, simply assemble them together using hot glue to bring your tin robot to life. For an added touch of realism, consider painting it a bright silver with black, gold, or copper highlights to accentuate different components.
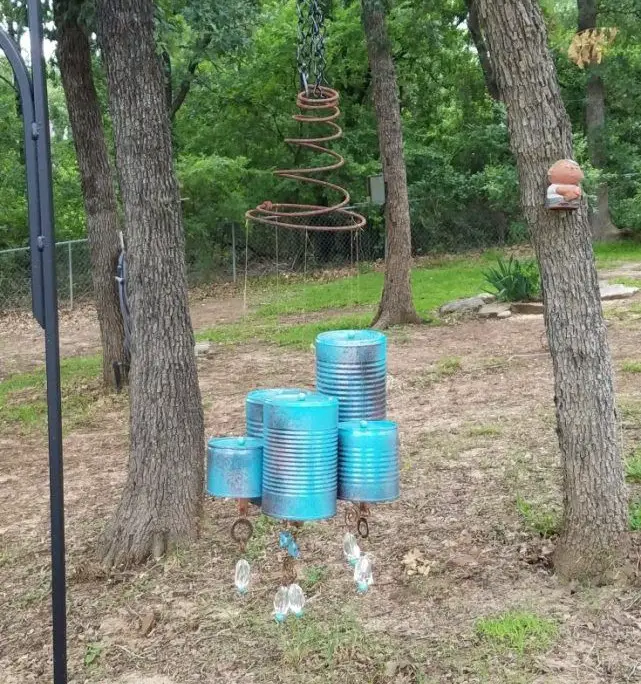
Tin Wind Chime
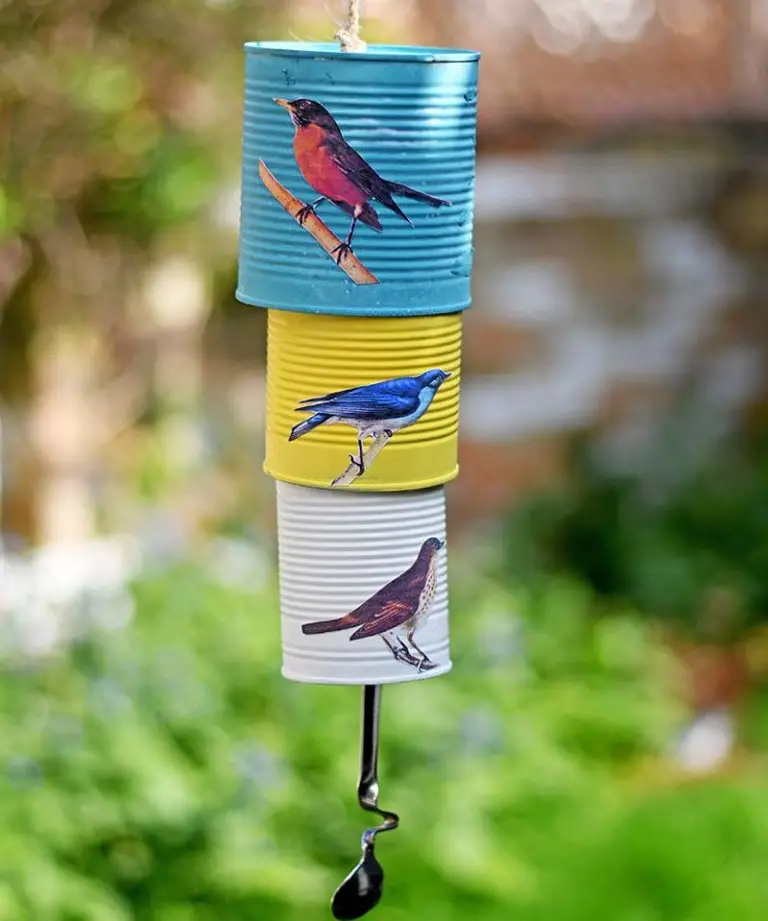
While their aesthetic appeal and DIY potential are undeniable, wind chimes ultimately serve a more functional purpose: producing a pleasant sound. For me, tin can wind chimes evoke memories of bygone eras. I can envision a collection of vintage, hand-painted tin cans suspended from twine or string, adorning the porch stoop. The clinking and clamoring of these rustic wind chimes as they danced in the breeze is almost audible.
Fortunately, you don’t have to be stuck in the past; with some creativity, you can craft your own wind chimes that serenade the air.
Duct Tape Black Cat Container
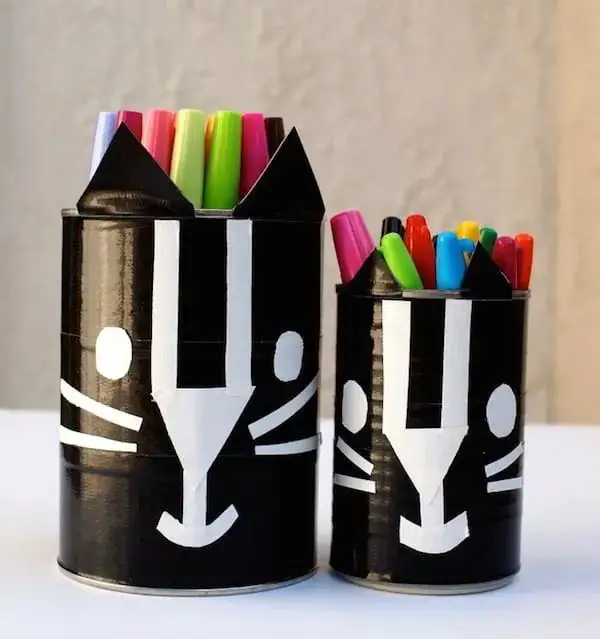
Let’s dive straight into the creative process. Crafting a cat-themed desk organizer requires some essential materials: jet black and snowy white paint, duct tape, a cutting mat, a craft knife, and scissors. Don’t forget to thoroughly clean the can before painting, ensuring it’s completely dry.
Makeup Organizers
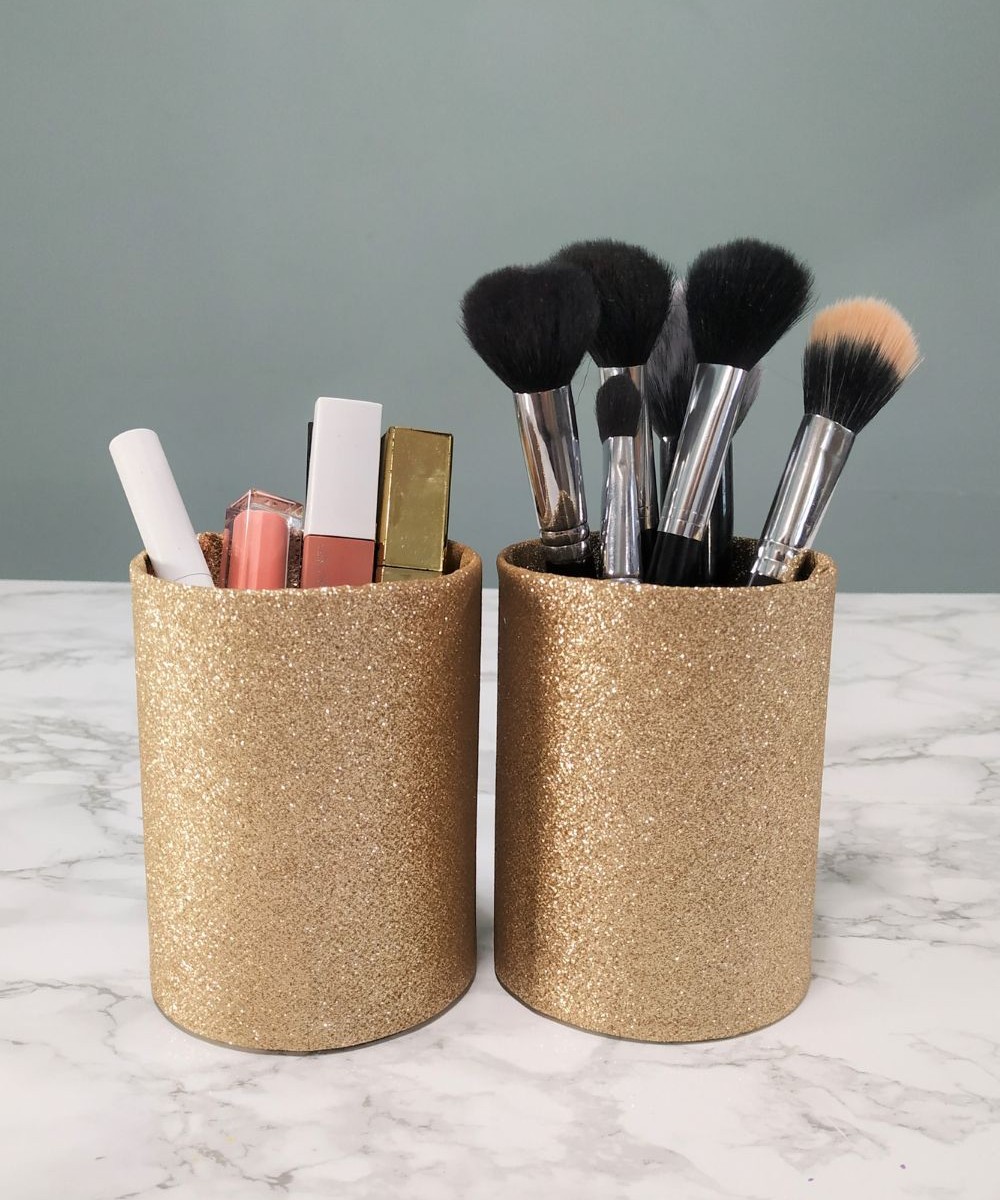
If you’re able to create multiple desk organizers, why not take it up a notch and craft a dozen or so upcycled tin organizers to corral your cosmetics collection? I mean, think about it – having more storage containers means you can accommodate more products, effectively enabling the very makeup shopping spree you’ve always dreamed of. And let’s be real, anyone who doesn’t grasp this fundamental principle has likely never had the pleasure of treating themselves to a fresh haul of must-haves.
To get started, simply grab some fabric – preferably larger scraps if you have them on hand – and a pair of scissors. Use these tools to cut and shape the material to fit the tin can, effortlessly capturing its dimensions by wrapping the fabric around it.
Tin Can Piggy Bank
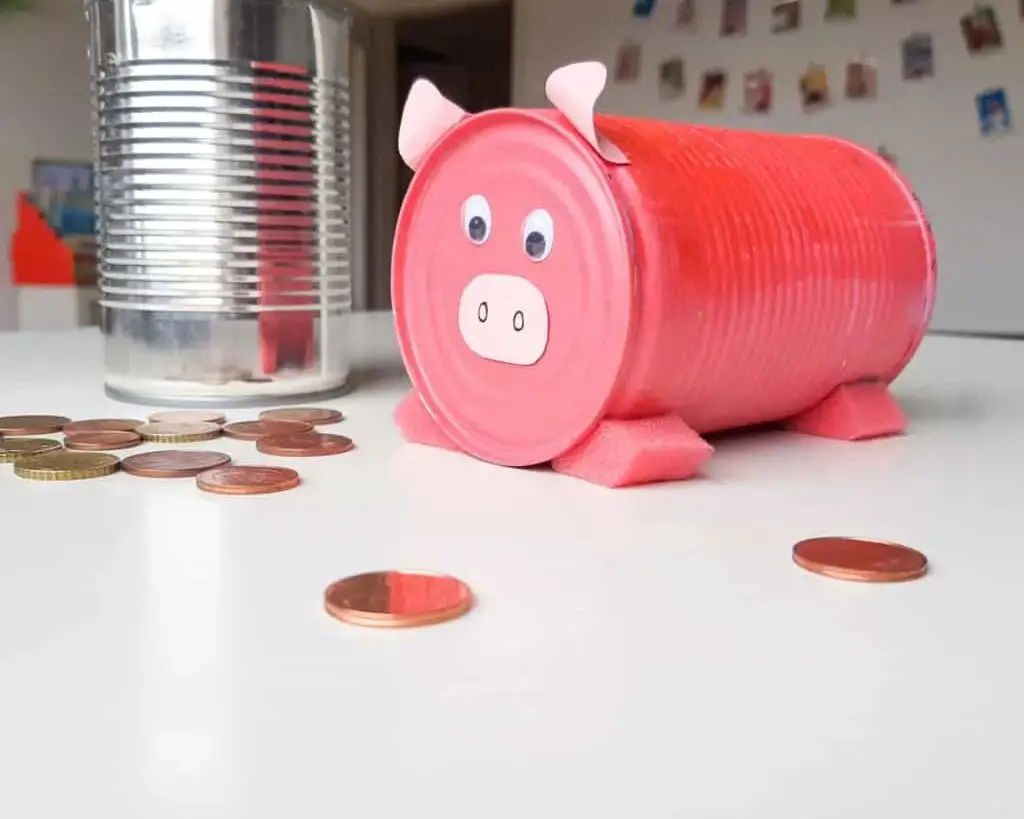
While it may seem like a relic of childhood, the concept of saving money in a piggy bank can be just as effective for adults. The issue arises when it’s time to access the funds accumulated within. Instead of breaking open the piggy bank or resorting to buying new ones, why not get creative and craft your own? You might already have the necessary supplies on hand, including paint, cardstock paper, and googly eyes.
However, if you’re missing one crucial element – a hot glue gun – it’s time to consider investing in this simple yet effective tool.
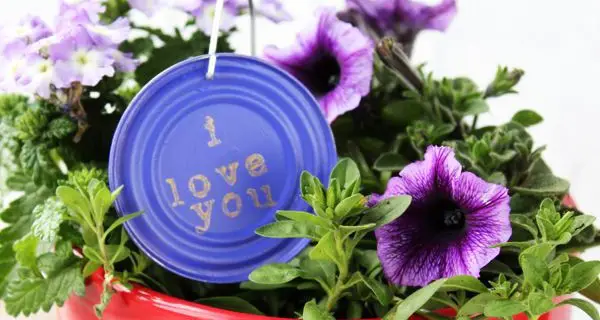
Tin Handbag
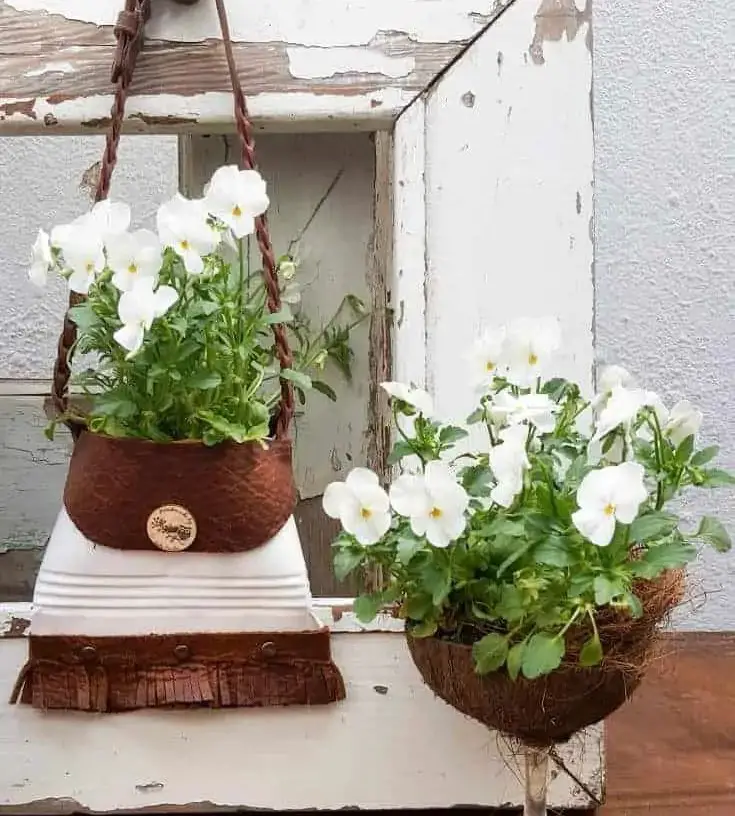
These clever tin handbags would be perfect for deterring potential thieves – one swift whack with them, and your bag is safe! However, their real purpose is to serve as charming planters. You can hang them from your porch or windows to add a touch of whimsy to your outdoor space.
One of the best aspects of using tin handbags as planters is that you can opt for artificial plants if you don’t want to deal with the upkeep.
This makes it an ideal solution for busy individuals or those who want to enjoy the aesthetic without the maintenance. With this unique craft, you’ll have a one-of-a-kind item to showcase in your home or sell at a market.
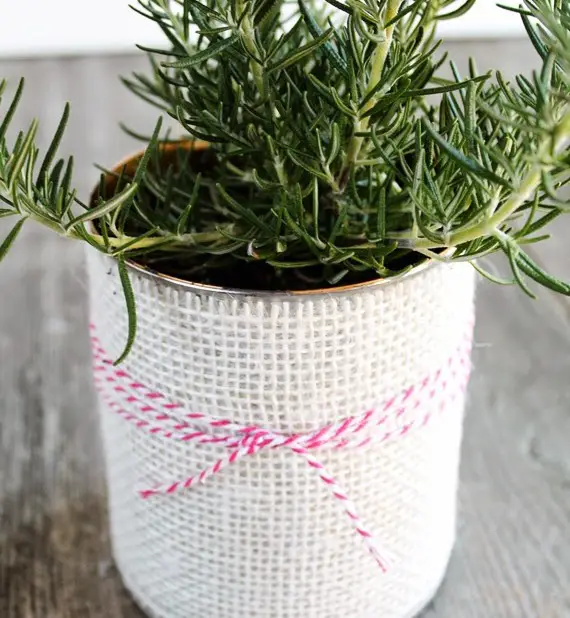
DIY Tin Can Vase
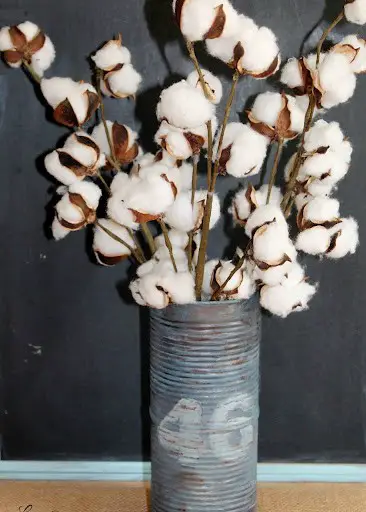
Floral arrangements are often met with an unexpected shortage of suitable vases. However, I’d like to propose an unconventional yet creative solution: repurposing tin containers as vases. Not only do they bring a unique touch to any space, but they also seamlessly blend into rustic farmhouse or shabby-chic settings. The juxtaposition of delicate flowers against the rugged tin creates a fascinating visual contrast.
To take it to the next level, why not transform an old can or container into a one-of-a-kind vase? You can start by browsing through DIY tutorials online, such as those featuring Dollar Tree vases, and get creative with your upcycling project.
Tin Cans into Wind Clankers
While wind chimes and wind clankers may seem like similar concepts at first glance, they possess distinct characteristics that set them apart. One noticeable difference lies in their appearance: wind chimes are often characterized by delicate, ornate components, whereas wind clankers, with their large cans and industrial aesthetic, are more rugged and unrefined.
The disparity is also evident in the way they produce sound.
Wind chimes typically emit a soft, melodious tone, whereas wind clankers will generate a louder, more cacophonous noise. This difference is largely due to their design and materials: wind chimes are often crafted from lightweight metals or other materials that allow for a smoother flow of air, resulting in a more harmonious sound.
If you’re looking to create your own wind clankers, there are a few key steps to keep in mind.
For one, make sure to clean the cans thoroughly before painting them to ensure the paint adheres properly. You can do this by washing them with soap and water or using a degreaser to remove any grease.
To add some texture and interest to your wind clankers, consider distressing the paint with sandpaper to scrape off a bit of the finish. This will give your creations a more weathered, industrial look that’s perfect for adding a touch of grit to your outdoor space.
Farmhouse Vase
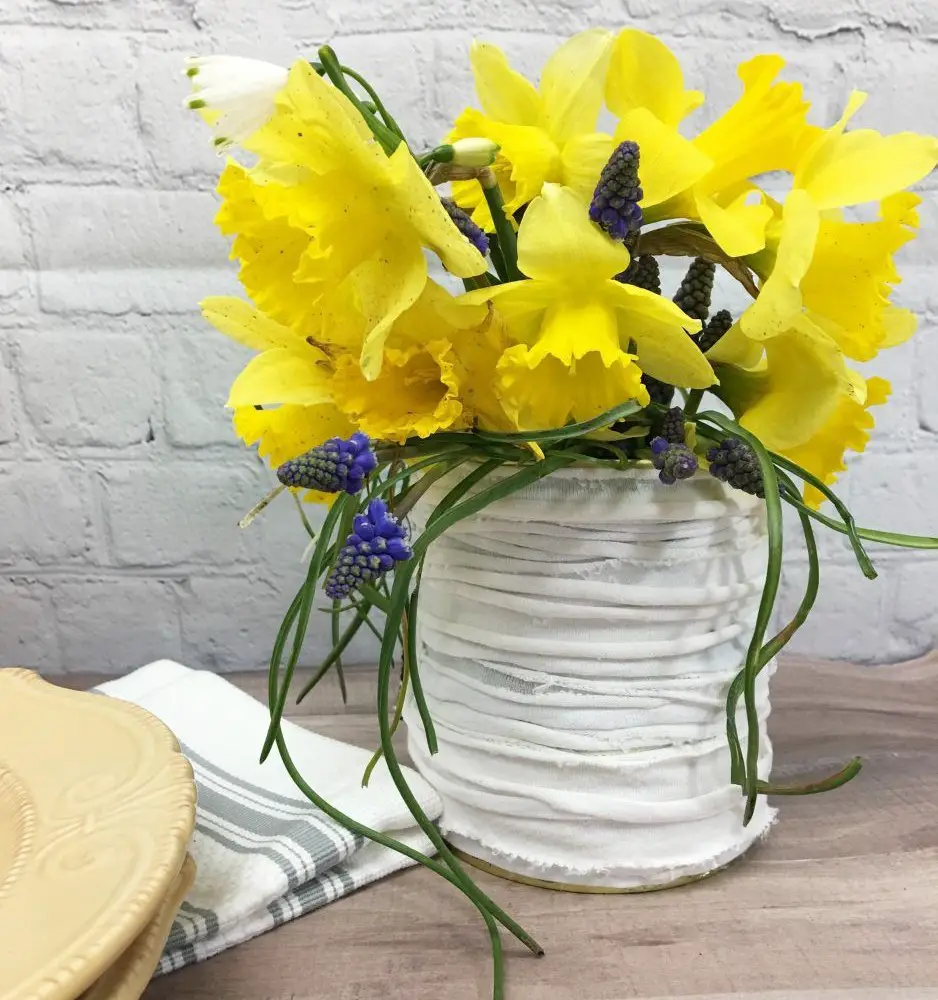
Perhaps you have old t-shirts or tank tops collecting dust in your closet that no longer bring you joy. If so, consider revamping them into a unique upcycled farmhouse tin can vase. To create this charming piece, you’ll first need to transform the tees into makeshift yarn by tearing them into long strips. Alternatively, you can opt for traditional yarn if you prefer. The process of repurposing old clothing is not only eco-friendly but also an engaging and creative outlet.
To complete the project, you’ll require a few additional materials: ribbon, fabric scissors, and some artificial or real flowers to add a touch of elegance to your finished vase.
Thanksgiving Craft From Old Soup Cans
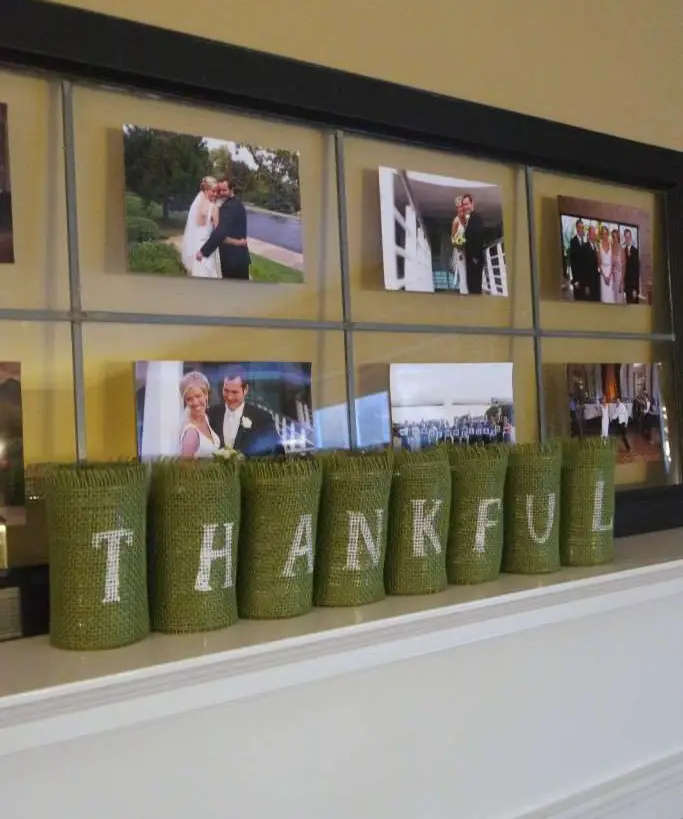
As you prepare for your annual Thanksgiving food drive, take a moment to repurpose those old soup cans that have been collecting dust in your closet. With just a few simple steps, you can transform them into unique decorations that will add a touch of autumn charm to your holiday decor.
Start by washing and drying the cans thoroughly, then grab some fall-inspired paint and give each one a couple of coats. Once dry, use a permanent marker to write the word ‘Thankful’ on eight individual cans.
Once painted and sealed, arrange the cans along your mantel or a designated area to create an eye-catching display. To add an extra layer of depth, consider filling some of the cans with artificial flowers or greenery for a beautiful vase arrangement that will last throughout the holiday season.
Decoupage Tin Can
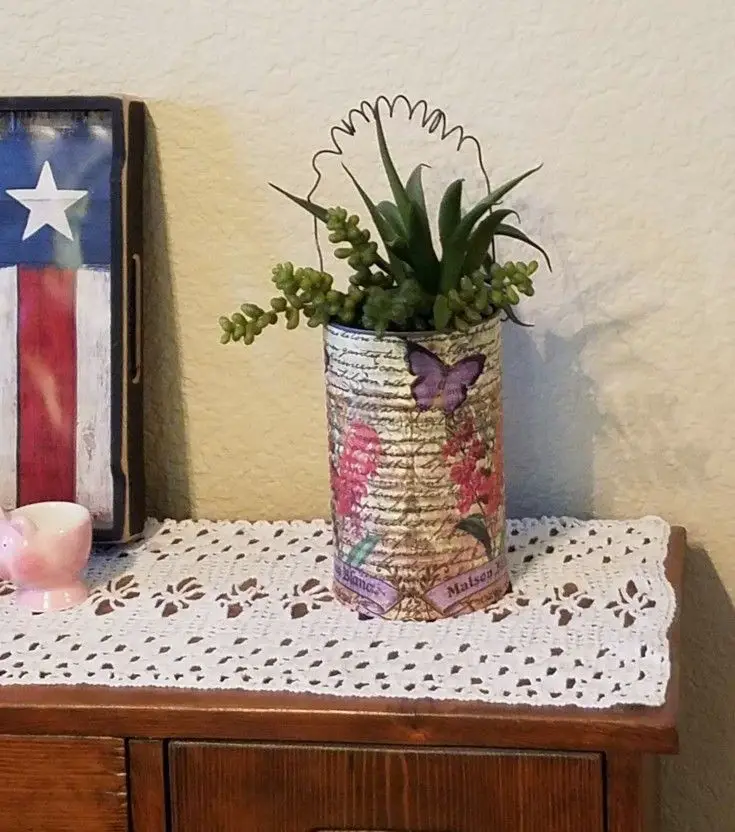
Improvisation is at the heart of this project, where creativity meets sustainability by upcycling old products into stunning pieces of art. Decoupaging an old tin can, for instance, requires a combination of imagination and technique. To get started, begin by selecting the perfect paper or tissue to adorn your tin can. You can find an array of beautifully printed paper napkins that would add a touch of elegance to your project.
Once you’ve made your selection, gather your materials, including a bottle or two of mod podge, and let the creative process unfold. If you’re looking to give your home a seasonal makeover with these tin cans, consider picking up printed napkins that match your desired aesthetic.
Craft Storage With Cricut
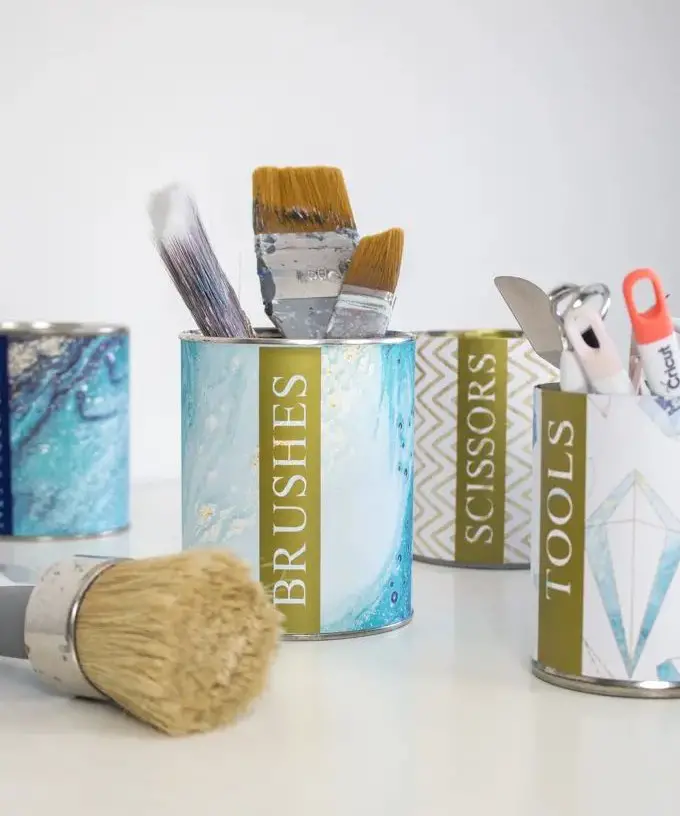
While upcycling old tin cans may seem like a sustainable solution for storing tools, it’s hard to avoid the irony of using those same tools to create more clutter in your craft room or desk. As someone who values organization, I believe that a tidy workspace is essential for productivity and creativity. My motto is ‘everything has a place, and there’s a place for everything.
‘ To achieve this order, I use conveniently labeled tin cans to keep my supplies in check, making it easy to focus on the task at hand.
Rustic Farmhouse DIY Patriotic Decorations
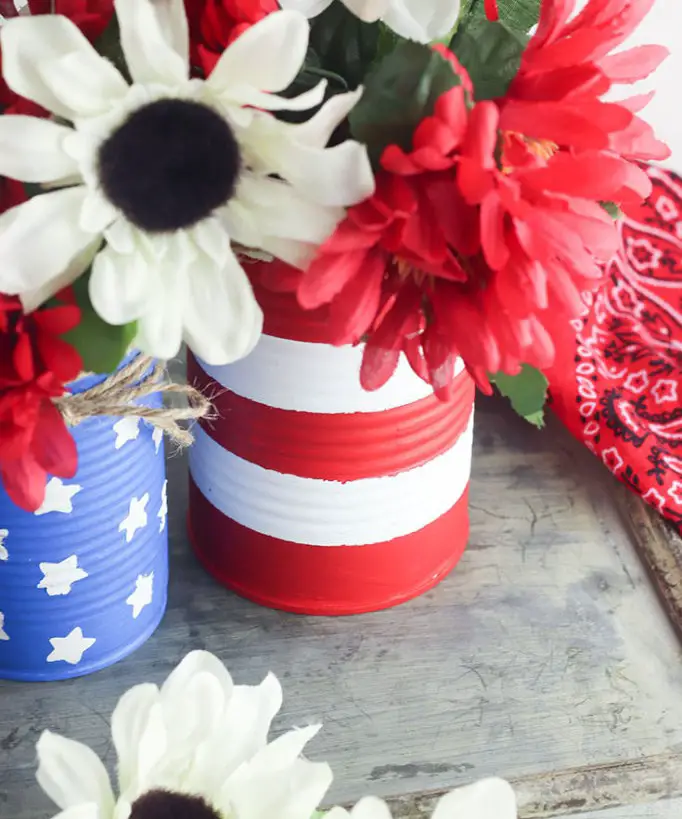
Bring a touch of patriotism and farmhouse charm to your home decor with a simple DIY project. To create these unique decorations, all you need is a few cans and some paint. Start by painting one can blue with white stars and another with red and white stripes, incorporating the iconic colors of the American flag. You can find star stencils online or simply freehand the design. To add a rustic touch, wrap jute twine around the tin can’s rim before adding your choice of flowers.
This easy craft is perfect for summer decorating and will add a charming personal touch to any room.
Utensil Holder
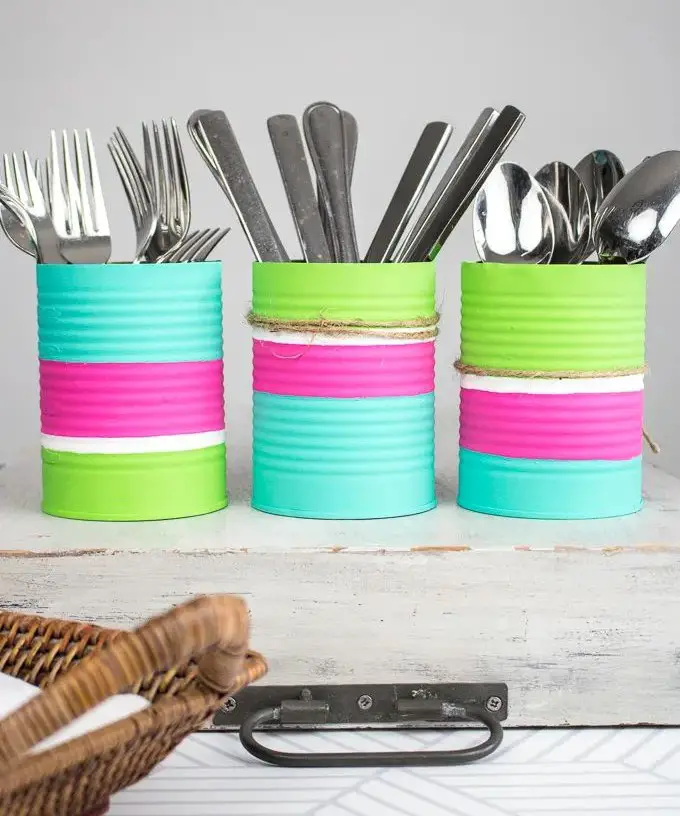
Transforming ordinary tin cans into extraordinary storage containers is an art we’ve mastered. From housing office essentials to nurturing flowers, our upcycling skills know no bounds – not even for your utensils and cutlery! To elevate the style quotient of your kitchen, we present you with three vibrant, matte-finish tin can masterpieces that will inject a dose of lightness, funkiness, and panache. And the best part?
You can achieve this project without breaking the bank by sourcing supplies from a local dollar store. In fact, why stop there? Take it to the next level by painting a matching tin tray to hold napkins and condiments – an added touch that will tie the whole look together.
Back-To-School Pencil Holder
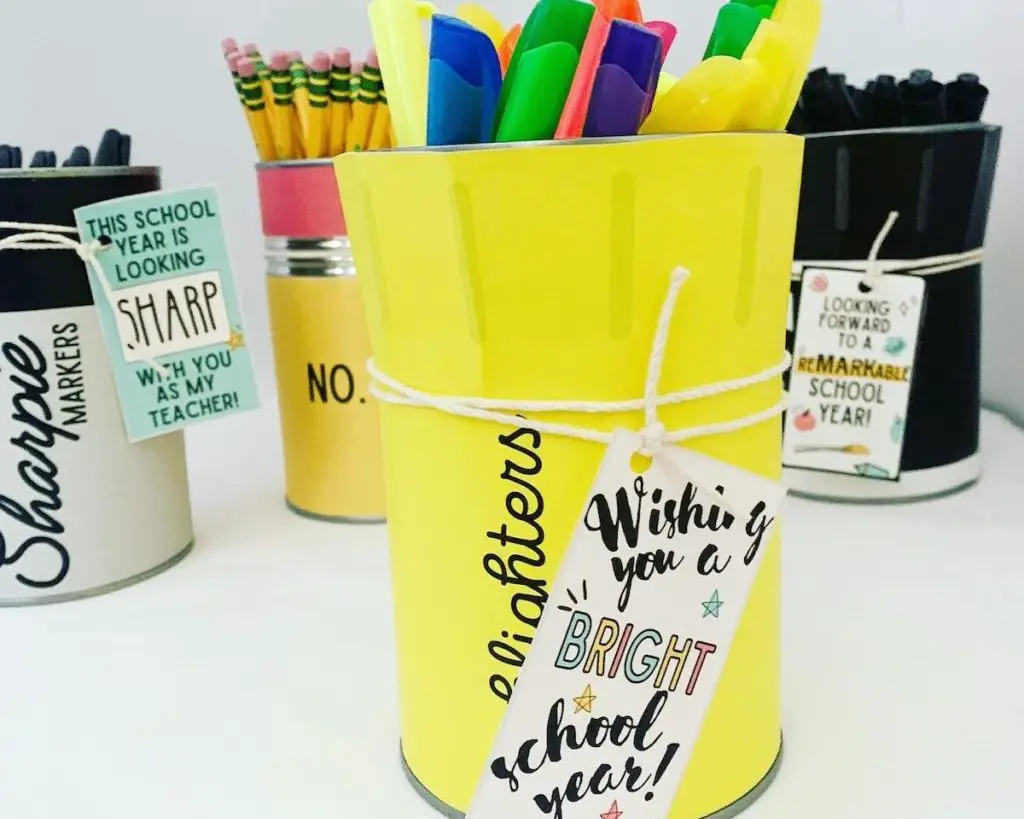
As we return from a well-deserved break, it’s natural to feel a bit sluggish about getting back into our daily routines. A little motivation can go a long way in making that first day back after vacation or school holiday more manageable. One simple yet effective way to boost your enthusiasm is by tackling a DIY project like crafting a personalized back-to-school pencil holder.
Not only will it keep you engaged and occupied, but it’ll also give you a sense of accomplishment and provide a much-needed morale boost. Plus, the end result looks fantastic! Consider writing yourself an uplifting message on the finished product as a reminder to stay motivated throughout the academic year. If you’re in need of more creative inspiration, be sure to check out our collection of 27 innovative back-to-school craft ideas.
School Supplies Organizer
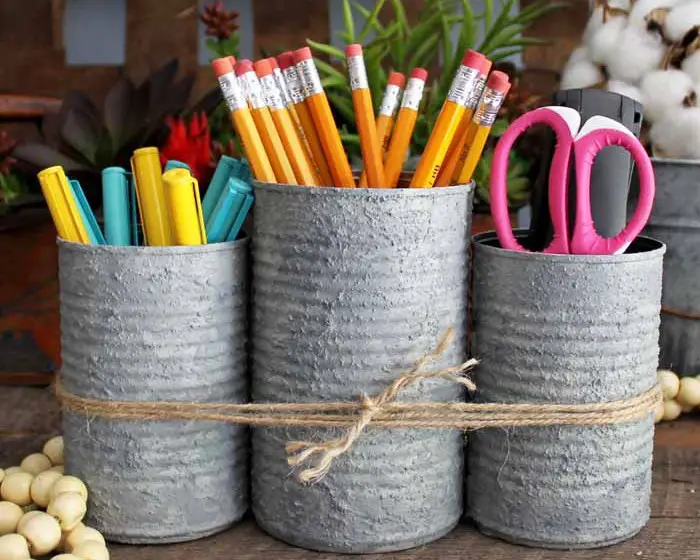
At first glance, this three-piece school supplies organizer appears to be a sturdy, cement-like material. But, surprisingly, it’s actually crafted from tin cans! If you’re a fan of that faux concrete finish, you can opt for that version and experiment with it. To achieve the desired look, use a pouncer brush to apply the first coat of paint and allow it to dry completely before adding subsequent layers.
DIY Tin Can Pencil Holder
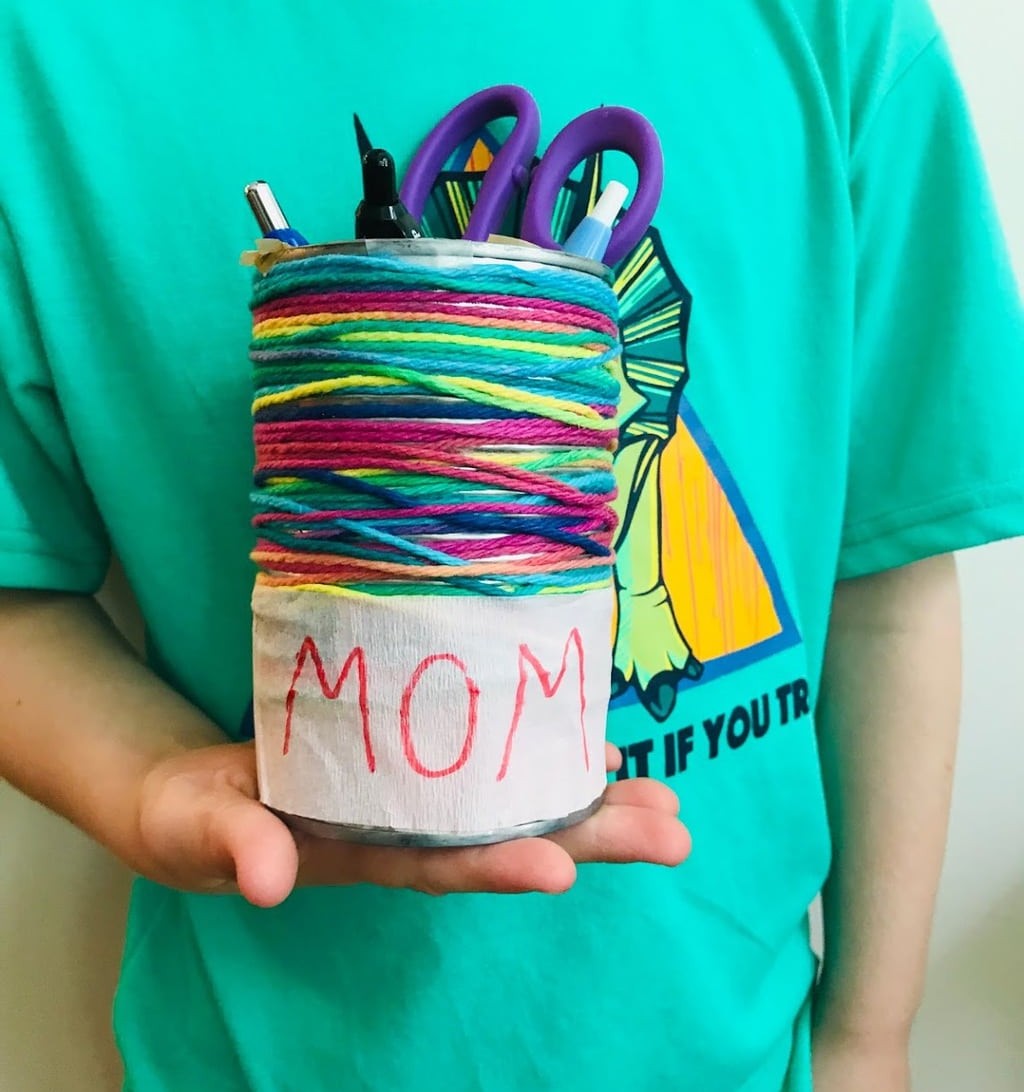
What sets this pencil holder apart from others is its undeniable uniqueness. The vibrant yarn wrapped around it adds an extra layer of visual interest, with its irregular shape and texture creating a visually appealing contrast. This DIY project is perfect as a thoughtful gift for friends, family, or even your mom on Mother’s Day.
Galaxy Painted Recycled Pen Holders
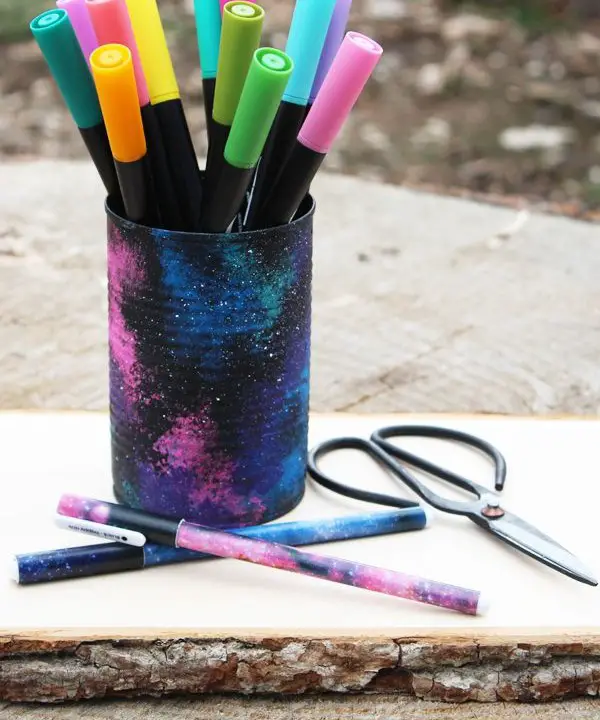
This pen holder is truly exceptional – its design rivals those typically found in upscale stores, yet it’s surprisingly affordable. To transform a tin can into this masterpiece, start by thoroughly cleaning the container, rinsing it with water, and drying it completely before moving on to the painting process.
Begin with a base coat of midnight black paint.
The goal is to capture the vibrant colors that appear when someone delivers a powerful blow – think bursts of bright color, smudges of blue, pink, purple, and subtle white accents.
Leprechaun Hat
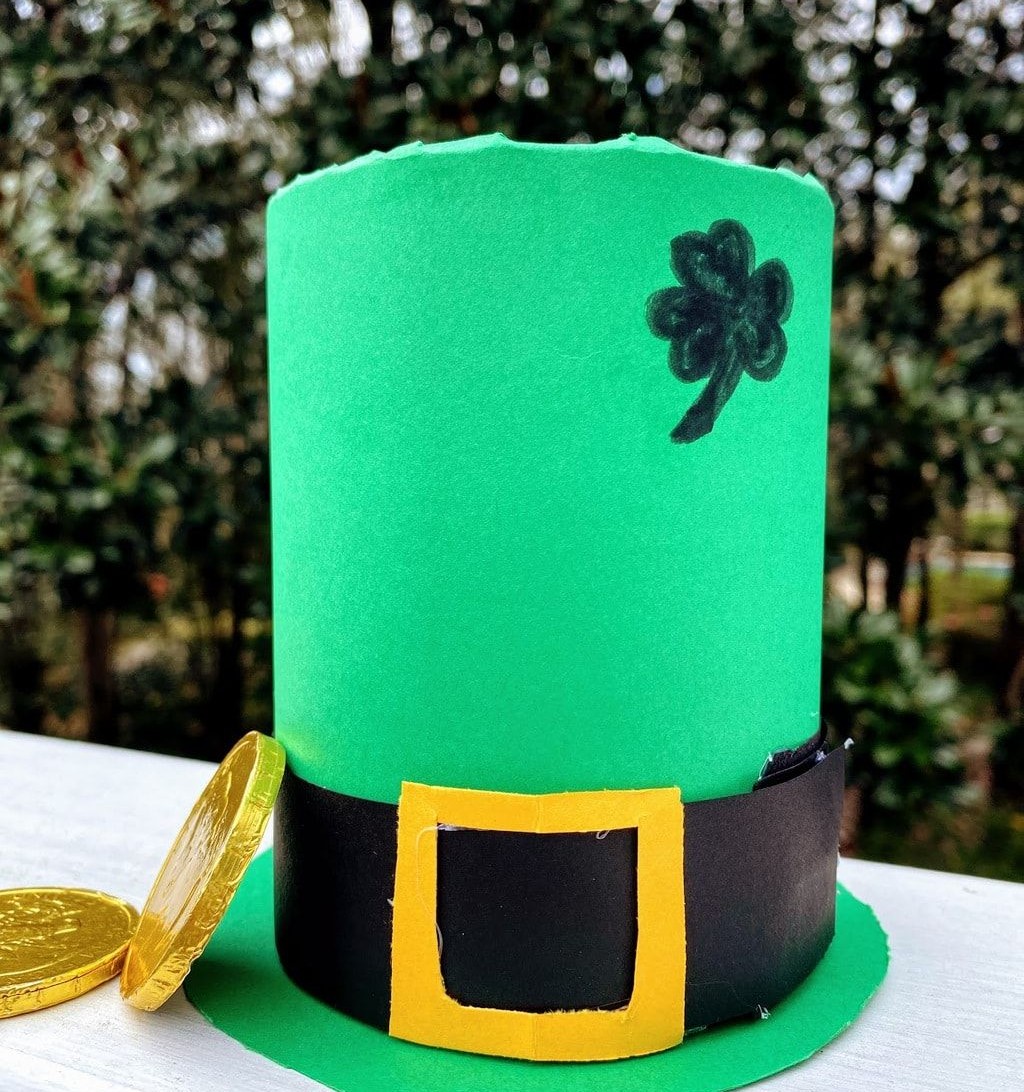
Beyond desk organizers, you can create a delightful decorative piece that adds a touch of whimsy to any room. A leprechaun hat made from a tin can is an excellent project for crafty individuals who want to add a splash of greenery to their space. Not only does this DIY project align perfectly with St. Patrick’s Day, but it also embodies the spirit of good fortune and merriment associated with leprechauns.
Having one of these charming hats sitting on your mantel or bedside table can’t help but bring a smile to your face. If you’re looking for more creative pursuits, be sure to explore our collection of DIY projects designed specifically for teenagers.
DIY Stamped Plant Markers
Transforming tin can lids into functional and charming garden markers is a creative endeavor that’s both eco-friendly and ingenious. By repurposing the abundant supply of lids, you’ll not only declutter your space but also create unique identifiers for your garden. To embark on this project, gather jewelry wire, typewriter stamps, a drill with bit, and some vibrant paint.
Tin Can Drums
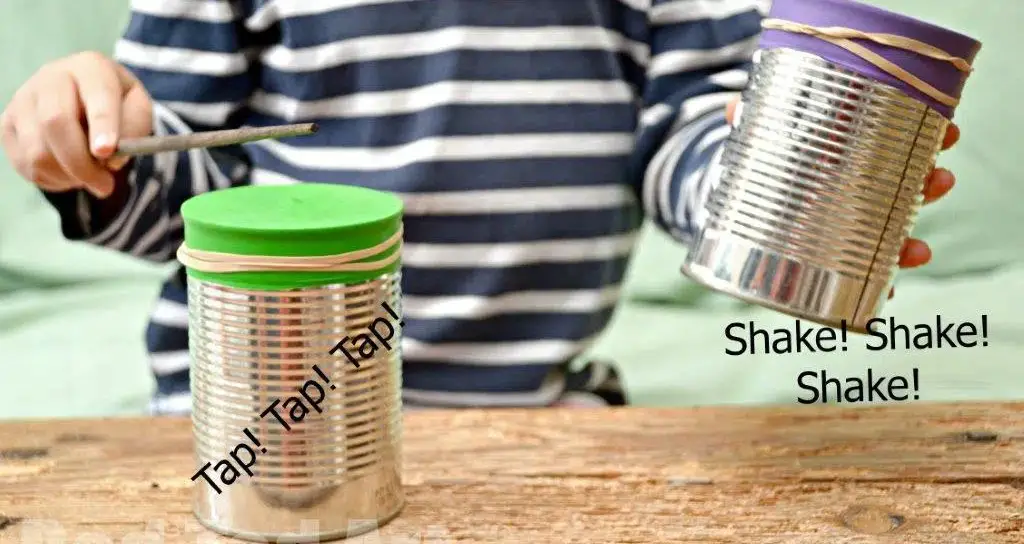
If you’re in the mood for 5-minute crafts, complex projects with multiple steps might not be appealing. But fear not! These simple tin can drums are surprisingly easy and require minimal materials. All you need is a tin can, a balloon, an elastic band, drumsticks, and some filler like rice, chickpeas, or lentils to add weight. The key is to create a noise-making mechanism by rapping on the balloon lid.
Giftable Planter
While this upcycled tin planter may be slightly more elaborate than its counterparts, its unique purpose makes it truly special. Crafted with gifting in mind, these planters are perfect for presenting to loved ones on any occasion, whether it’s a birthday, holiday, or simply as a token of appreciation. Of course, you can also use them for your own personal touch.
To give them an extra-special flair, wrap the tin can with wide burlap ribbon and add a whimsical flourish courtesy of some baker’s twine.
Halloween Tin Can Bowling
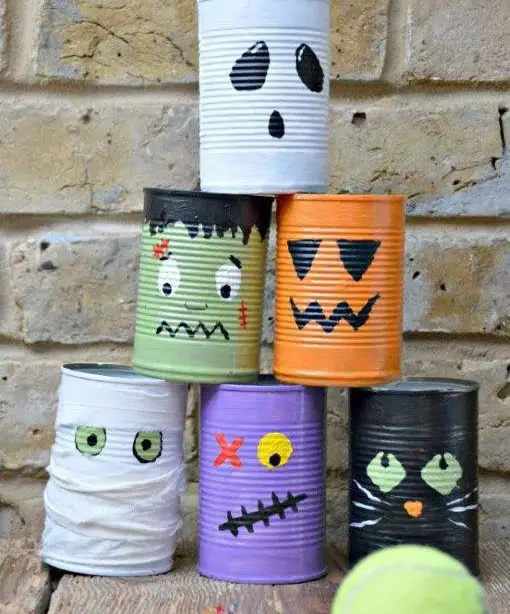
Remember the joy of childhood playtime when you’d construct a tower from discarded tin cans and attempt to knock it down with pebbles or makeshift catapults? Let’s revive that nostalgic fun, but this time, we’ll trade in the traditional can-stacking for a bowling-inspired game. To get started, gather six to ten clean and dry tin cans.
As Halloween approaches, consider transforming them into a spooky set of ‘bowling pins’ featuring monsters like ghosts, ghouls, black cats, mummies, Frankenstein’s monster, and jack-o’-lanterns.
Pretty In Pink Can Organizer
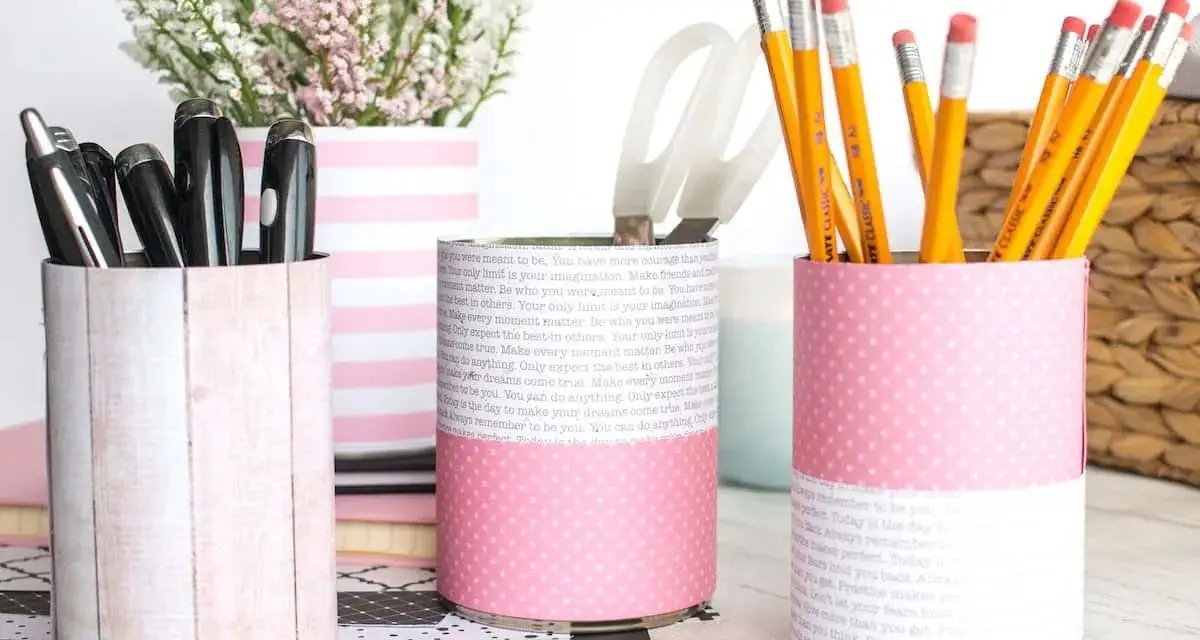
When gazing upon these three-piece organizer sets, I’m struck by the descriptors ‘fresh’, ‘pretty’, and ‘bright’. Each container serves a unique purpose: one can be repurposed as a pencil stand, while another can store pens, scissors, and rulers. The third piece, in my opinion, is perfect for adding some greenery to your workspace – simply place a small succulent or cactus within its confines. For an added touch of whimsy, consider alternating between scrapbook paper and washi tape.
By incorporating double-sided tape into your creative process, the possibilities are endless.
Craft Stilts
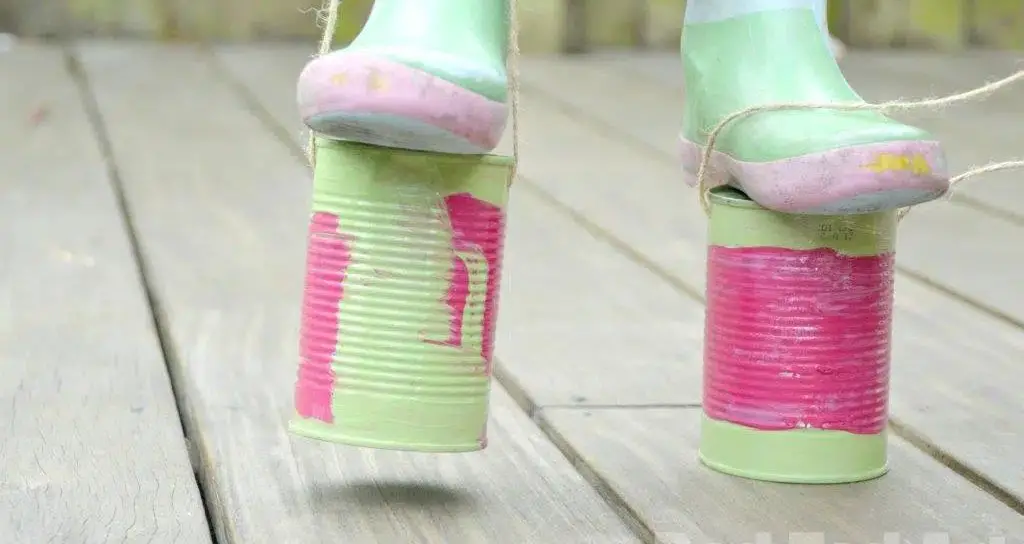
In the realm of unconventional playthings, I’ve stumbled upon a peculiar creation – makeshift stilts fashioned from tin cans and twine. While their simplicity might raise eyebrows, I can envision this activity bringing joy to children during their summer breaks. After all, accidents do happen, but with these low-tech stilts, any mishaps would be minor at best. Still, for added safety, a helmet wouldn’t go amiss.
The importance of creativity and experimentation, even in the face of imperfection, is what makes this DIY project so appealing.
Ghost Tin Can Chimes
The front porch sets the tone for Halloween festivities. As trick-or-treaters approach, they’ll be greeted by your carefully curated decorations. One idea is to repurpose tin cans into a spooky wind chime. Paint them to resemble ghosts and hang them from the porch as an added touch. To create this DIY masterpiece, you’ll need to gather supplies like white chalk-finish matte paint, brushes, screwdriver, hammer, googly eyes, and at least three tin cans of varying sizes.
For more creative projects for adults, explore our collection.
Colorful Tin Can Planters
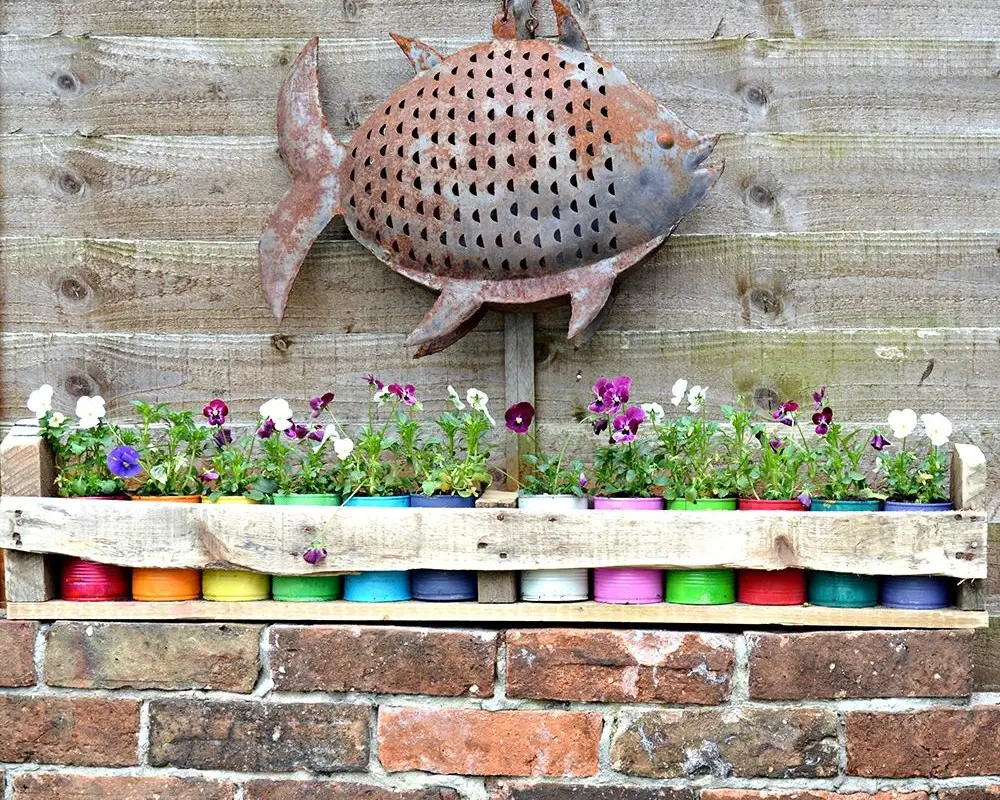
When it comes to decorating your front porch, planters are an essential element. While traditional clay or terracotta pots are always a great choice, you can also give old tin cans a new lease on life by upcycling them into unique planters. The best part? These DIY planters require minimal effort and no specialized skills. Simply start by cleaning the cans thoroughly to ensure any dirt or grease is removed, as this will prevent paint from adhering properly.
Once clean, you can get creative with a coat of paint and add some distressed texture using sandpaper for an added touch.
Tin Can Easter Craft
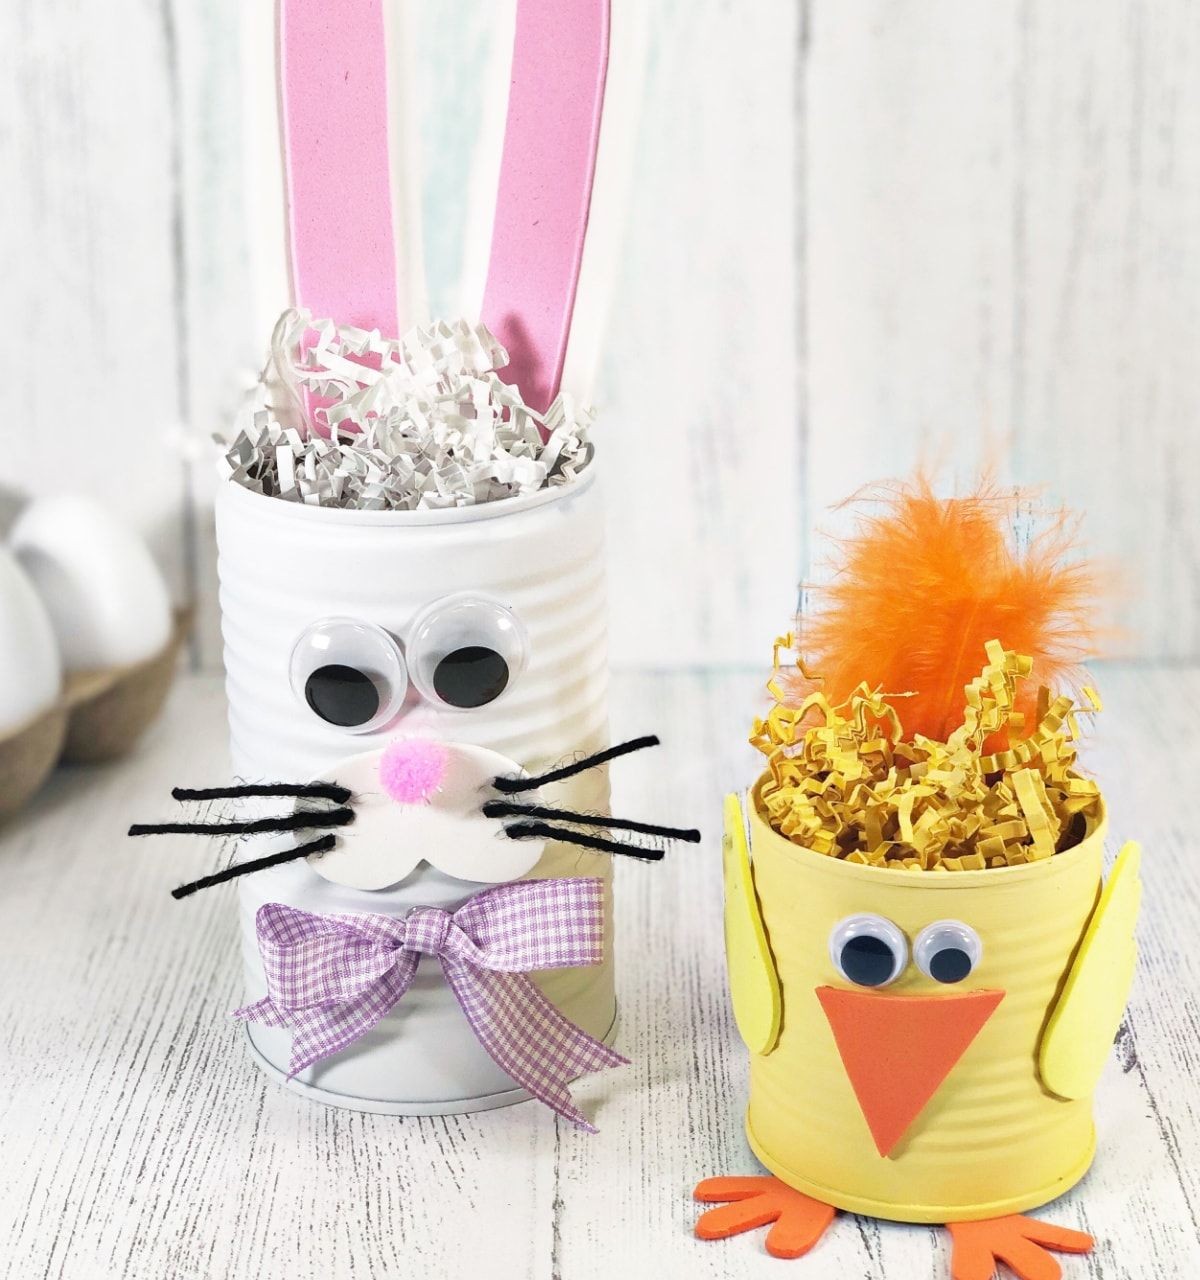
Transforming tin cans into adorable bunnies and chicks is a fun, eco-friendly craft perfect for kids of all ages. To get started, gather the following supplies: googly eyes, black twine, paints and brushes, shredded paper in various colors, and craft foam. Don’t forget to download the templates for the bunny’s ears and chick’s ears, using different colored paper for each.
This creative project is an excellent way to encourage imagination, creativity, and sustainability while upcycling recyclable materials.
Tin Can Pendant Lights
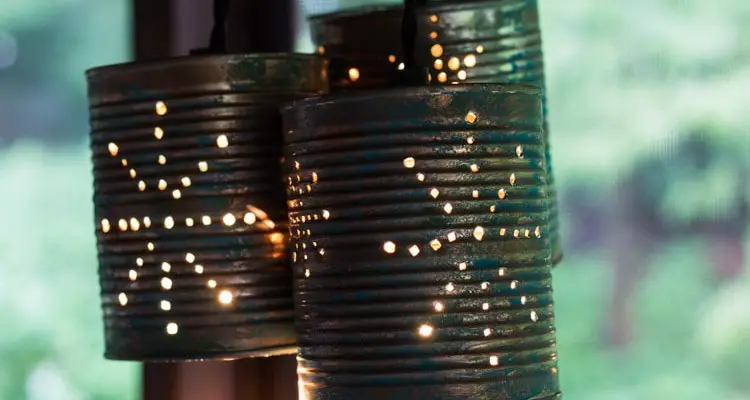
To create these unique pendant lanterns, you’ll need to punch or pierce holes through a tin can, allowing the light to shine through. For added ease, consider purchasing a pendant light kit that provides all the necessary tools. If you’re feeling crafty, you can opt for a free-hand approach and use your own creativity to guide your hole-piercing. Alternatively, download a template and hold it up against the can to ensure precise placement of the holes.
Rainbow Wind Chime
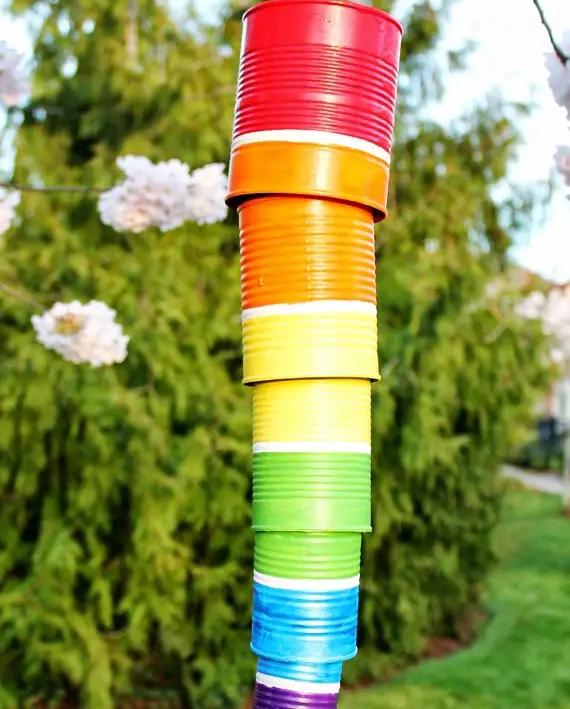
To kickstart this project, you’ll need to select the ideal tin cans based on their size. Next, thoroughly clean and dry each can to ensure a smooth painting process. Once they’re completely dry, get creative by painting them in vibrant colors that reflect the hues of the rainbow. Don’t forget to add some finishing touches by painting a decorative trim around the rim and bottom of each can.
Finally, drill holes through the cans, thread them with string, and hang them proudly from your porch or any other desired location.
Gold Crushed DIY planters
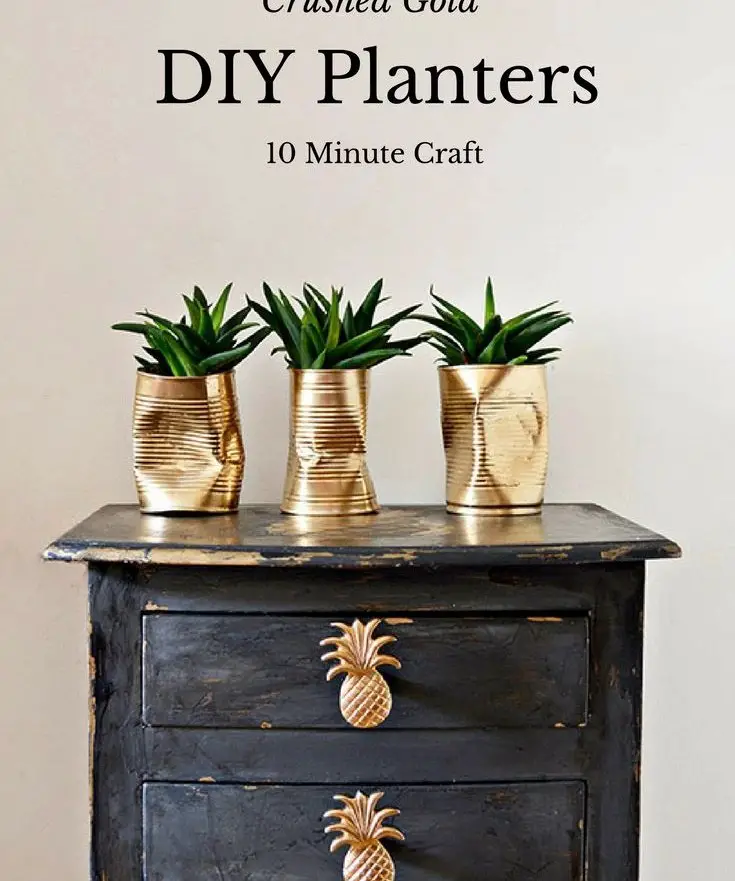
Before writing off those dented or scratched cans as trash, think again! With a little creativity, you can transform them into one-of-a-kind planters that will add a touch of charm to your space. This 10-minute DIY project is the perfect way to breathe new life into items you might have otherwise tossed in the recycling bin. The result is a truly unique and eye-catching display piece that’s sure to spark conversation.
