New to the world of sewing. Fear not. With these clever tricks up your sleeve, you’ll be whipping up garments in no time. You don’t need to break out the big guns or invest in an arsenal of specialized tools – sometimes, all it takes is a trusty needle and thread. These 17 game-changing hacks will have you wondering how you ever managed without them. From streamlining your stitches to simplifying your seams, these tips are designed to make sewing as effortless as can be.
Hem Jeans Easily
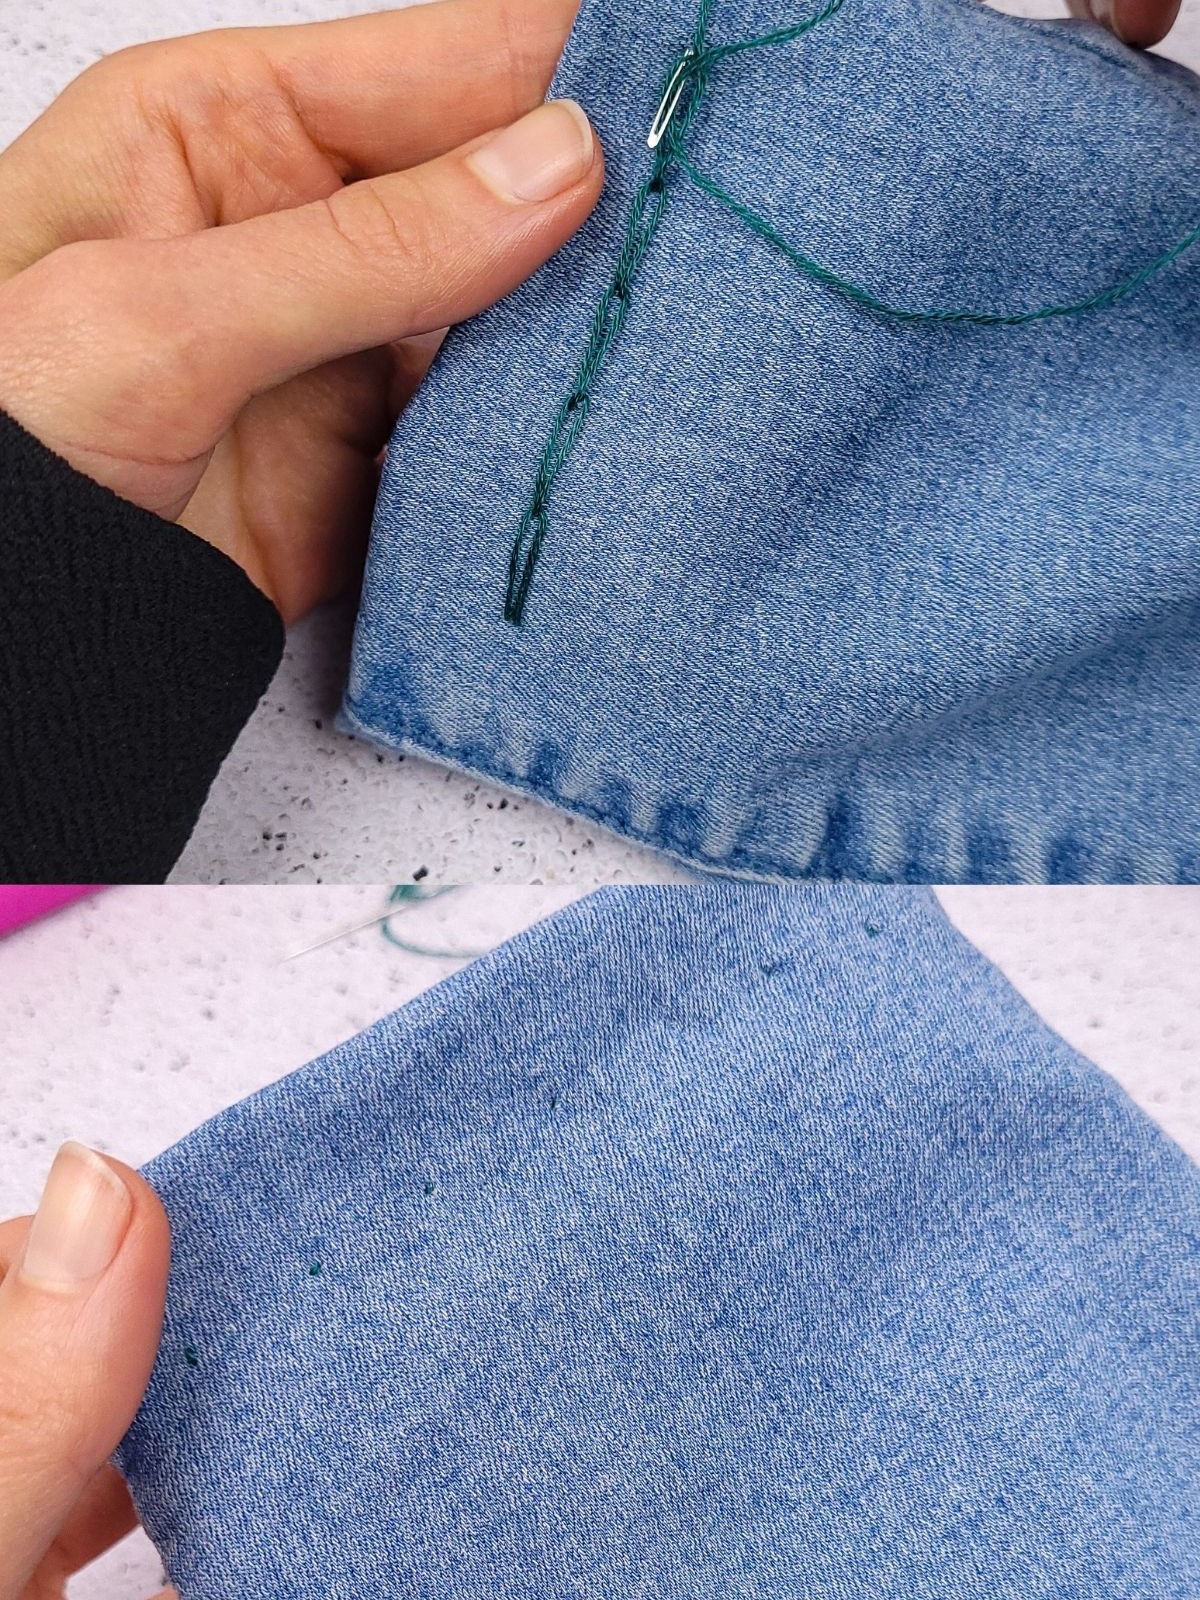
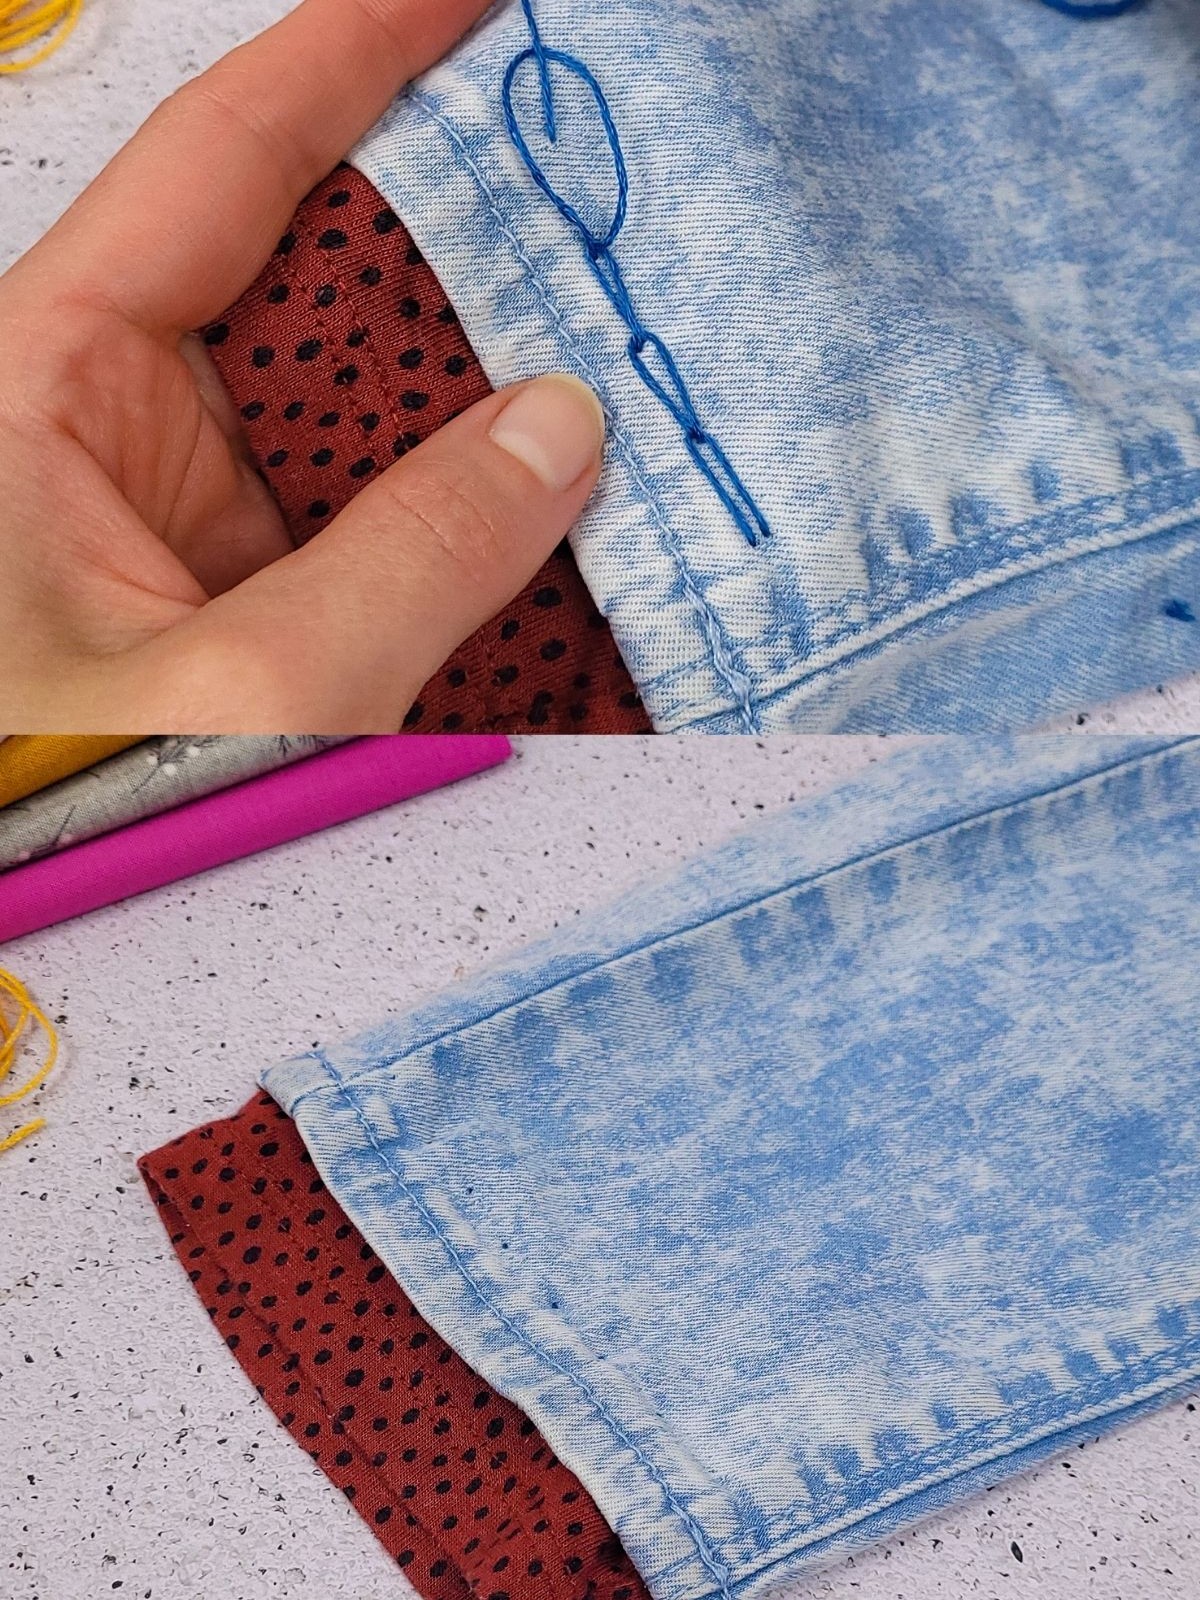
The frustration of dealing with too-long jeans is all too familiar – who hasn’t experienced the embarrassment of their pants slipping down around their ankles. But fear not, With a clever hack and some simple stitching skills, you can easily hem your jeans and say goodbye to those pesky ankle sagging issues. The secret lies in using invisible hem stitches that seamlessly elevate the ankle line and tuck it inside the jean.
Once the stitches are complete, the real magic happens when you tug on the thread – watch as it disappears from view, leaving behind a smooth and polished hemline. With this nifty trick up your sleeve, you’ll be ready to take on more sewing projects in no time.
Fix Clothing Holes with a Cute Flower
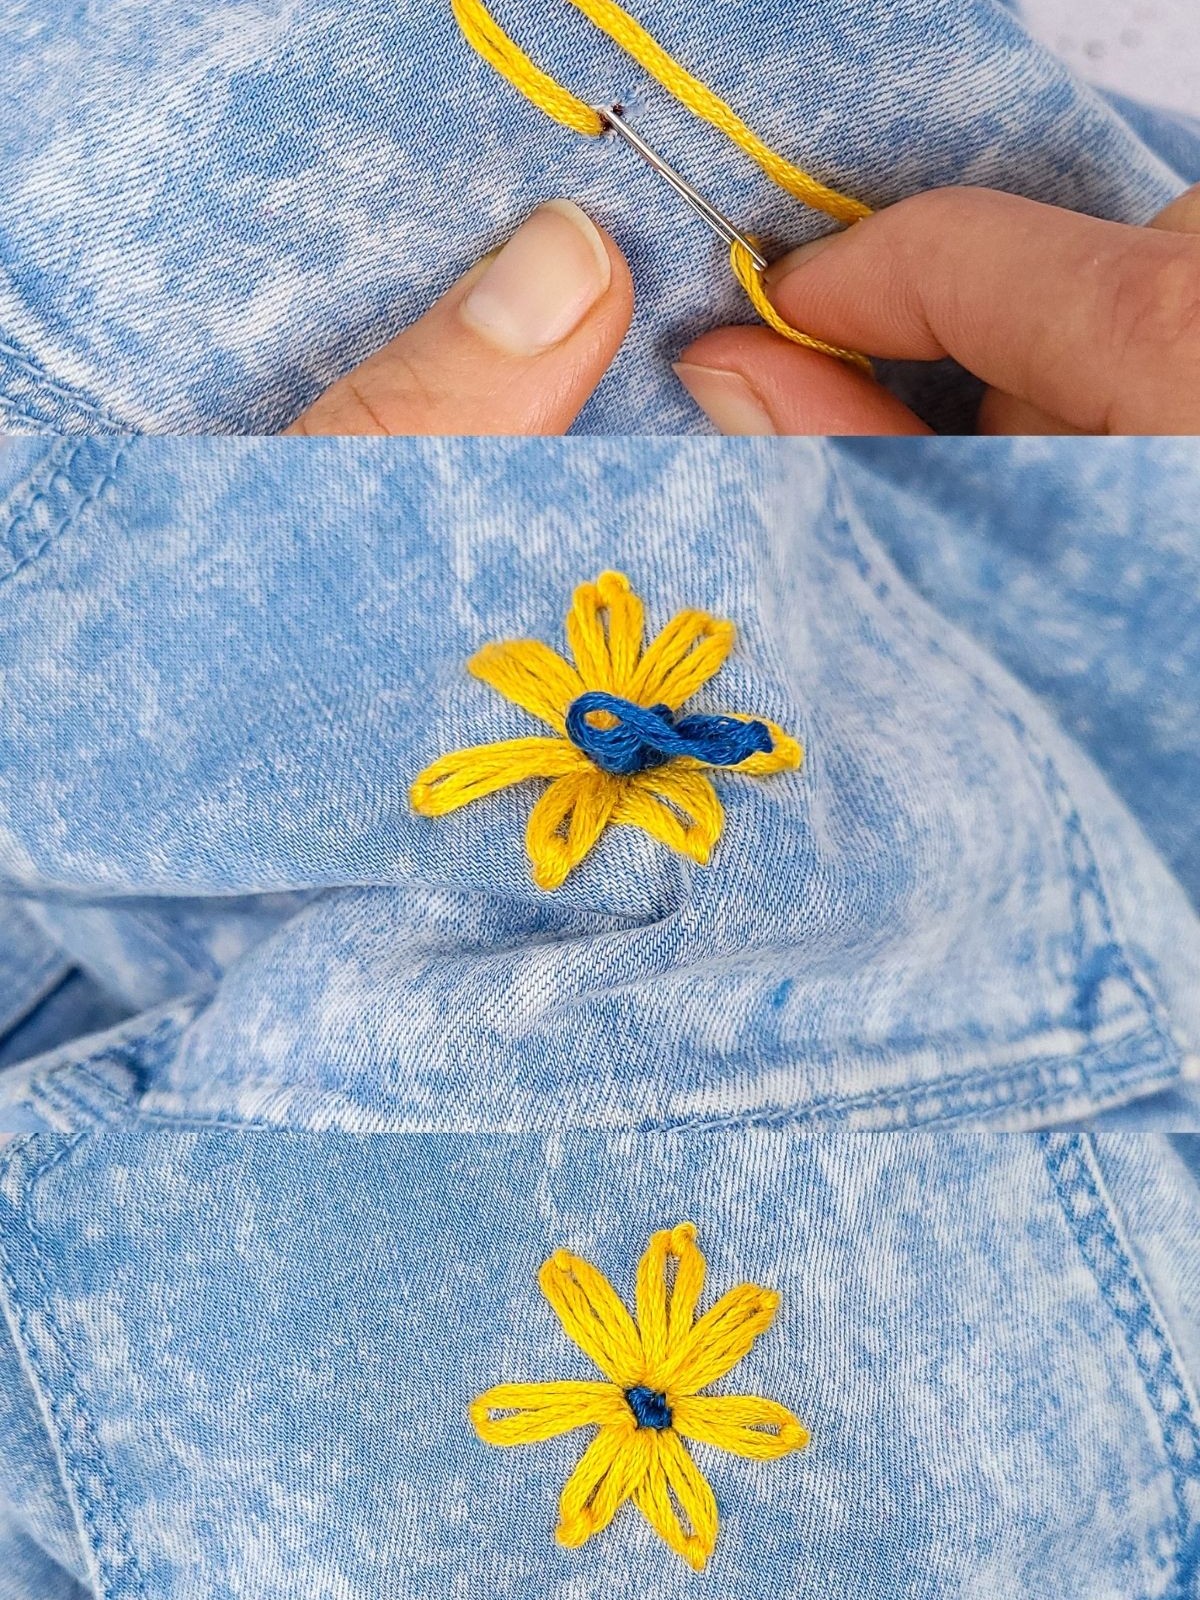
When pesky holes appear on your favorite jeans or jacket, it can be frustrating. But instead of letting them go unnoticed, why not turn them into a quirky fashion statement? Simply sew on a small flower around the hole to not only cover it up, but also add a touch of whimsy to your outfit. This DIY project is a great way to express your personality and get creative with colors and designs. Plus, you’ll be giving new life to an old favorite piece.
Use Clear Nail Polish to Protect the Thread
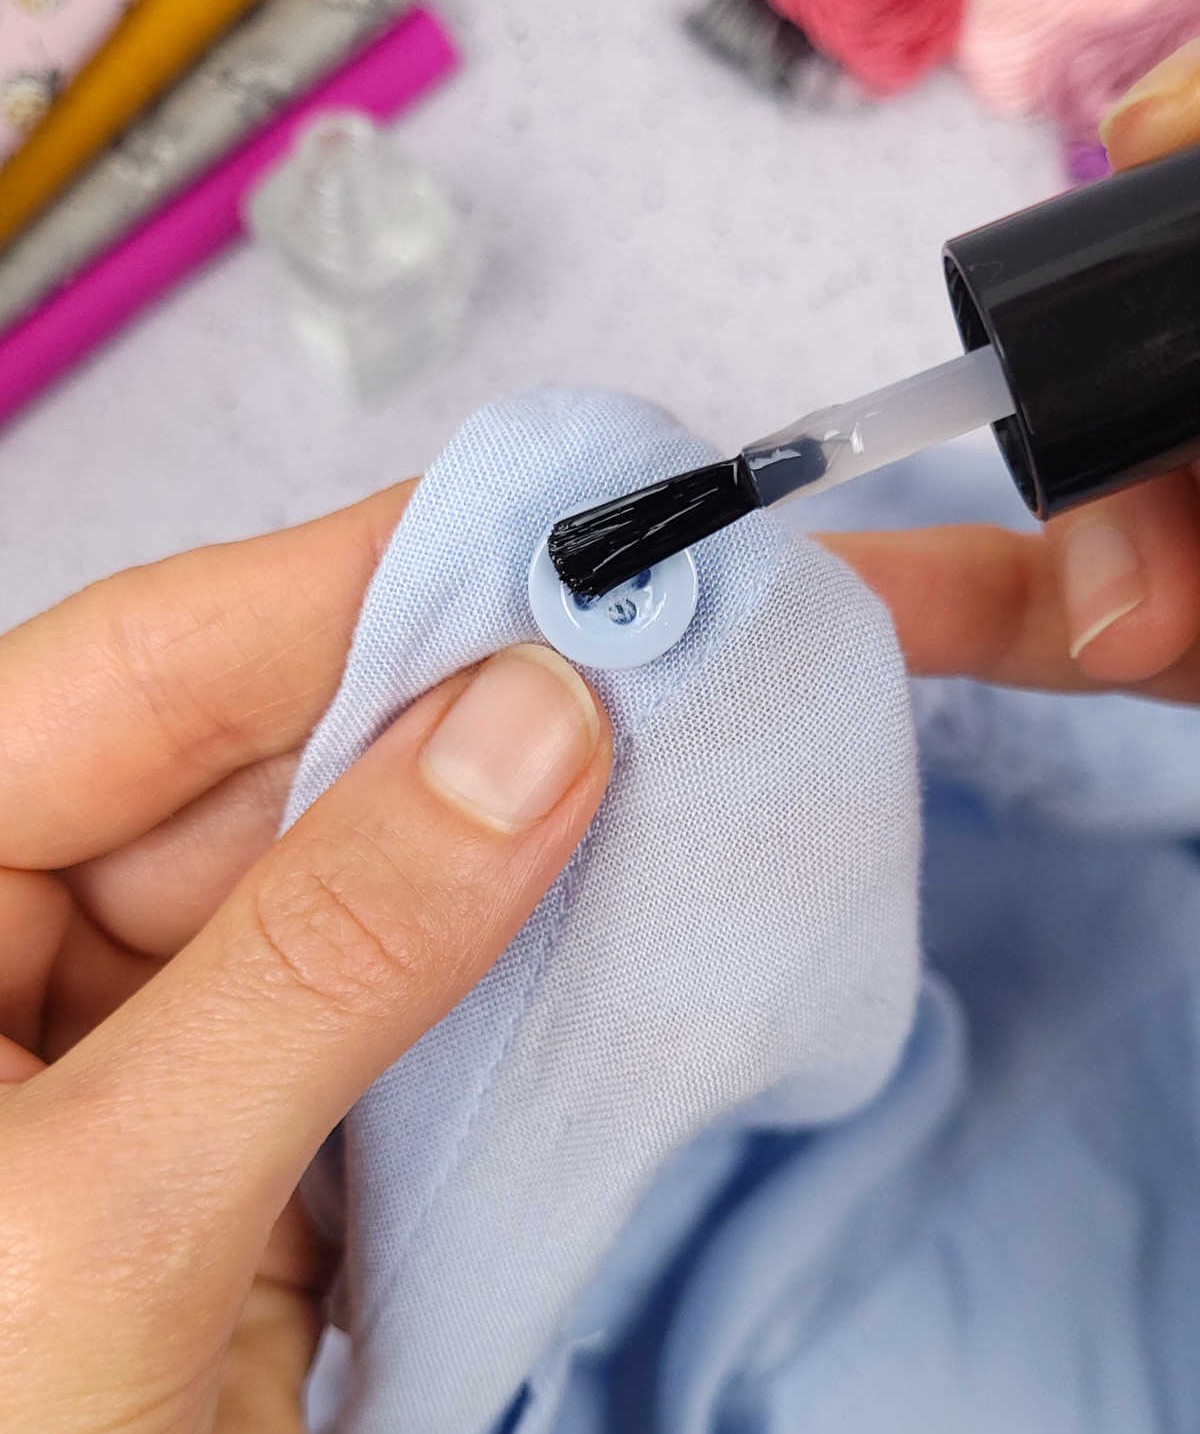
When using clear nail polish as a hack to secure threads in place, it’s essential to exercise caution. A coat or two of polish can effectively prevent fraying or dirt buildup, but its effectiveness depends on where you apply it. For instance, applying the polish directly over a button thread can significantly prolong the lifespan of that button. However, if applied over fabric, there’s a risk of damaging the material when the polish dries and hardens.
Start Your Sewing Without a Knot
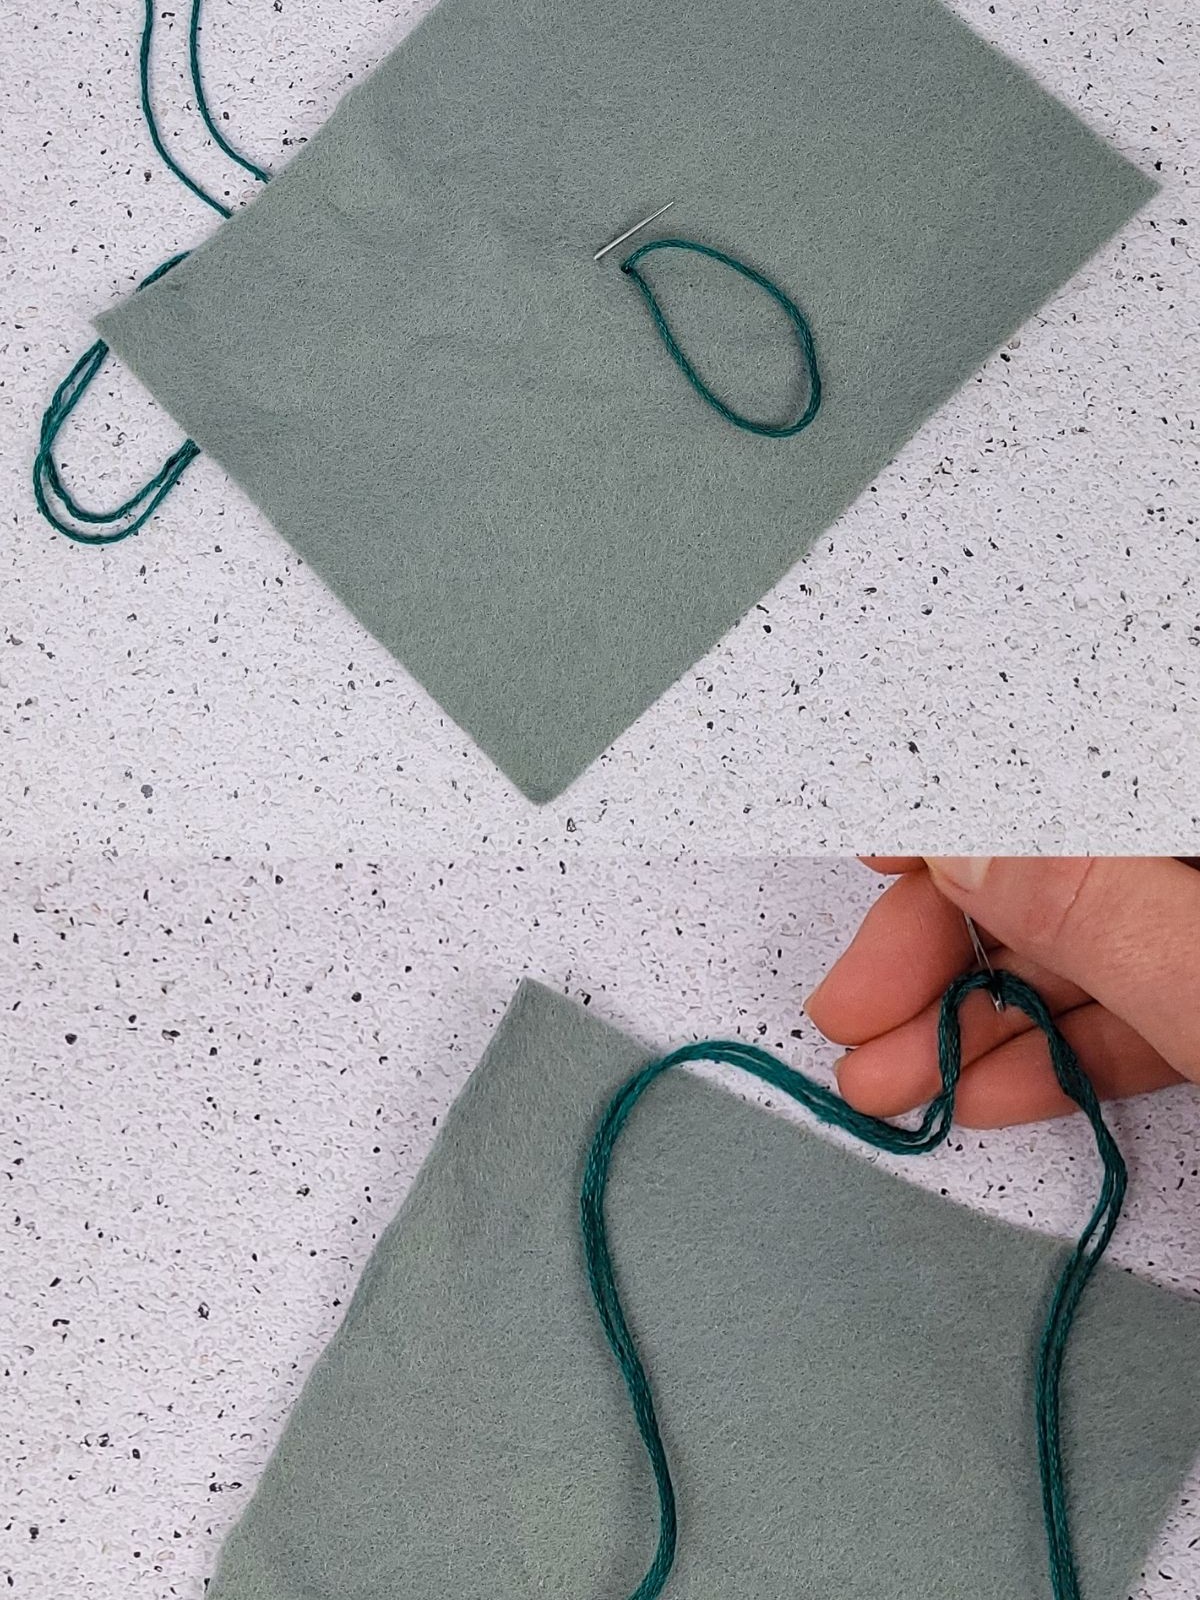
When dealing with the first knot of your thread, many sewers face frustration. This initial tangle can be particularly pesky when it’s hidden at the back of your fabric, making it difficult to start sewing smoothly. The solution lies in a simple yet effective technique: folding your thread in half and looping both ends through the eye of the needle. As you insert the needle into the fabric, you’ll have a looped end waiting for you.
A gentle tug on the thread will then create a neat knot, eliminating the need to struggle with that initial first knot. This method not only saves time but also helps maintain a clean and organized workspace.
Prevent Fraying When Threading Needles
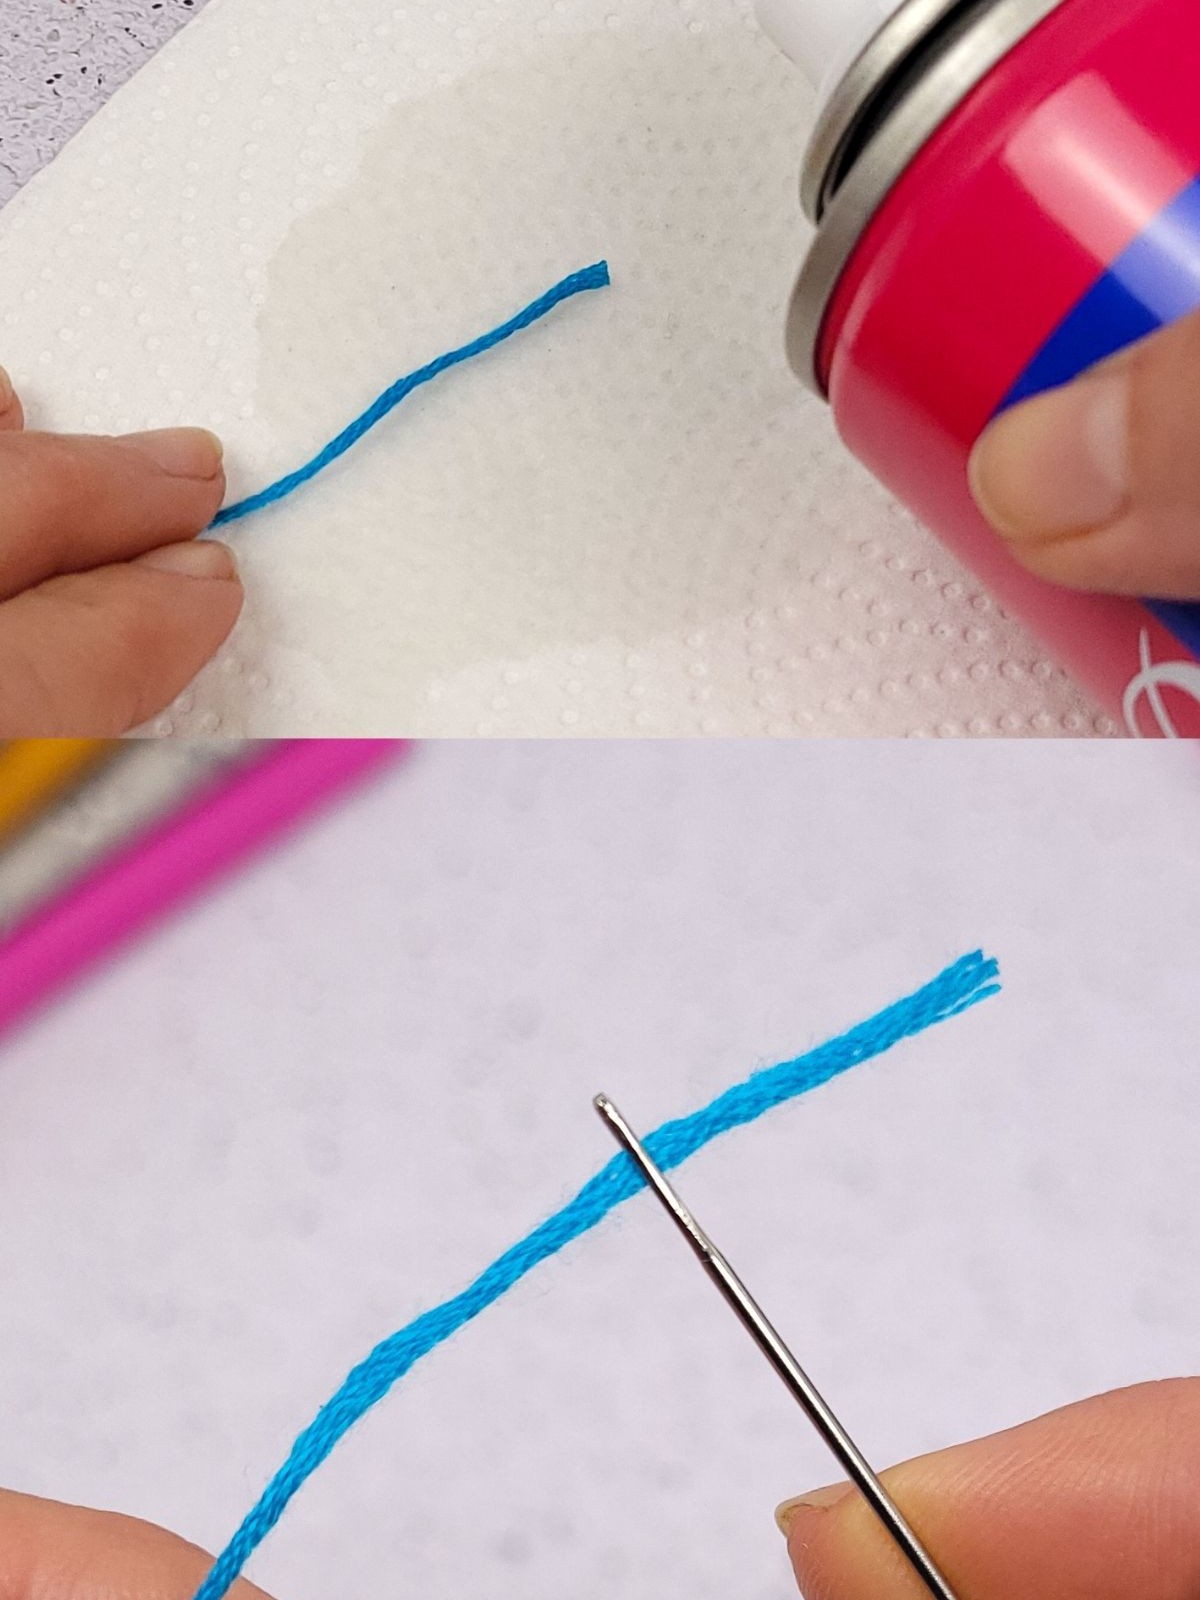
When it comes to the initial stages of sewing, there’s nothing quite as frustrating as trying to get the thread through the needle. The tedious process of licking the end of the thread to prevent fraying is not only annoying but also counterproductive, as it can actually make it harder to pull through. Fortunately, there are a couple of simple tricks that can save you time and hassle. One approach is to lightly spray a setting agent, such as hairspray, over the thread to prevent fraying.
Alternatively, you can also try dipping the ends in beeswax, which achieves the same effect.
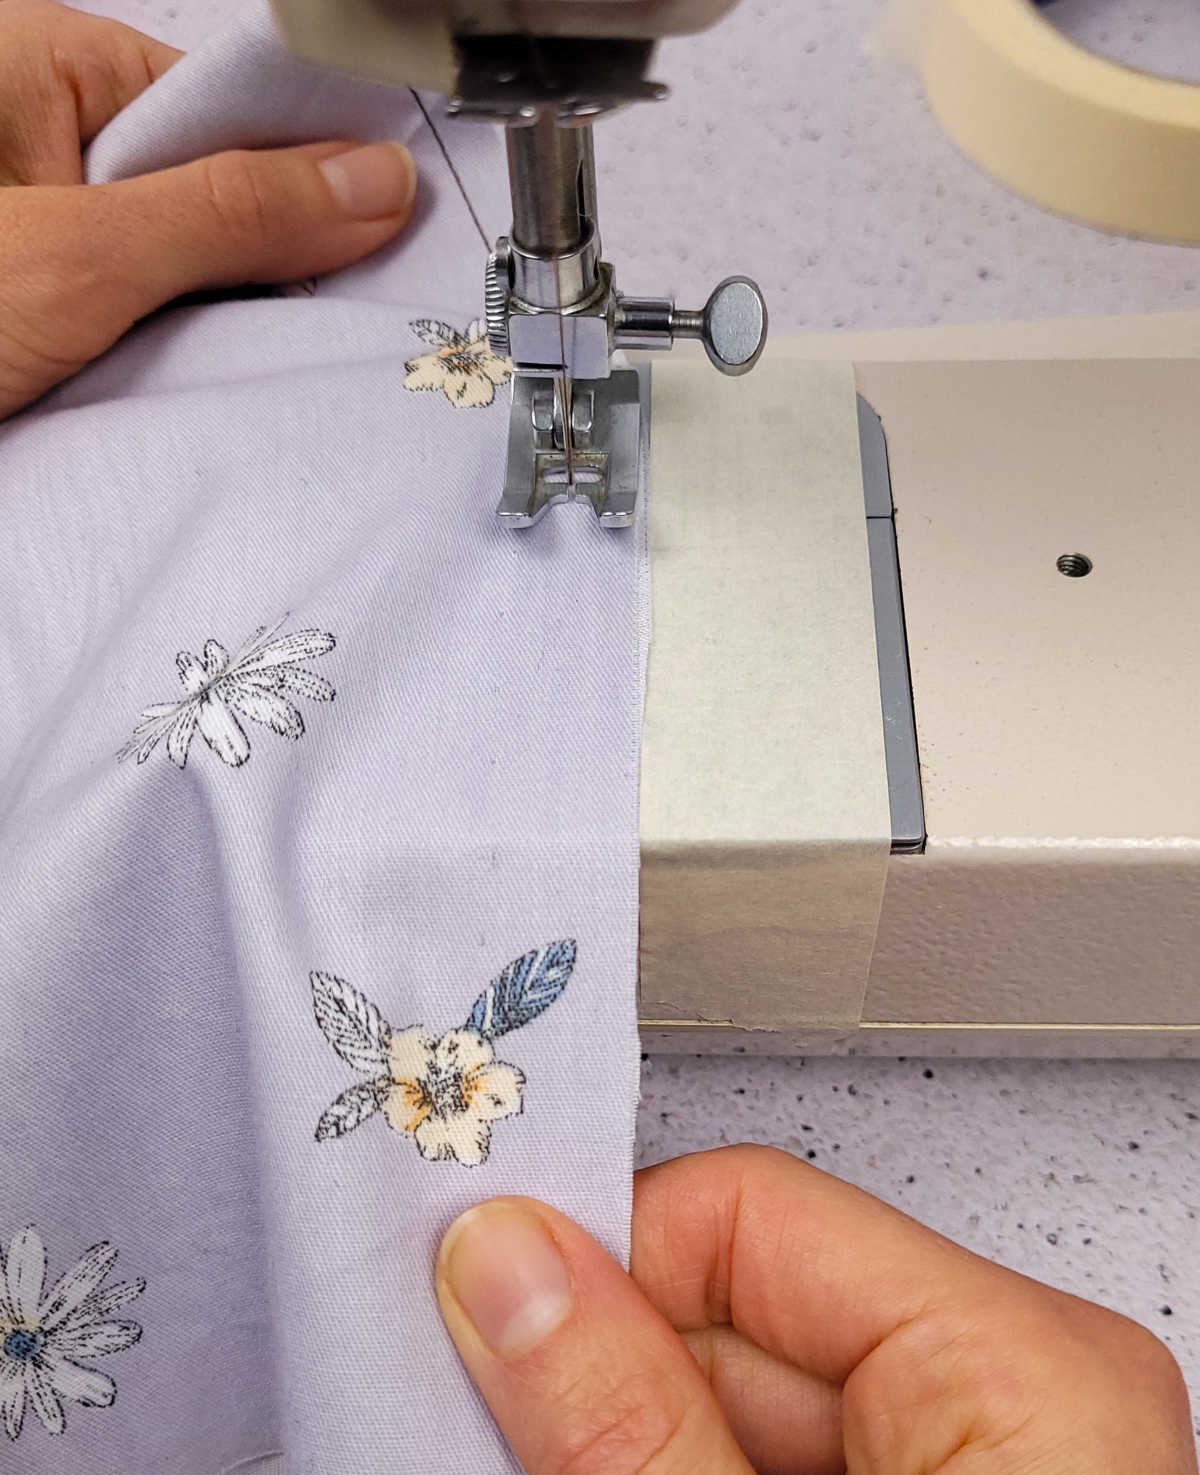
Create a Perfect Ruffle on a Shirt
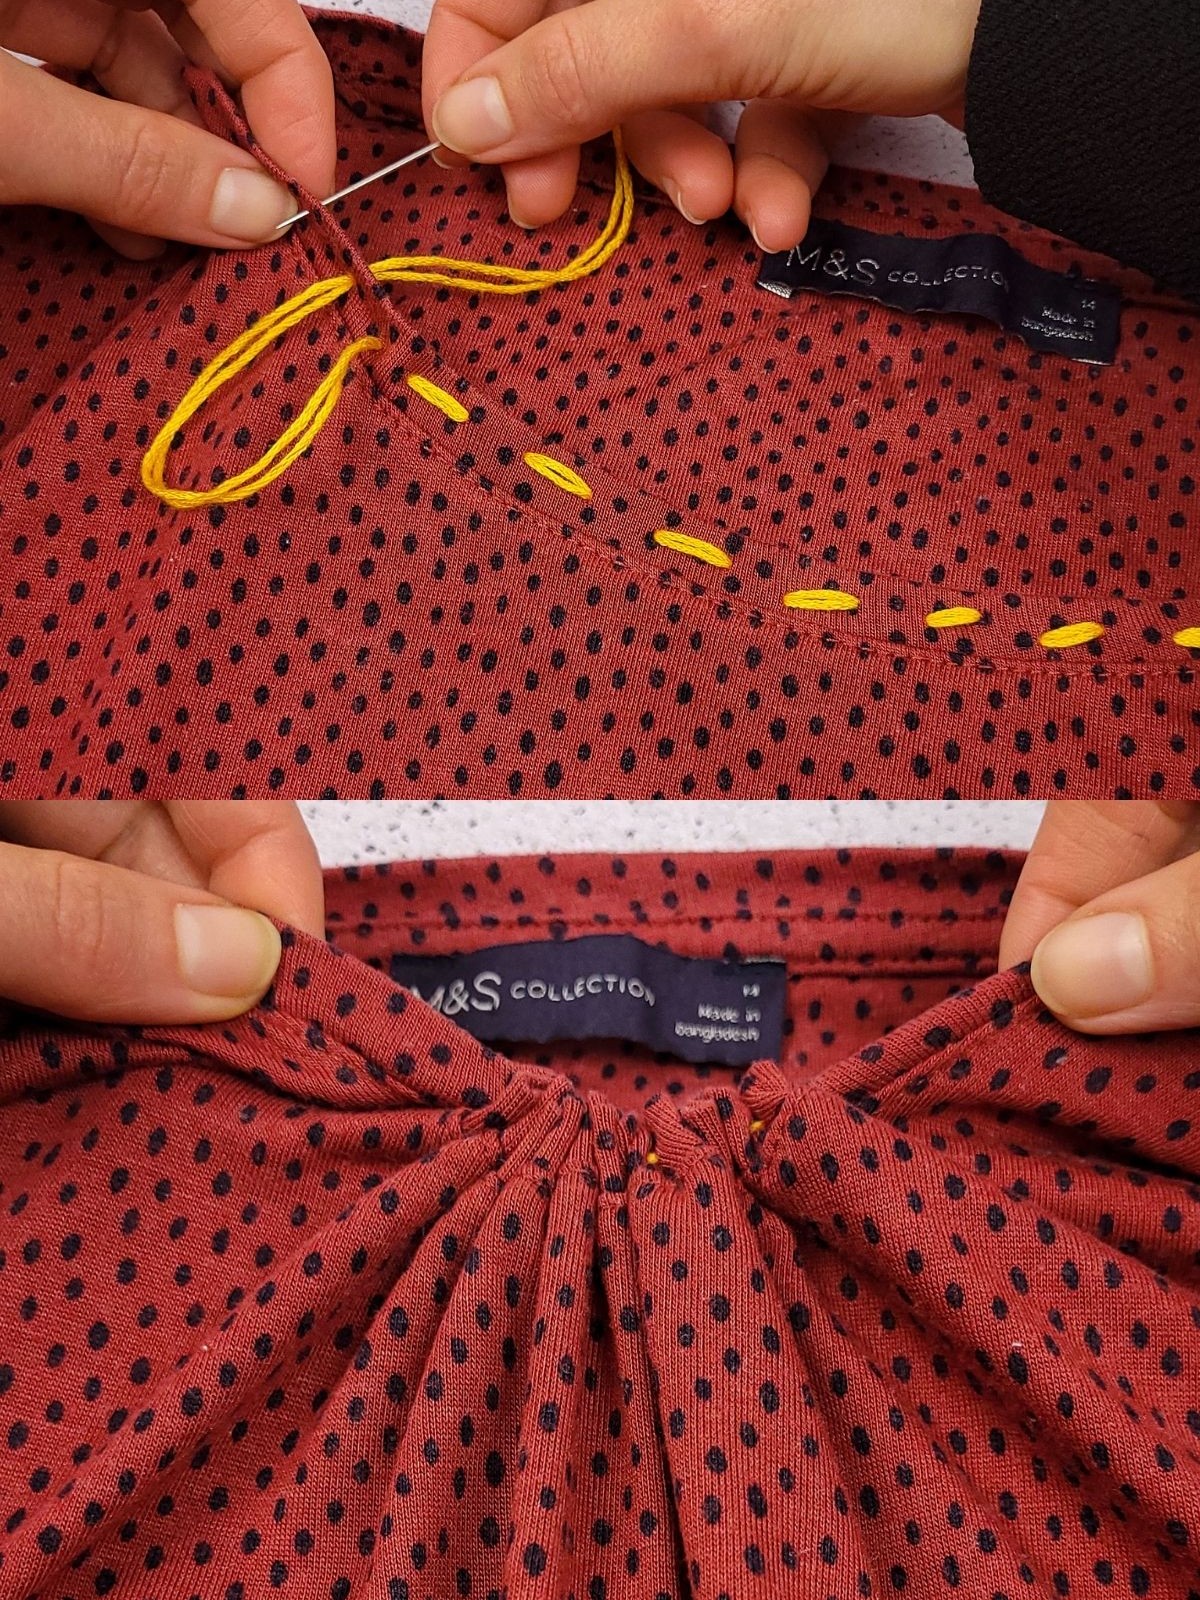
Ruffles bring an undeniable charm to any garment. When you’re looking to revamp a basic blouse and inject some personality into your wardrobe, this simple yet effective technique is just what you need by gathering fabric with a needle and thread, you can create a playful bunching effect that forms pleats or ruffles, depending on the material’s natural tendency. This quick fix can breathe new life into an old favorite, transforming it from dull to dazzling.
Pair your newly ruffled blouse with a pencil skirt, and you’ll be ready for a stylish workday look in no time.
Make Sleeves Longer
The perpetual struggle with sleeves riding up our wrists is a common one. When this occurs, it’s often because the sleeve itself is slightly too short for our liking. Fortunately, there’s a simple solution to extend the length of your sleeve. With a little creativity, you can transform this hack into a stylish and eye-catching border on your shirt. To get started, measure the circumference of your sleeve and cut out a strip of fabric that matches.
Then, recall the disappearing hem stitch technique we covered earlier for sewing hems on jeans and apply it here to secure the new fabric piece in place.
Ruffle Your Sleeves
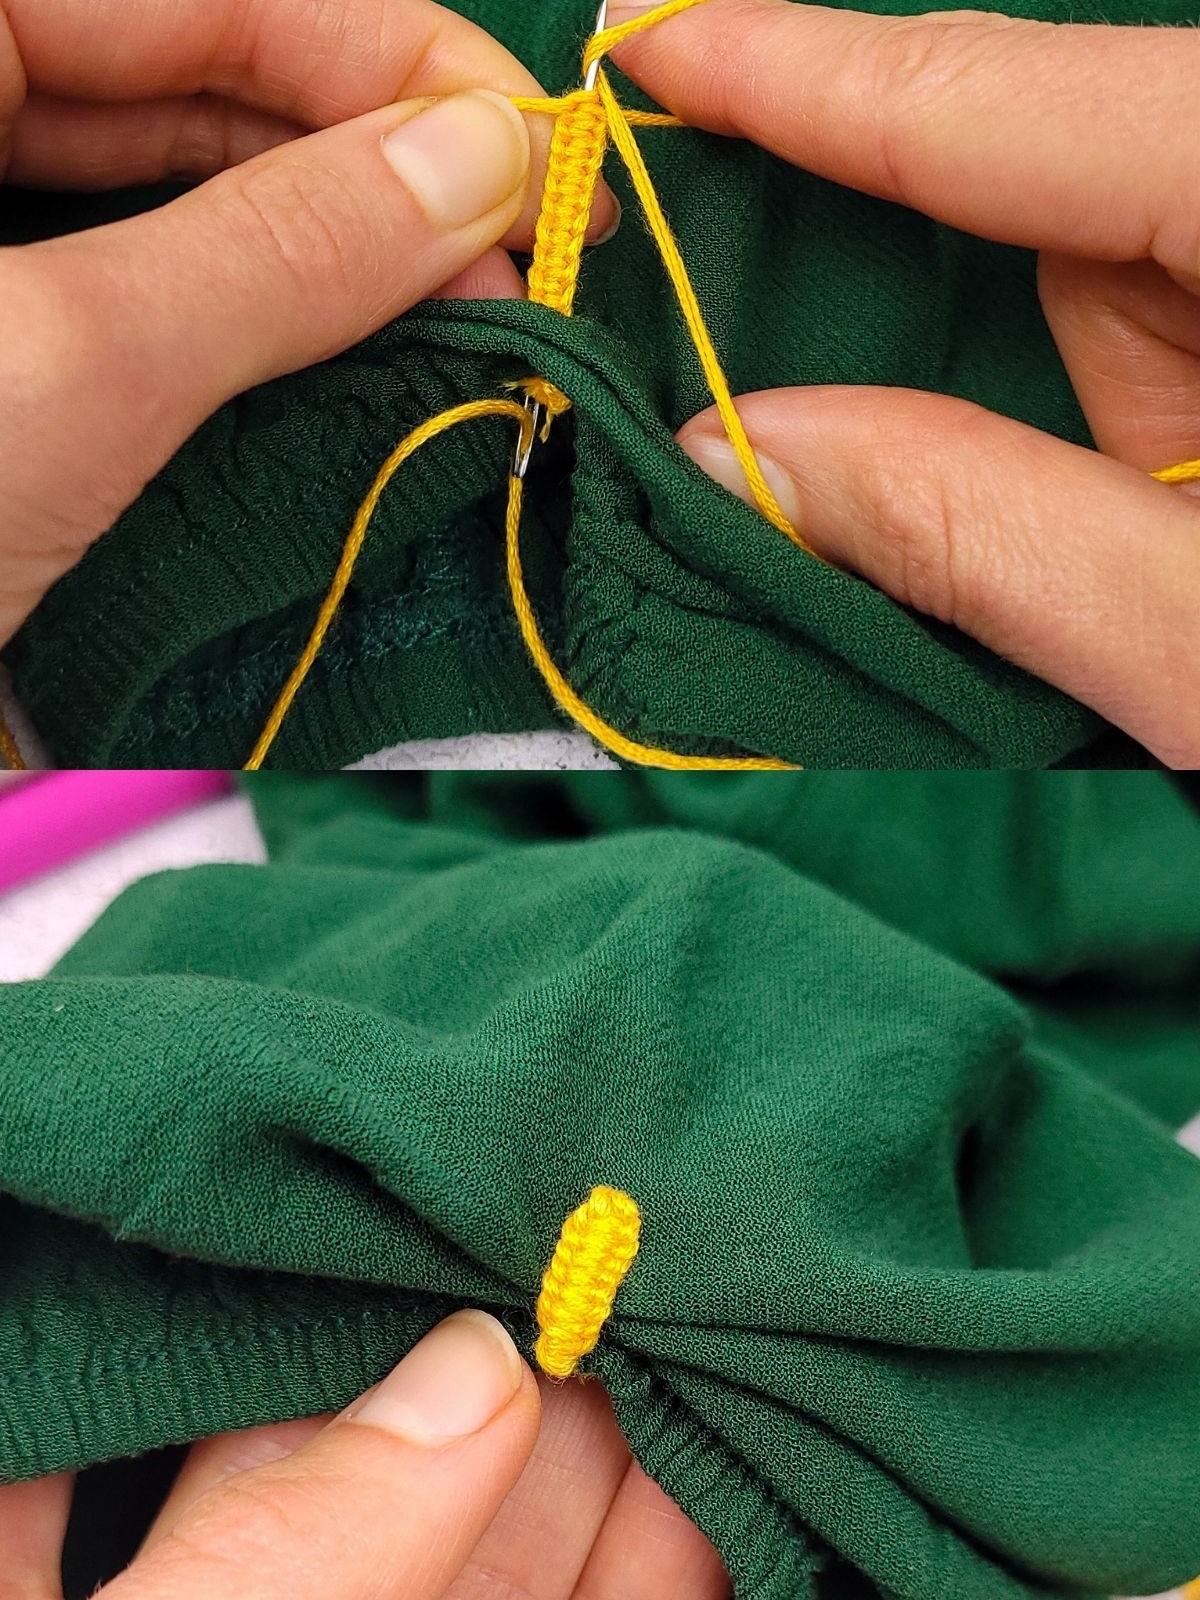
When it comes to sleeve styling, there are times when you might want to add some visual interest or even adjust the fit. One easy and effective way to do so is by creating a makeshift ruffle on your blouse’s sleeves. You can achieve this in two ways: either opt for a more permanent solution by sewing a small circular piece of ruffled fabric onto the sleeve, which will undoubtedly alter the overall look and silhouette of the garment.
Alternatively, you can use a needle and thread to create a temporary gather effect by pulling a knot through the fabric at a specific point. This simple hack will instantly add texture and visual appeal to your sleeves while maintaining the original fit and finish of the blouse.
Sew with Finger as a Stitch Guide
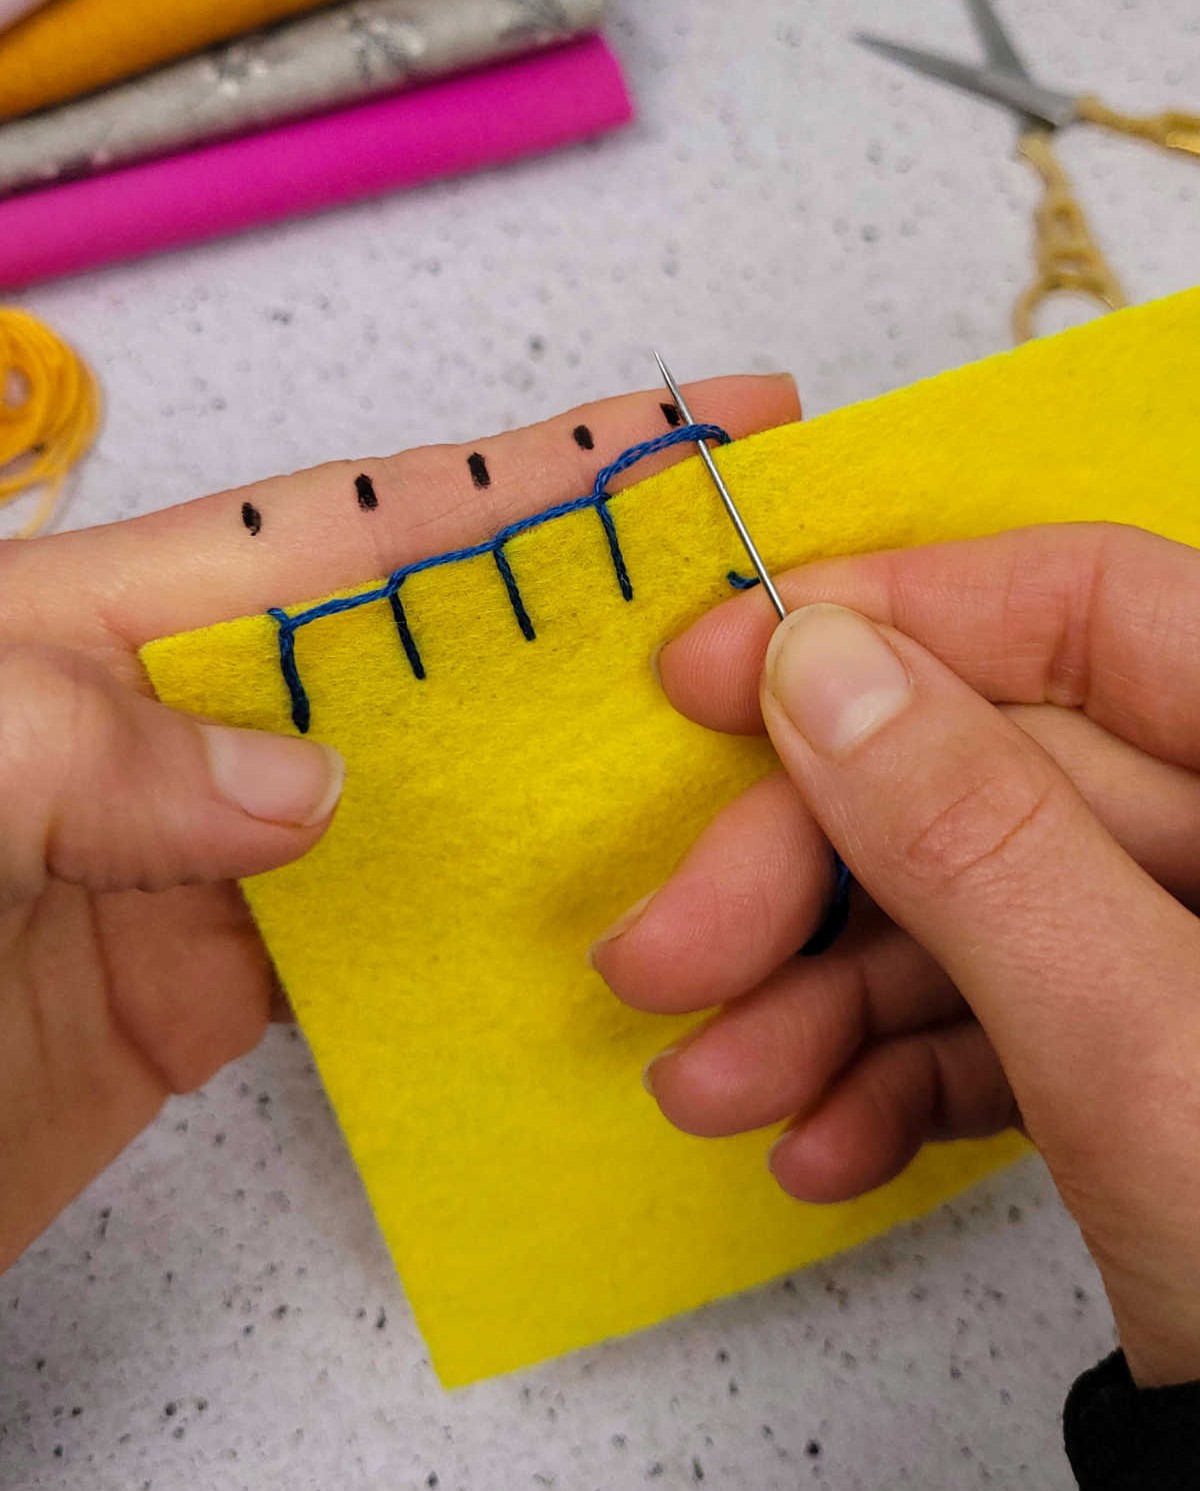
When it comes to maintaining even spacing and distance between stitches, many seamstresses face a common challenge: The disparity can significantly impact the overall finish and quality of a garment. To achieve uniformity, start by using a black marker (non-permanent) to create three to four subtle markings along the outer side of your index finger, on your non-dominant hand.
This simple trick allows you to use these visual cues as a guide when holding up fabric with your left hand while sewing, ensuring your stitches are consistently spaced and perfectly placed.
Sharpen Scissors with Aluminum Foil
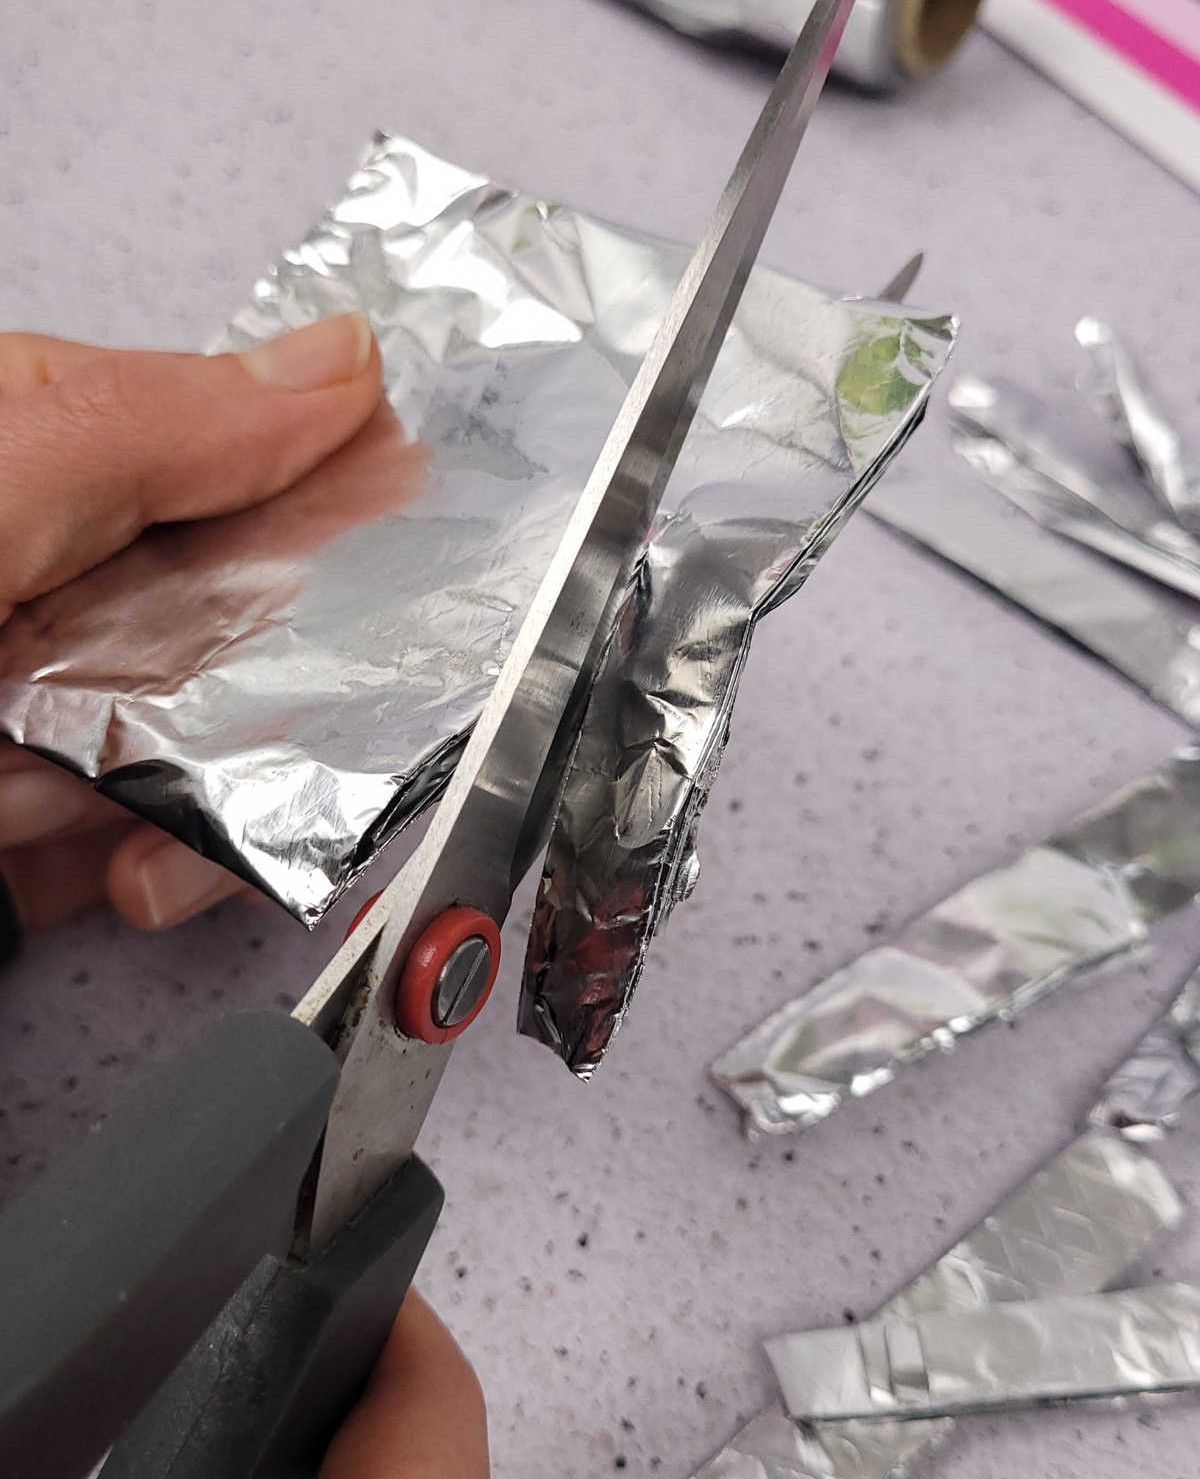
Sharpening your scissors doesn’t have to involve expensive tools or professional services – a simple household item can do the trick. Aluminum foil is often overlooked as a versatile material that not only enhances food preservation but also sharpens and cleans your scissors. To take advantage of this hack, start by folding the foil multiple times to create a thick surface area. This will provide an effective cutting platform for your scissors.
As you cut through the foil, the blades will not only sharpen but also clean out any dirt or grime that may have accumulated, resulting in improved performance and efficiency when cutting various materials.
Use Washi Tape as a Sewing Guide
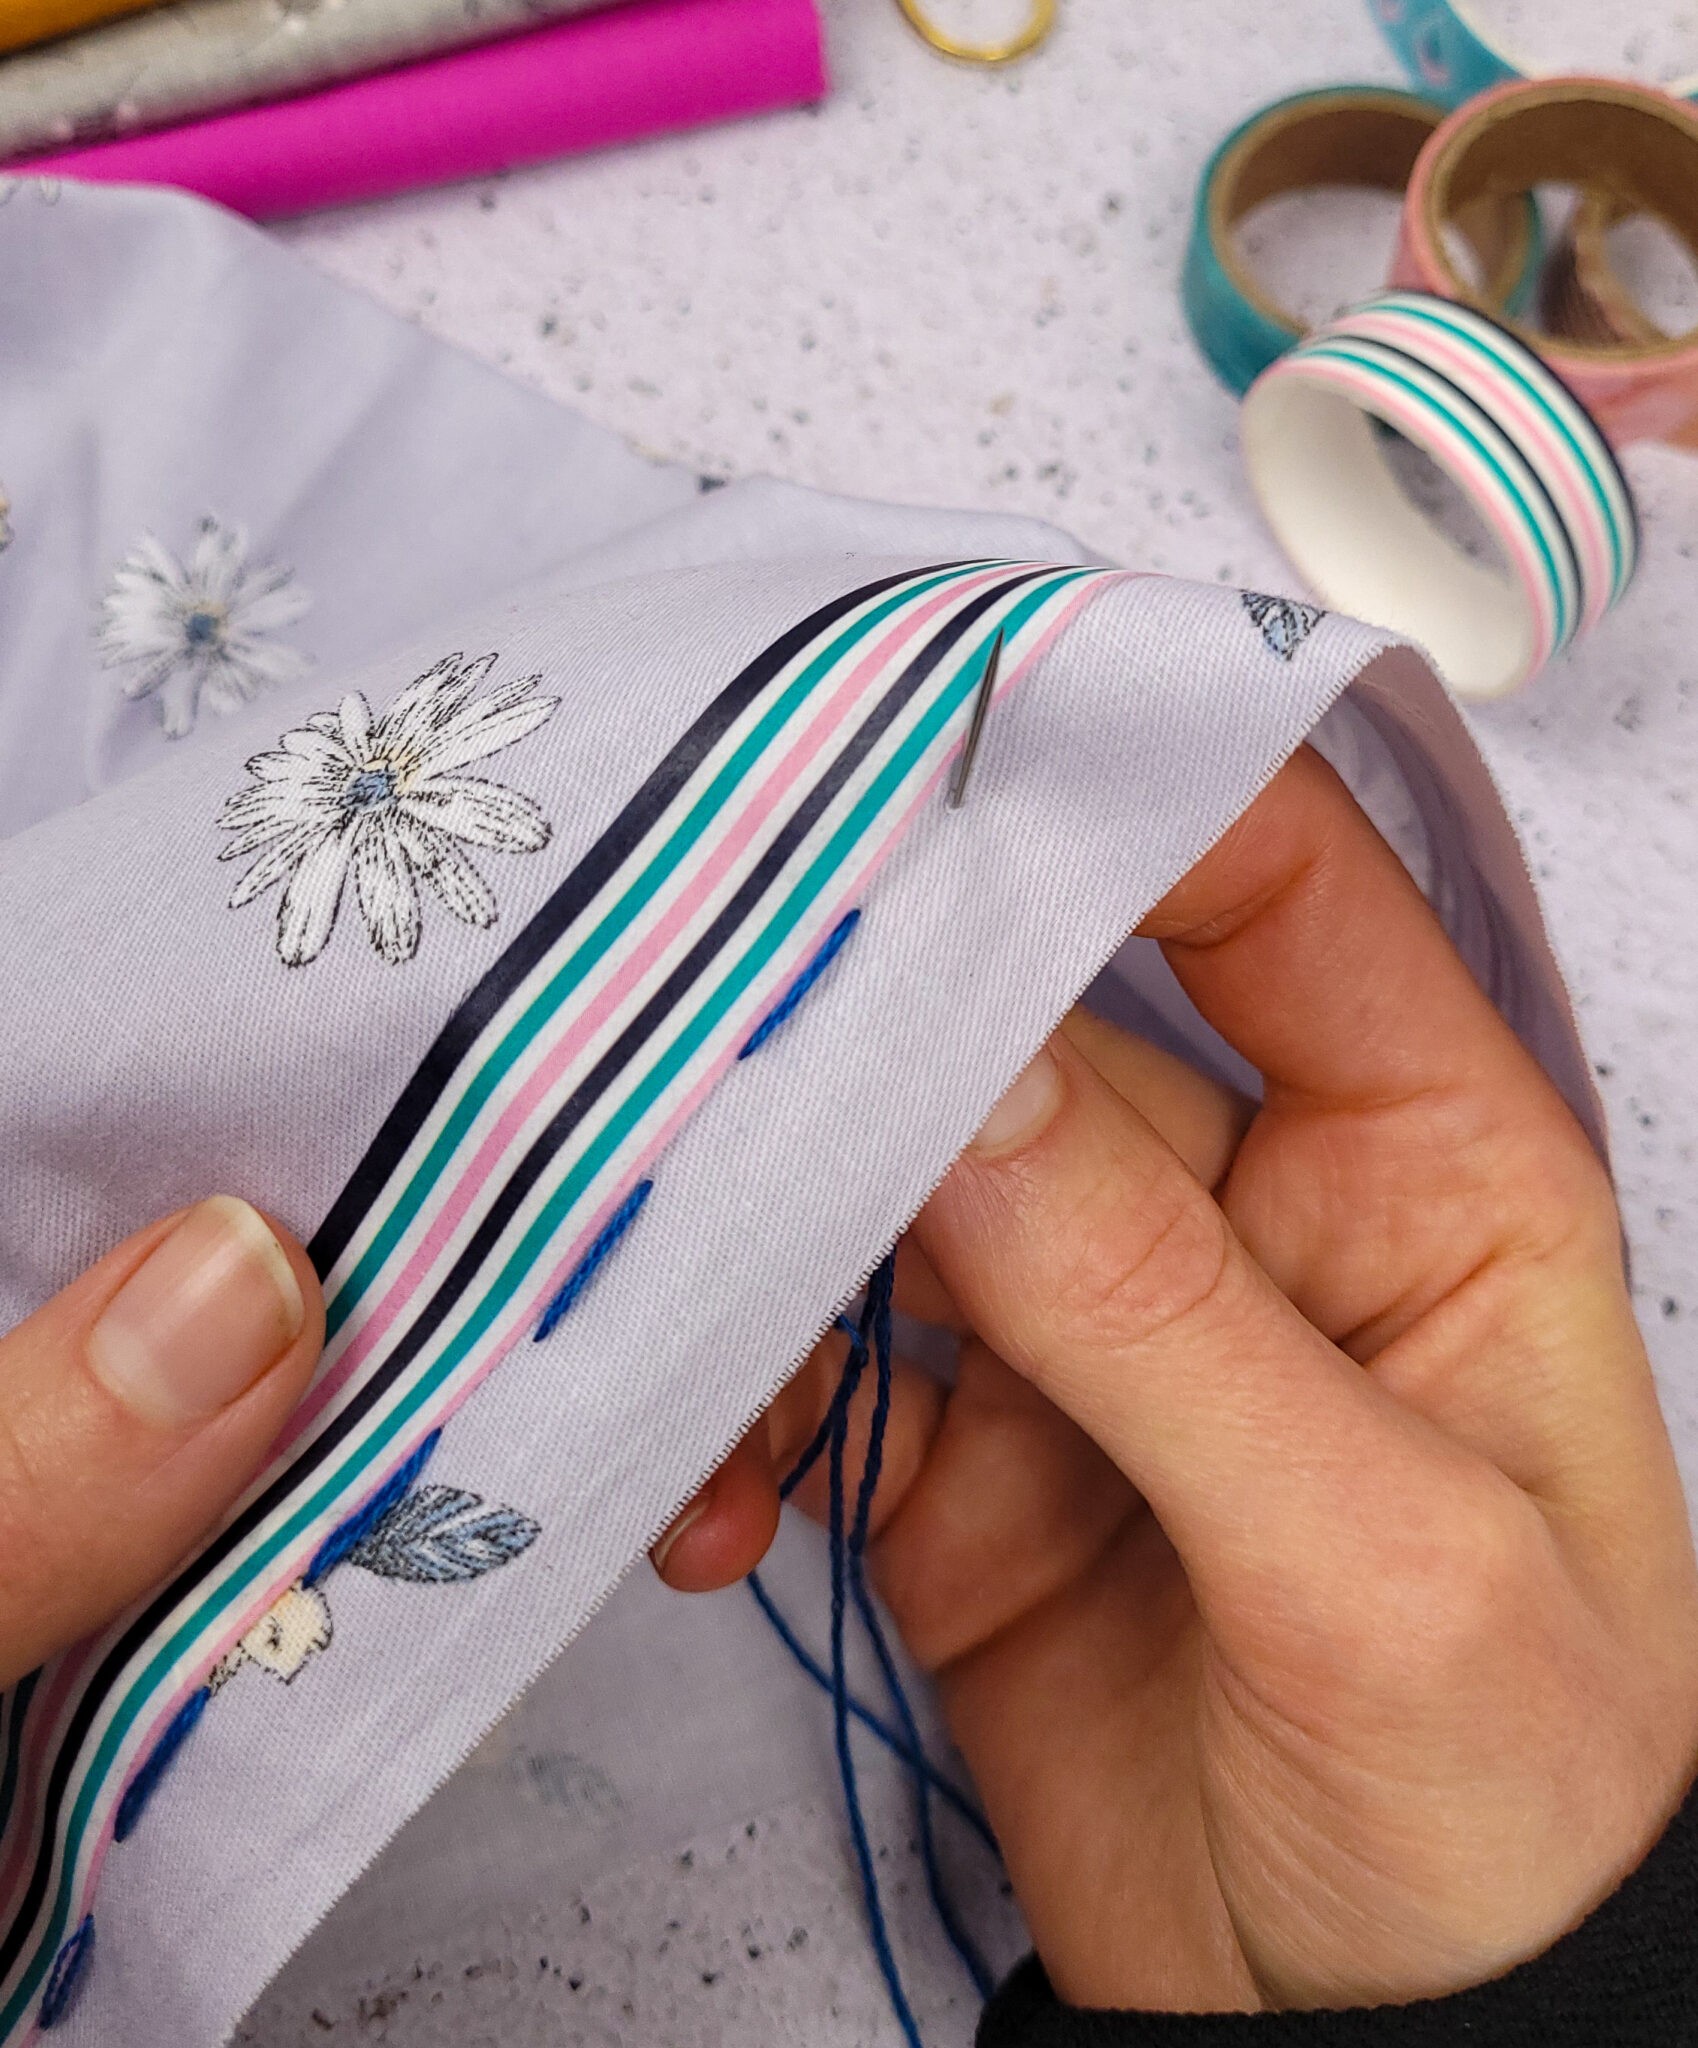
Are you tired of struggling to maintain a straight line while sewing, only to be left with an imperfect stitch? Fear not: A simple yet effective solution lies in the humble washi tape. By applying this versatile adhesive strip along your fabric, you’ll be able to achieve crisp, clean lines with minimal effort, ensuring that your finished project looks polished and professional.
Use Painter’s Tape to Help Sew Straight
For precision in your sewing, a common issue is maintaining a straight line while maneuvering the machine. To address this, I recommend using painter’s tape as a makeshift guide. Begin by applying a strip of tape to the right side of the desired sewing line, ensuring the edges are aligned and parallel. Once in place, position your fabric against the edge of the tape, then start sewing. The tape will provide a visual cue for straight stitches all the way along.
Easily Shorten the Zipper
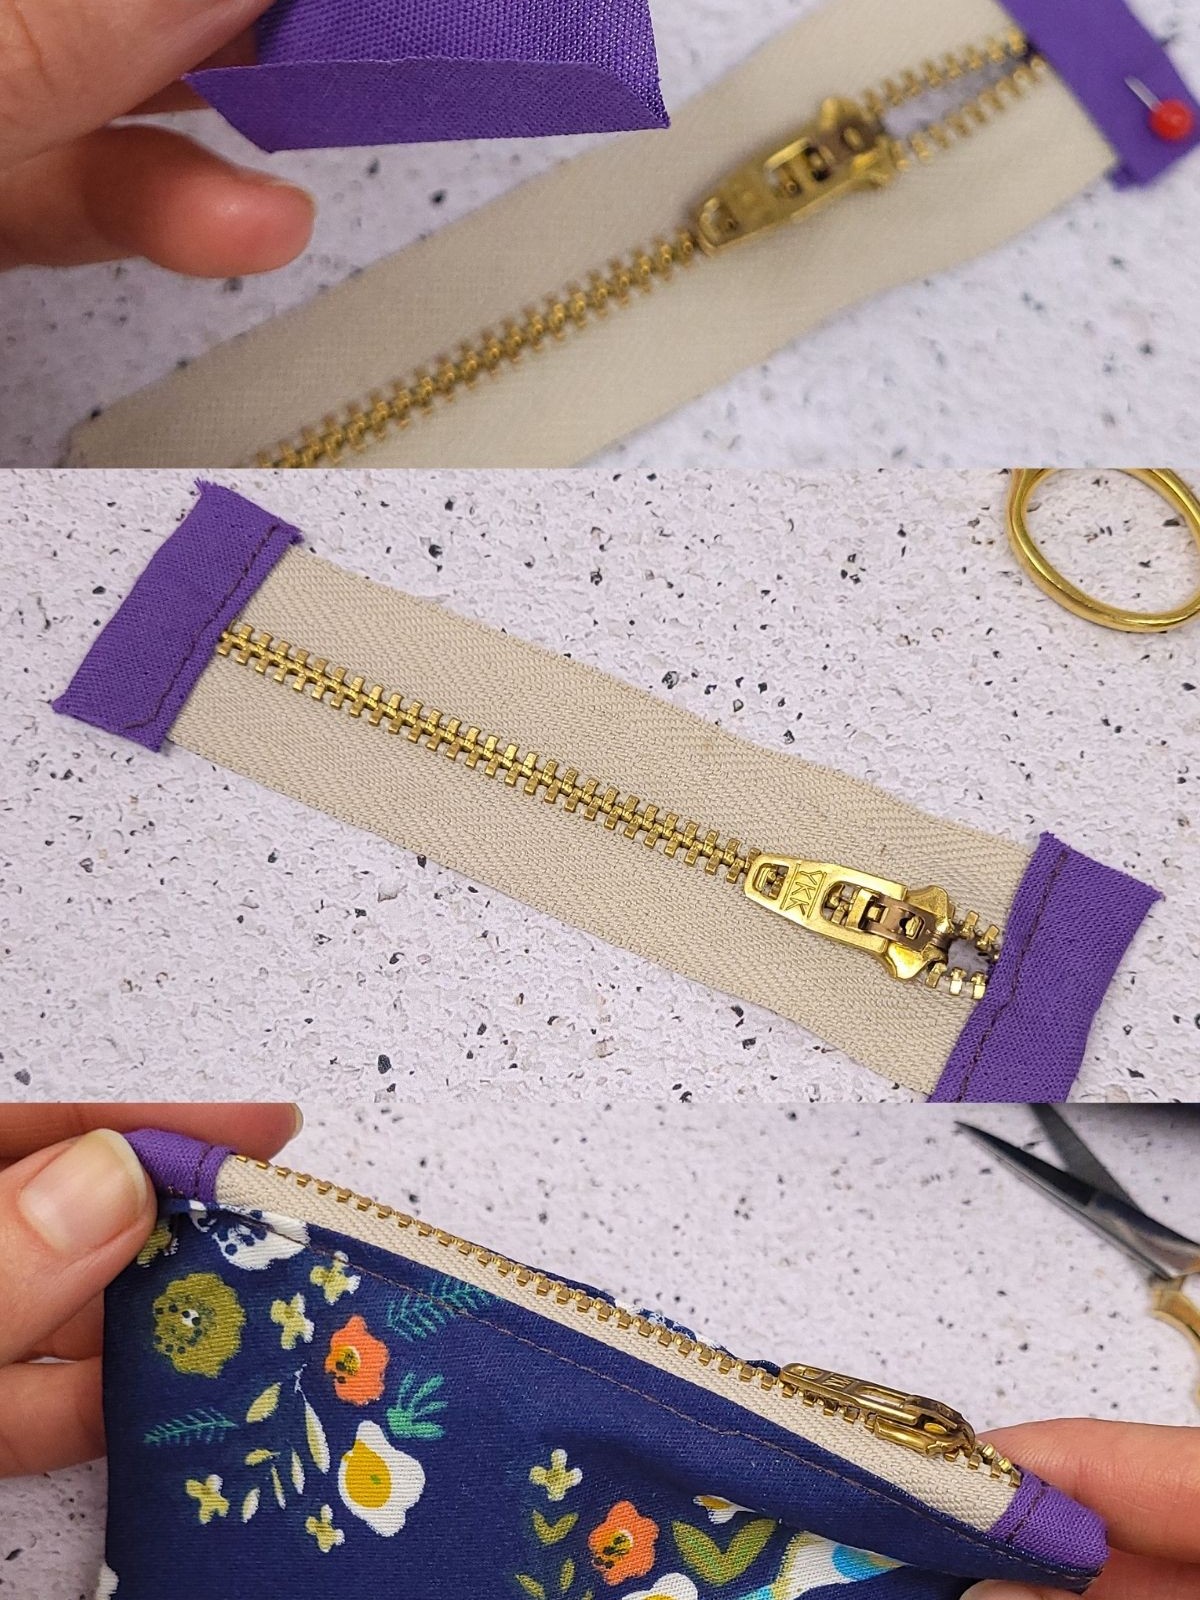
To shorten a zipper, what initially appears as a daunting task can be effortlessly accomplished with the right tools and a simple trick. The key lies in measuring precisely where you want to cut the scissors, ensuring that you leave about an inch of teeth beyond that point. This allows for a clean and controlled snip off the fabric of the zipper. Once completed, simply sew the ends together and tuck them into your desired pouch or application.
Use Bar Soap to Help Pins Glide Through the Fabric
What I find most fascinating about this clever hack is its sheer ingenuity. Who would have predicted that a humble bar of soap could be so versatile in sewing? The versatility of this soap bar is truly remarkable. Not only can it serve as an effective pin cushion, but it also facilitates the insertion and removal of pins through thick fabrics with ease.
The secret to its success lies in the soap’s ability to coat the sharp tip of the pin, allowing it to glide smoothly through coarse and thick fabrics, making it a game-changer for sewing enthusiasts.
Hem Jeans with a Pattern
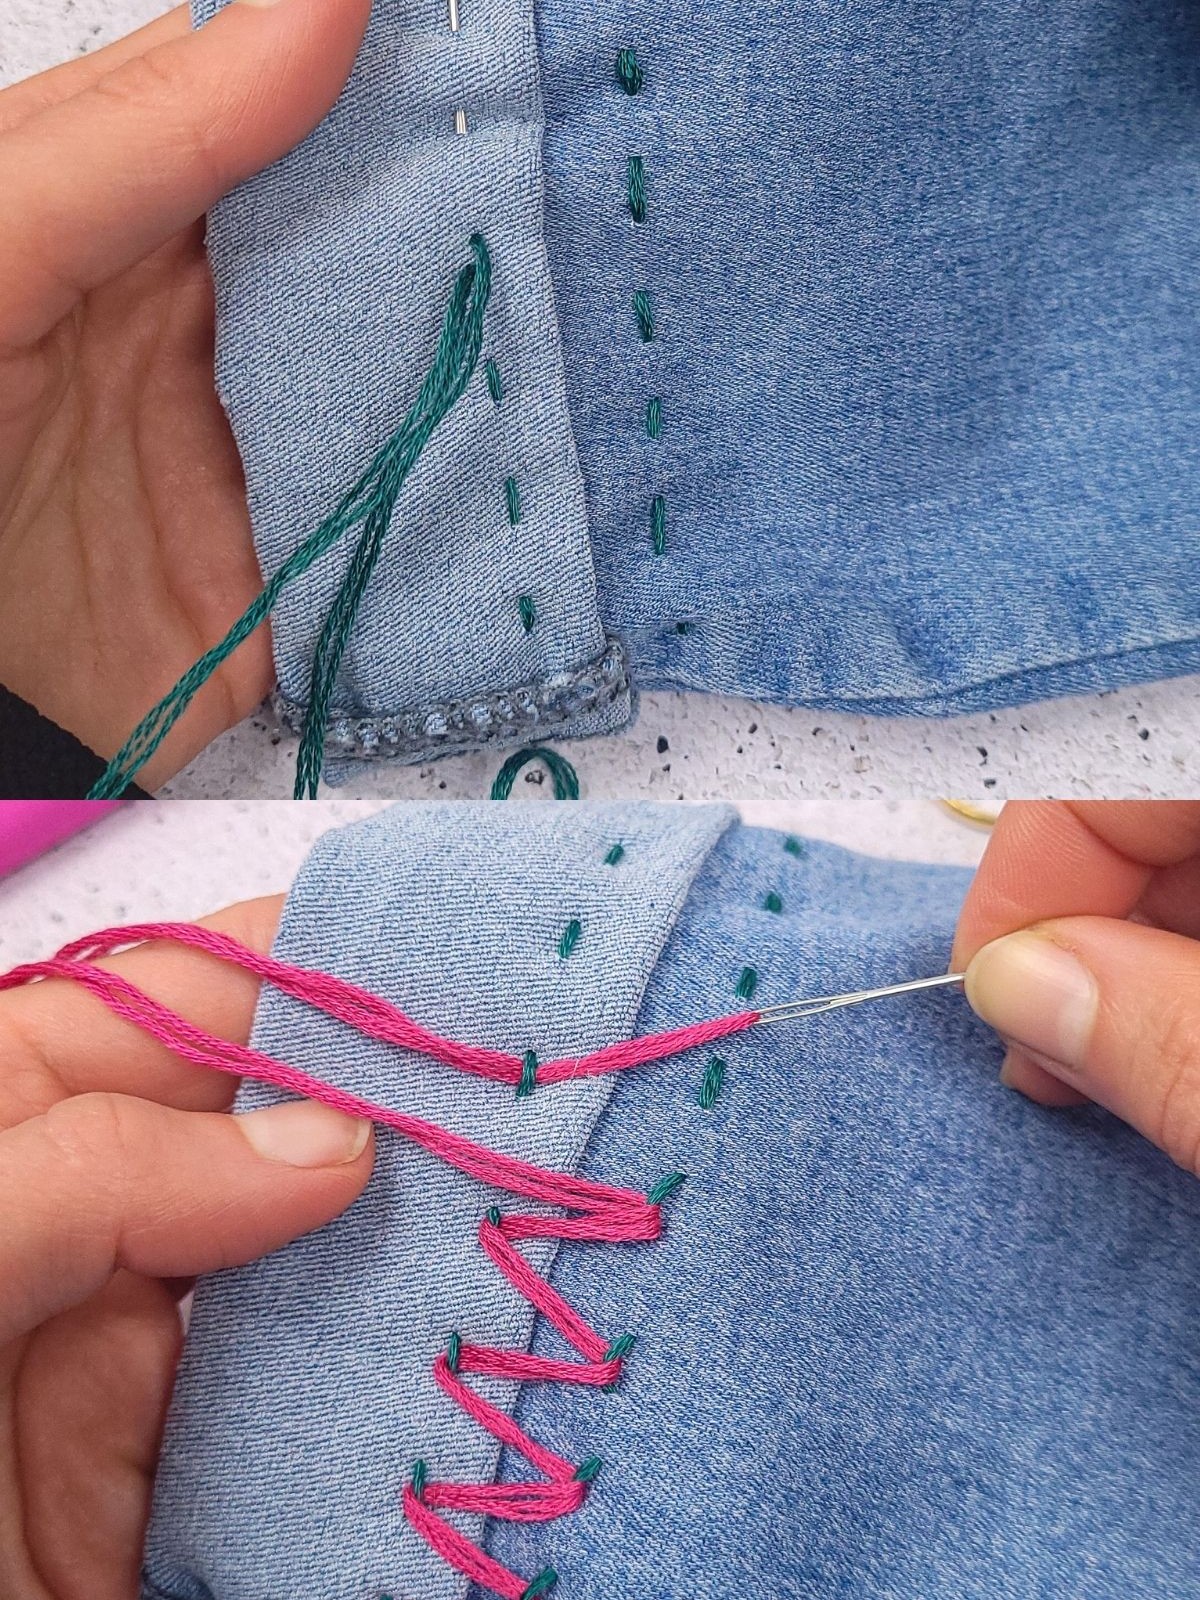
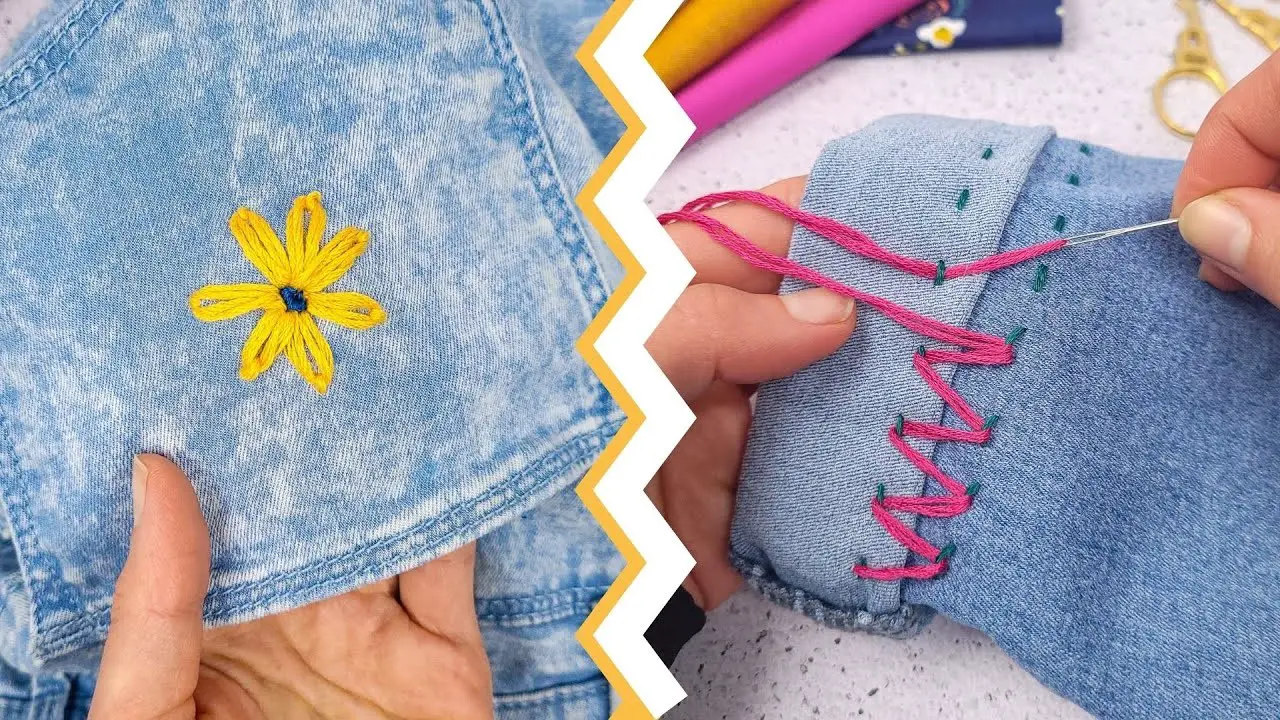
Unlike the seamless disappearing hem stitch we explored earlier, this next technique is an opportunity to let your creativity shine. If you don’t mind the thread being visible, why not use it as a chance to add some personality to your jeans? You can create a unique and quirky hemline by sewing a pattern using contrasting colored thread. A simple yet effective choice is to sew a zig-zag design that adds visual interest and becomes a conversation starter.
The beauty of this technique lies in its simplicity, making it accessible to anyone looking to add a personal touch to their jeans.
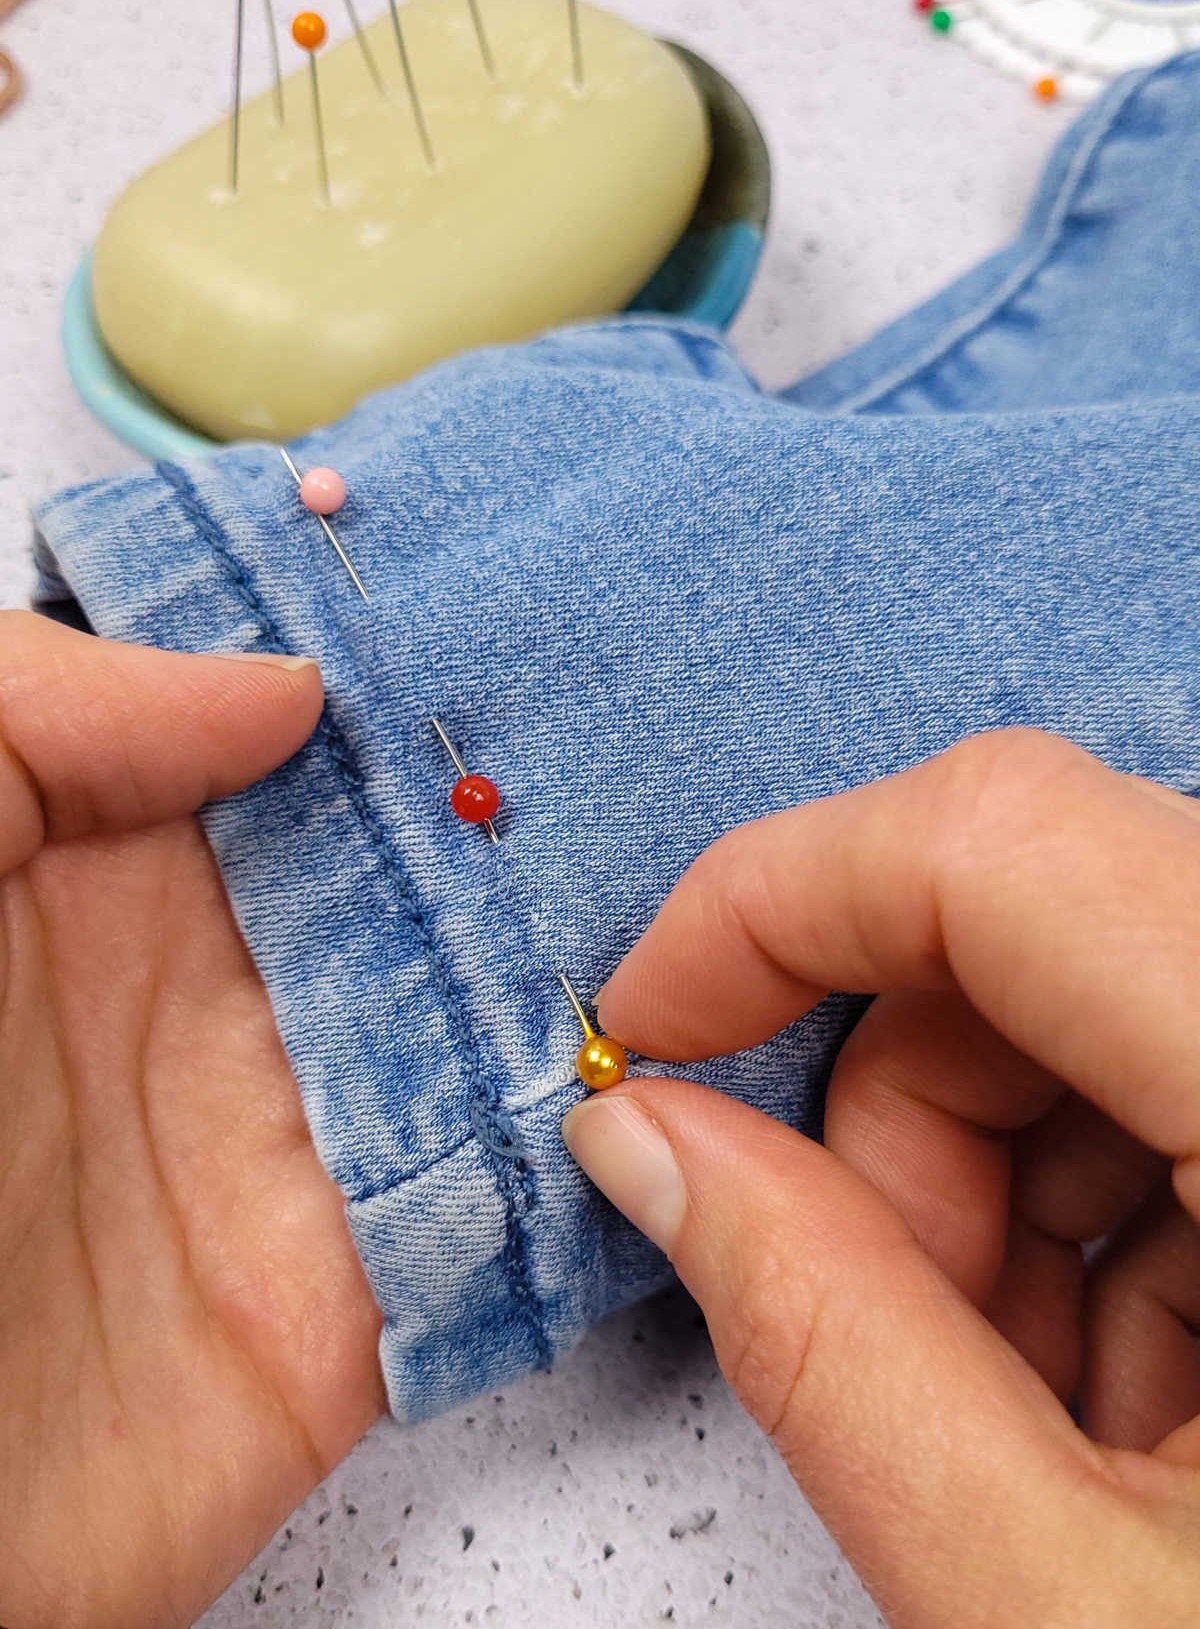
Turn T-Shirt into a V-neck
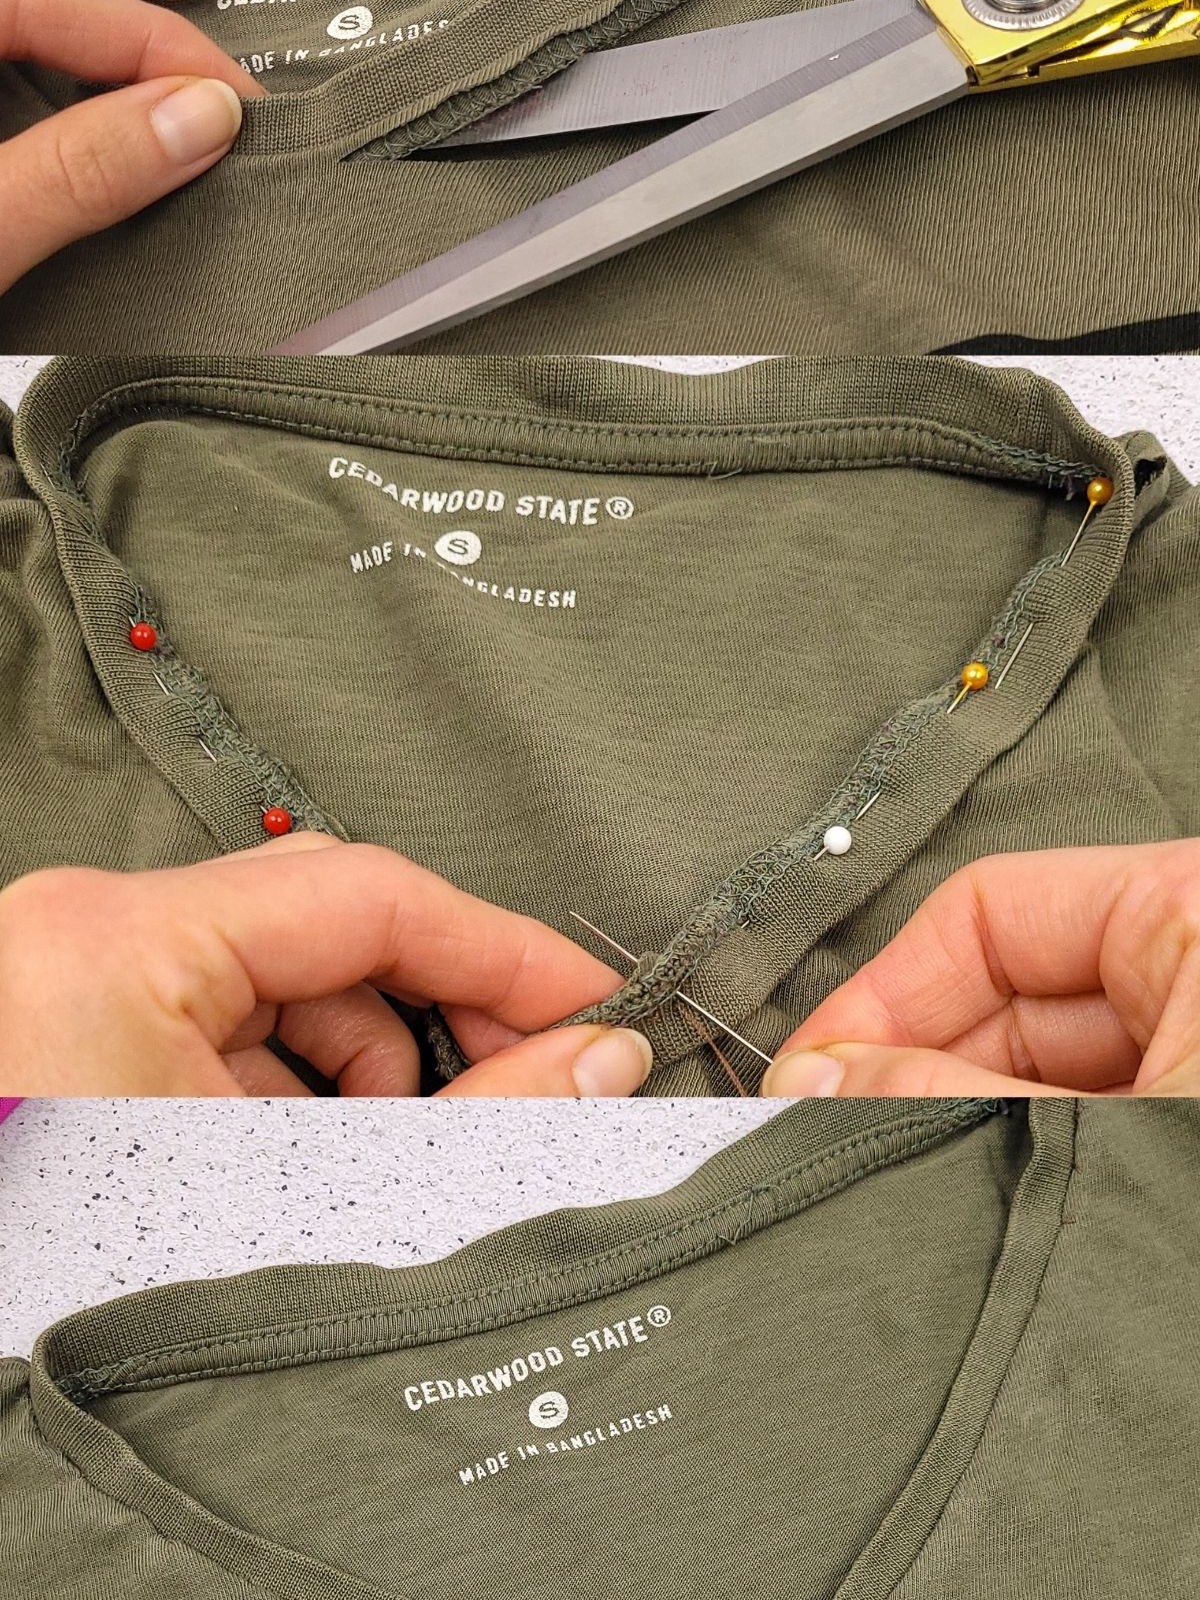
Transforming your old T-shirts from mere closet dwellers to stylish statement pieces is not only a great way to upcycle but also to hone your sewing skills. One clever hack involves transforming a plain round neck T-shirt into a chic v-neck design. To achieve this, you’ll need just a few trusty sewing pins to keep the neckline in place as you sew. Begin by gently pulling the neckline back about an inch to create a rough V-shape, then fold it over and press it flat with your iron.
Next, insert a few pins into the folded edge to hold everything in place. Finally, simply sew along the neckline to complete the transformation, revealing a fresh new v-neck T-shirt that’s sure to earn you some style points.
Patch Big Holes in Your Clothes
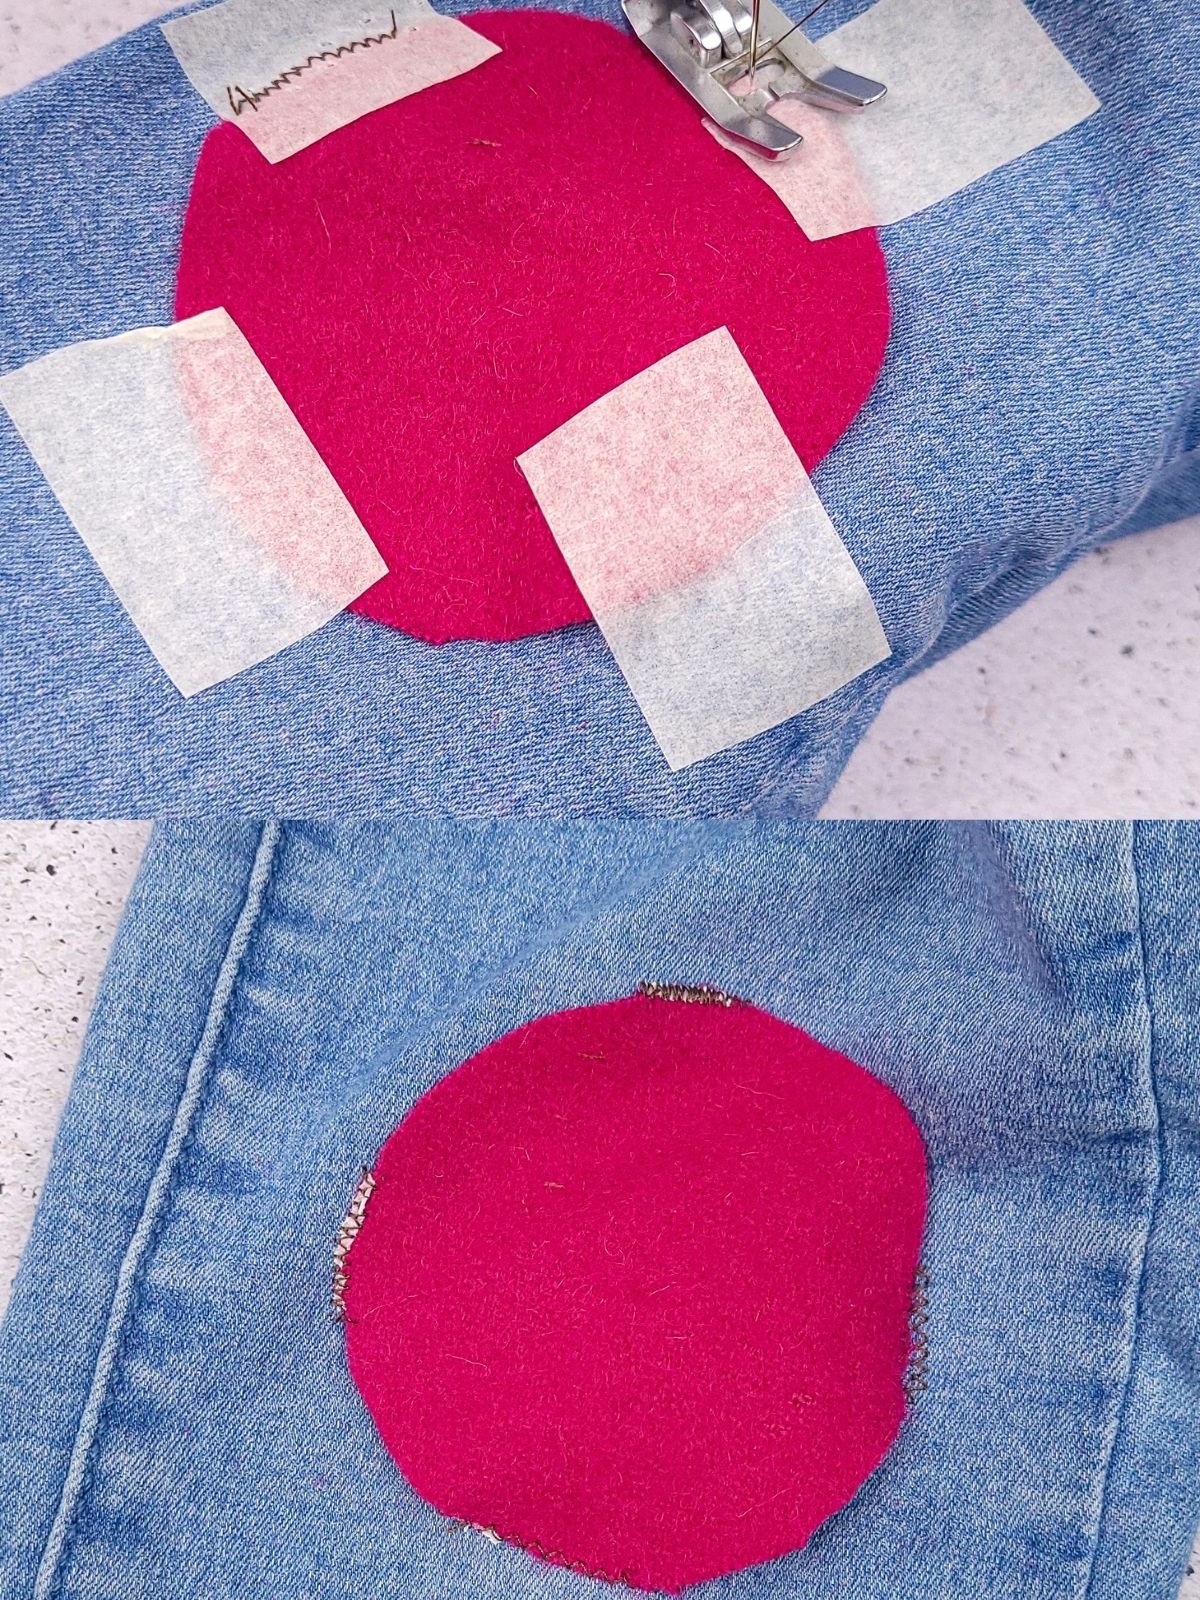
When holes in our clothes are too large to be masked with a decorative touch, traditional patching becomes the best solution. While sewing on a flower-shaped patch might not be suitable for massive tears, incorporating a functional repair can still add an element of personality and flair. By selecting patches or repurposing leftover fabric from past projects, we can introduce new colors, textures, and designs to our garments, breathing fresh life into what was once worn-out attire.