Rock painting – a nostalgic activity that brings joy to people of all ages! Who can forget the excitement of searching for the perfect rock to paint and then bringing it to life with vibrant colors? As an adult, I still get a thrill from this activity. It’s not just about creating something beautiful; it’s also about connecting with nature and exercising your creativity. The process of selecting the right rock is half the fun!
Whether you’re painting a potato or a spider, the type of rock you choose can greatly impact the final result. By opting for a pitted rock for a potato-themed piece or a flat, wide rock for a spider design, you can add an extra layer of realism to your artwork. If you’re ready to unleash your inner artist and get creative with rock painting, I’ve got some inspiration to share!
From cute and playful designs to more intricate and detailed pieces, there are countless ways to express yourself through this hobby. So, what are you waiting for? Grab those rocks and get started!
DIY Rock Photo Holders
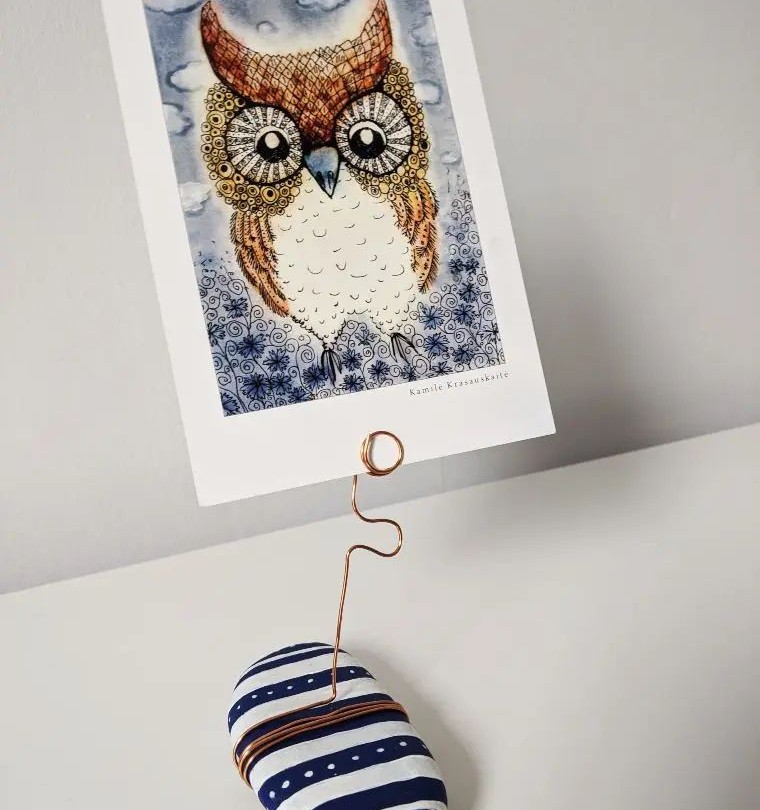
What’s truly special about these rock photo holders is that they combine two creative projects into one. Not only do you get to unleash your artistic side by painting rocks, but you can also transform them into functional photo displays. To create the latter, you’ll need some sturdy wire, like copper wire, which you can shape into coils with a sufficient opening at the top for slipping in a photo.
This unique DIY project has the potential to be both a showstopper at social gatherings and a thoughtful take-away for your guests.
Flower Painted Rocks
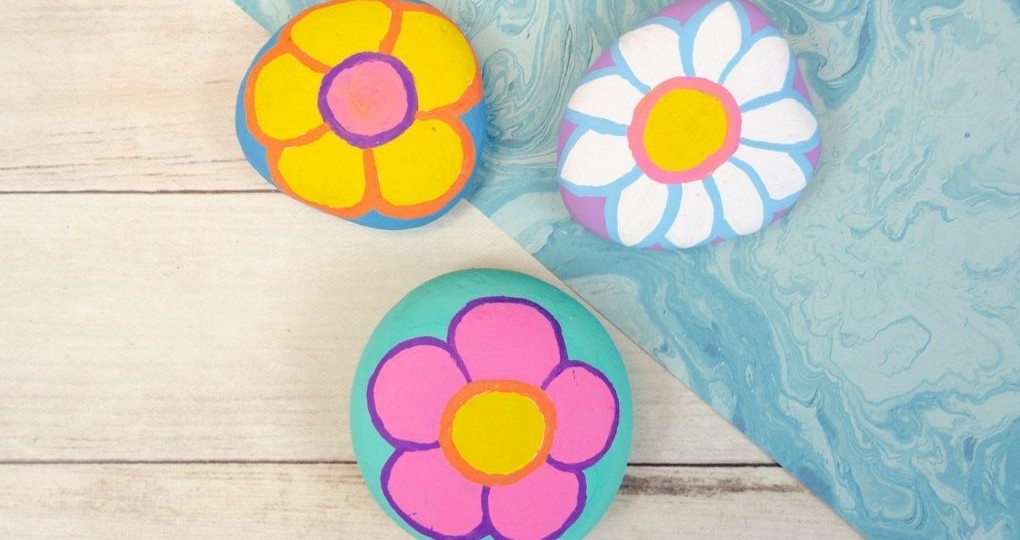
Contrasting elements often lead to intriguing outcomes. Take the juxtaposition of rocks and flowers, for instance. While rocks embody hardness and rigidity, flowers exemplify delicacy and fragility. This dichotomy sparks curiosity, as if asking us to challenge our assumptions. And that’s exactly what we’re going to do! By combining the two, we can create something entirely new. Let’s break out the paintbrushes and vibrant colors, then bring those beautiful blooms to life on a rock canvas.
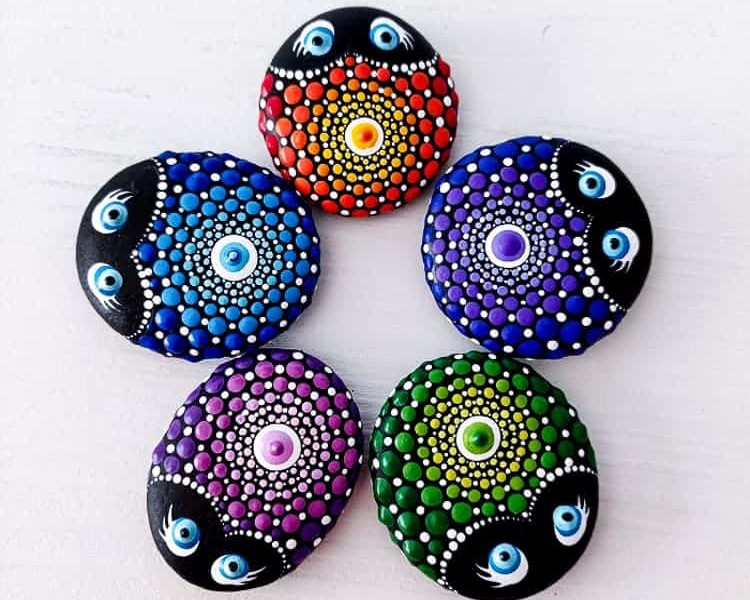
DIY Dot Painting
The phenomenon of dot-painting has gained immense popularity over the past few years, and it’s easy to see why. There’s something undeniably therapeutic about creating intricate patterns with dots, reminiscent of mandalas. The process is not only soothing but also enjoyable, making it a great way to unwind. To get started, put on your favorite music – perhaps some upbeat rock tunes? – and begin painting those rocks.
If you’re feeling adventurous, consider investing in a dot-painting kit for added fun. You can find one at the link provided.
Autumn Leaf Painting

As the seasons transition into fall, I find myself captivated by the vibrant hues that blanket the landscape – fiery reds, radiant oranges, and muted golds. The way leaves rustle in the gentle breeze, their intricate patterns shifting with each whisper of wind, is nothing short of mesmerizing. It’s as if nature is painting a masterpiece, one leaf at a time. And yet, I crave something more permanent, a way to freeze this fleeting beauty in stone.
That’s when it hit me – why not paint leaves with leaves? Gather your favorite specimens from the backyard and get creative. If you’re feeling extra generous, use some of those same leaves to craft a one-of-a-kind DIY leaf candle holder that will warm up any room.
Mix and Match Stone Snowmen
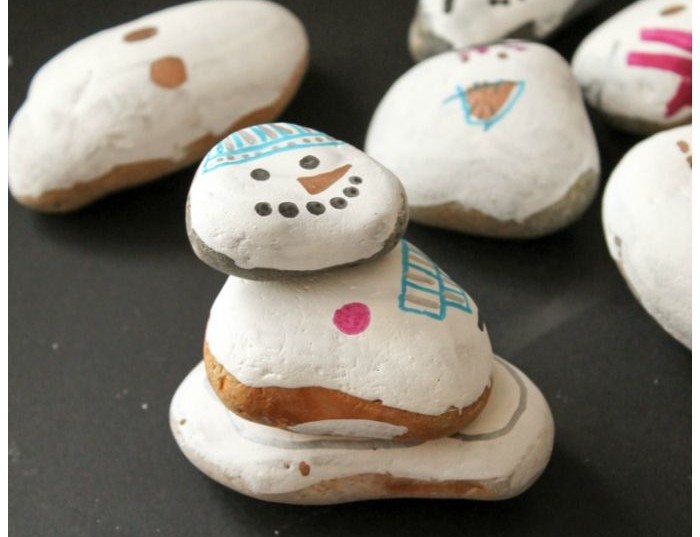
There’s something undeniably charming about creating unique snowmen through mixing and matching different patterns and designs. This project offers a world of possibilities, allowing you to craft happy, grumpy, tall, stout, or even four-tiered snowmen – the only limit is your imagination! The versatility of this activity makes it an excellent fit for toddlers and younger kids, but let’s be honest, adults can have fun with it too.
For a Halloween twist, check out these 27 easy crafts for toddlers!
Buzzing Bee Painted Rocks
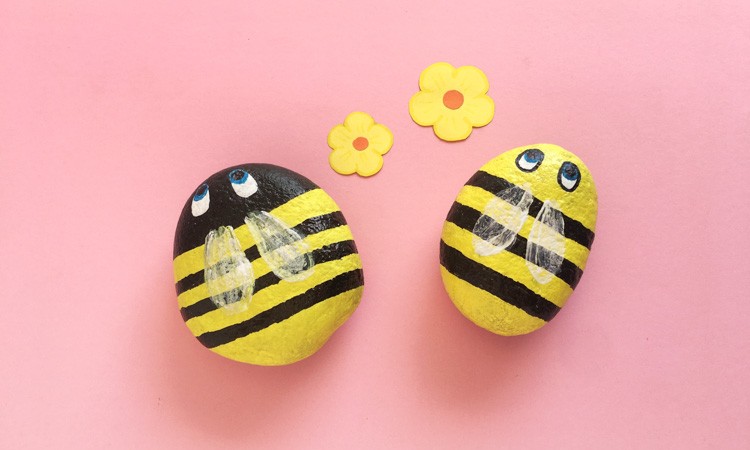
When it comes to recreating bees with a creative twist, rocks are an unexpected yet perfect medium. Look for rounded and smooth pebbles that can serve as a canvas for your artistic endeavors.
The curvaceous nature of both rocks and bees makes them ideal subjects for painting. You can have hours of fun painting yellow and black stripes onto the rocks with your little ones.
This activity not only provides an entertaining way to spend quality time together but also fosters creativity and fine motor skills in children.
To complete the bee’s appearance, don’t forget to add a touch of white paint or use a white paint pen to create the wings. You can find suitable painting supplies at your local craft store.
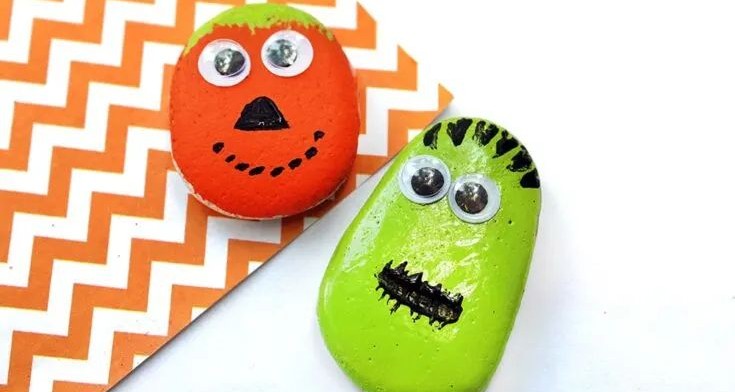
Painted Frankenstein Craft
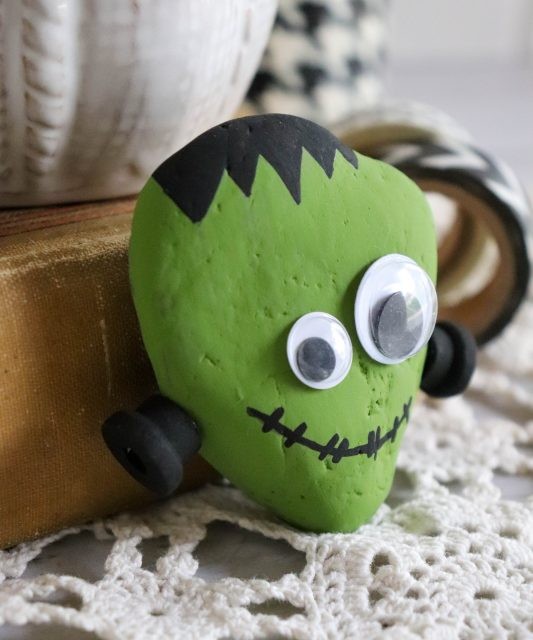
As Halloween approaches, I’m sure your household is buzzing with excitement for the spooky season. Your little ones are likely eager to get creative with some festive craft projects and decorations. One activity that’s sure to delight them is painting Frankenstein monsters on rocks! This charming project takes a classic character and adds a delightful twist by using googly eyes instead of plain features.
To add an extra layer of dimensionality, you can also cut a small wooden spool in half and attach it to the sides of the rock, creating a 3D effect that’s sure to impress. For more fun and creative ideas like this one, be sure to check out our collection of kid-friendly crafts.
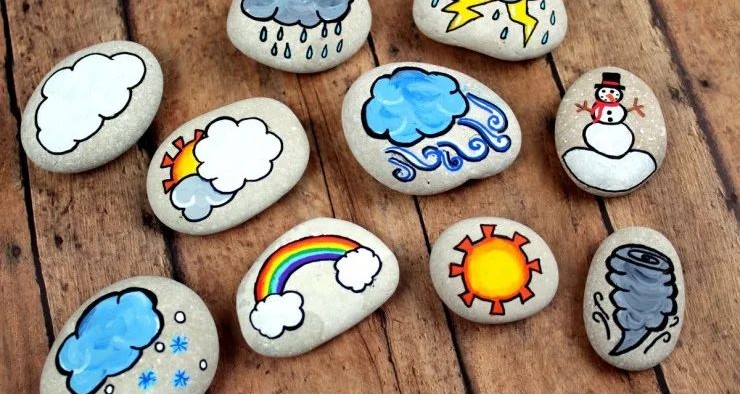
Weather Story Stones
Rainbow Mix And Match Rocks
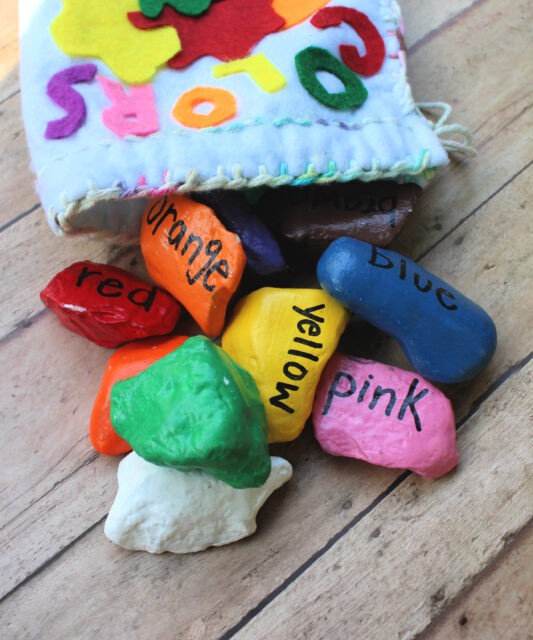
When it comes to learning experiences, rock painting offers a unique opportunity to introduce children to the world of colors. A fun and interactive way to do this is through a mix-and-match game, where they can become familiar with different hues. As kids grow older, you can also teach them the art of color mixing. For instance, combining blue and yellow stones yields a beautiful shade of green.
By experimenting with various combinations, your children can develop their problem-solving skills and gain a deeper understanding of how colors interact. To explore more summer craft ideas that encourage learning and creativity, be sure to check out our additional resources.
Angry Birds
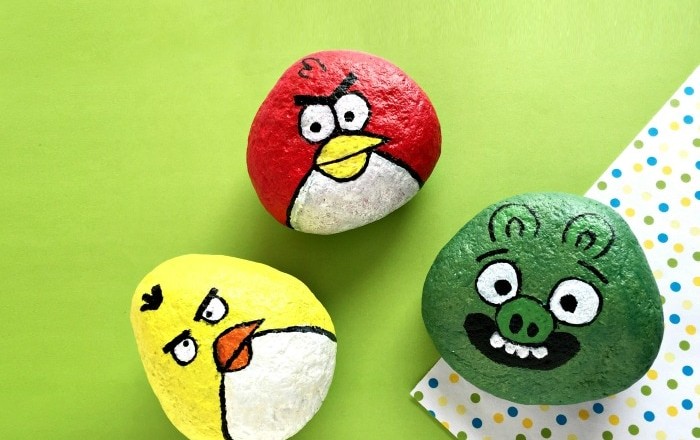
As we fondly recall the thrill of catapulting those feisty fowl in the classic game, it’s hard not to chuckle at the irony of painting angry birds onto stones – with no chance of launching them, of course. But, let’s get creative! For this project, you’ll need a few essential supplies: black permanent markers, a sealer, acrylic paint, and some good brushes. Once you’ve got your materials ready, it’s time to choose the perfect stone for each Angry Bird design.
Finally, simply paint away and voila – you’re all set!
Forky Painted Rocks
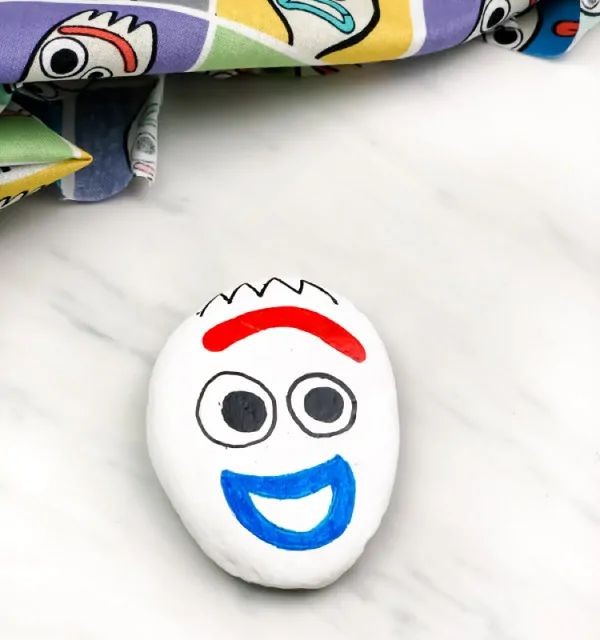
Before diving into the creative process, start by preparing your materials. Grab a sufficient number of flat rocks and cover them in white acrylic paint, applying at least three to four coats, allowing each layer to dry completely before moving forward. This will provide a smooth base for your artistic endeavors.
While you’re at it, feel free to get creative with paint pens as well.
These versatile tools can help you achieve greater precision and skill when bringing your Forky designs to life.
As a precautionary measure, consider laying out a generous amount of newspapers to catch any stray drips or spills, ensuring a mess-free experience for all involved.
Hot Rocks
Working with hot rock craft is an unexpectedly delightful experience. The process itself is straightforward: simply heat up the rocks in an oven, and then use melted crayons to bring your artistic vision to life. As the waxen crayon marks melt into vibrant colors on the heated surface, you’ll find yourself fully absorbed in the activity – a perfect blend of creativity and fun.
Zombie Halloween Painted Rocks
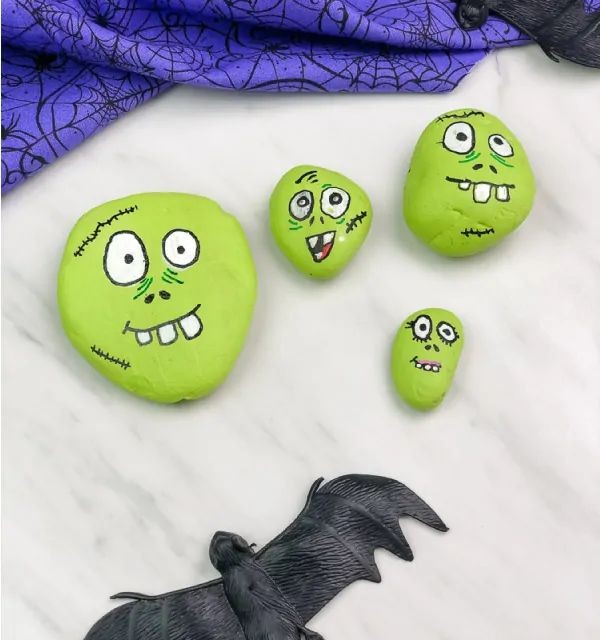
As your kiddos settle in for a spook-tacular Halloween-themed crafting session, why not start by setting them up with some tasty treats to fuel their creativity? Offer a plate of cookies, a glass of lemonade, or a bowl of popcorn to munch on while they get creative. Then, bring out the rocks and painting supplies! Let them unleash their inner artist and paint their own unique Halloween monsters and creatures.
With an endless array of creepy critters to choose from, your little ones can use markers or white paint pens to add fine details and make their designs truly stand out. If they love this craft, be sure to check out more DIY Halloween projects for kids here.
Glittery Galaxy Rocks
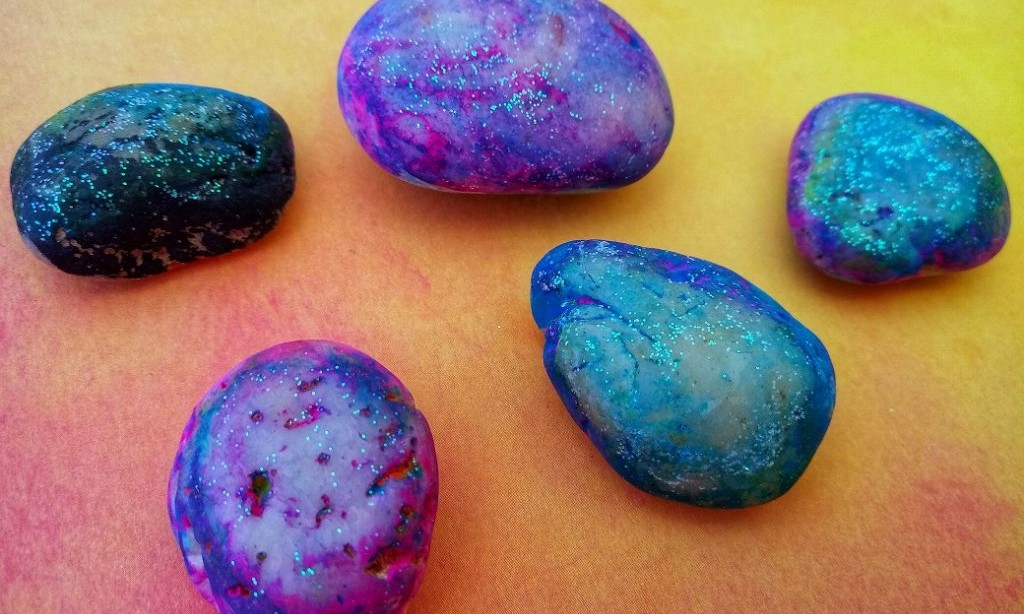
I’ve always been captivated by the allure of sparkly galaxy rocks, a fascination that doesn’t seem to fade with time. Perhaps it’s because space offers an endless array of inspiration and creative possibilities for rock art. With galaxy rocks, the sky is truly the limit – or rather, the cosmos is the limit – when it comes to experimenting with color combinations and patterns. The beauty of this medium lies in its unbridled freedom, allowing you to let your imagination run wild.
To get started, gather some glitter glue, parchment paper, and a clear acrylic varnish spray for an out-of-this-world creative experience.
Toy Story Alien Rock Painting
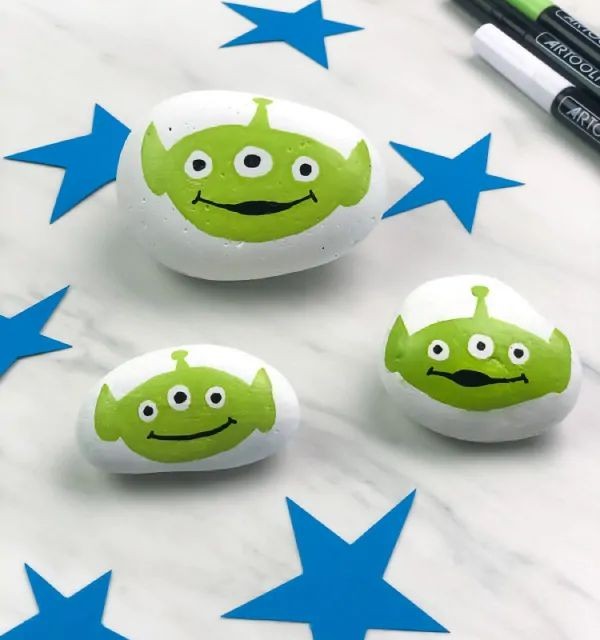
The 1995 film Toy Story was an unconventional cinematic experience, blending seemingly normal toys with extraterrestrial dolls, incomplete ones, and more. This unique fusion of characters makes it an excellent source of inspiration for creative projects like rock-painting. Specifically, this exercise involves painting the adorable three-eyed baby aliens that appeared in the movie. Take a moment to revisit these endearing characters before embarking on this project.
Kindness Rocks

Crafting with children is more than just a fun activity – it’s a valuable learning experience. Take, for instance, painted kindness rocks adorned with uplifting quotes and affirmations promoting kindness and compassion. This humble yet powerful medium allows kids to absorb crucial life lessons about the importance of spreading positivity.
Not only does this endeavor teach youngsters about the value of empathy, but it also encourages them to spread kindness wherever they go – whether intentionally or unintentionally. The added bonus? If someone is being unkind, a discreetly placed kindness rock can prompt a change in their behavior. This clever project isn’t just for kids; adults too can participate and reap its rewards.
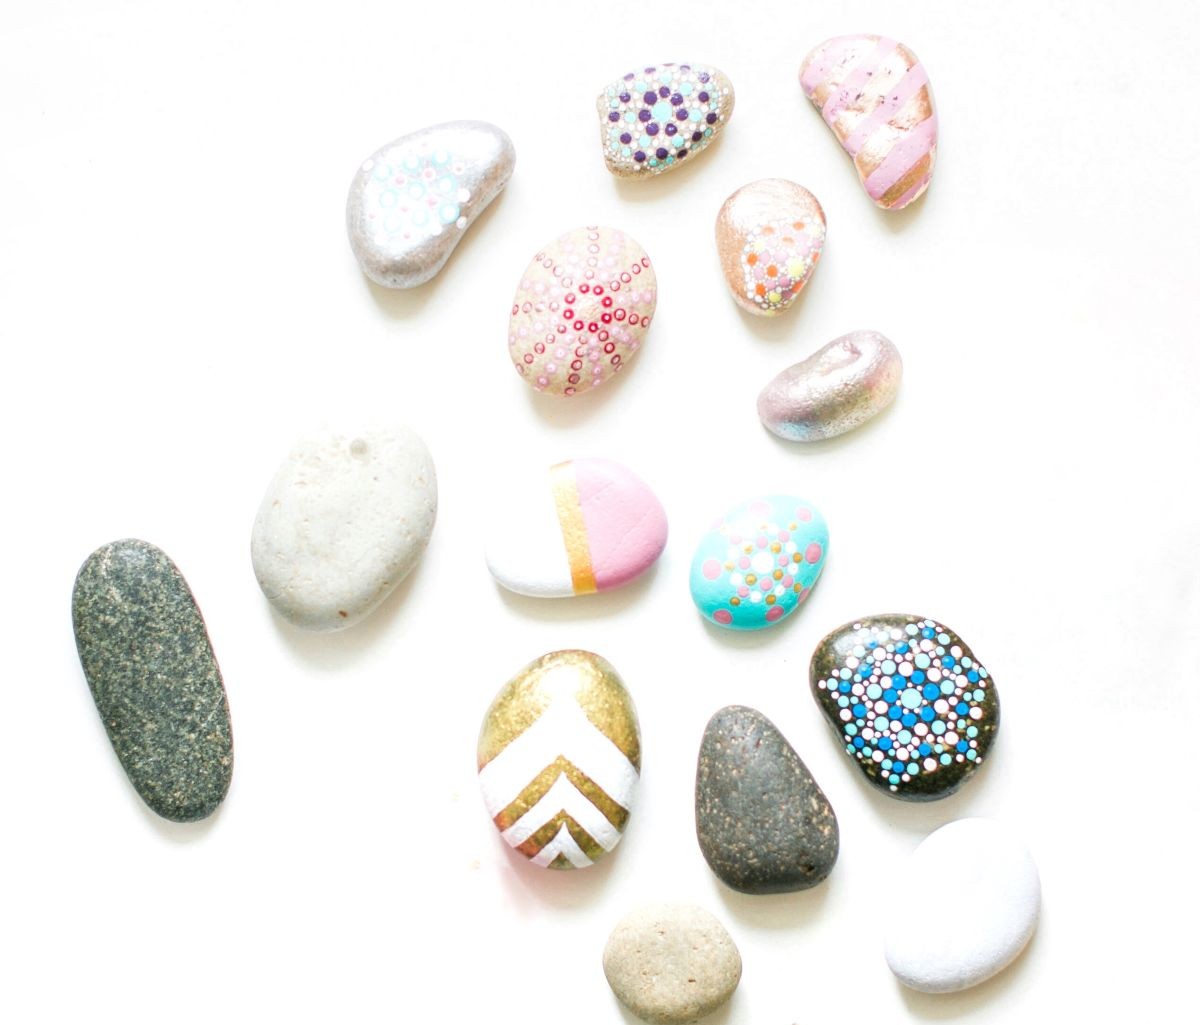
Marbled Rocks
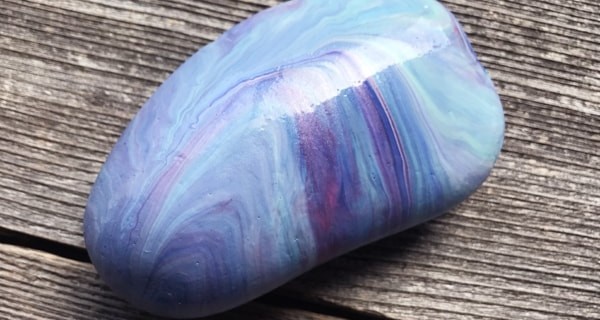
When it comes to rock painting, I’m particularly fond of the marble-finish effect. It’s sleek, sophisticated, and surprisingly straightforward to achieve. The key is to master one of three techniques: tilted, swirled, or dipped. Each method has its own unique characteristics, so take your pick – you can always experiment with all three. Depending on the approach you choose, you’ll need a specific set of supplies.
Once you’ve completed your masterpiece, don’t forget to add a layer of acrylic spray sealer to seal in that paint and make it long-lasting.
Flower Painted Rocks
While the previous flower-painted rock project was delightful, it did have a slightly more playful tone to it. In contrast, these rocks have a more understated elegance that evokes the beauty of cherry blossoms, daffodils, and daisies. If you’re looking for ways to add some depth and interest to your painting, try using slanted brushes – they can make all the difference in creating a more dynamic design.
For this project, I recommend reaching for the specialized rock-painting brushes that will give you the precise control you need to bring these delicate blooms to life.
Butterfly Rock
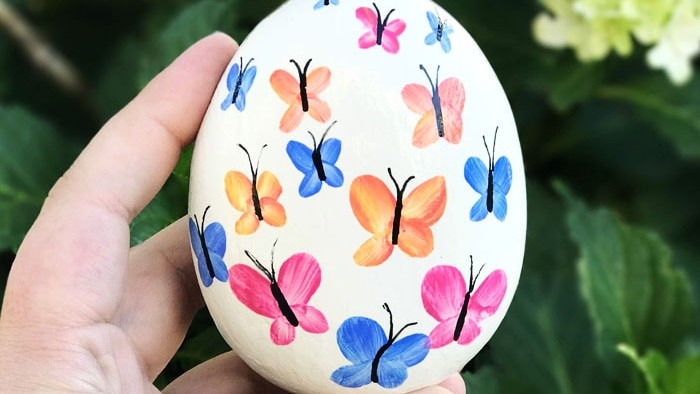
The beauty of this rock is truly captivating, its smooth edges evoking a sense of serenity reminiscent of an eggshell. The importance of selecting the right rock cannot be overstated, particularly when working with delicate butterfly-painted designs like this one. To achieve optimal results, it’s crucial to choose only the finest rocks available.
Prior preparation is also key; practicing watercolor techniques beforehand will significantly enhance your ability to paint the butterflies with precision and finesse.
Sheep Painted Rocks
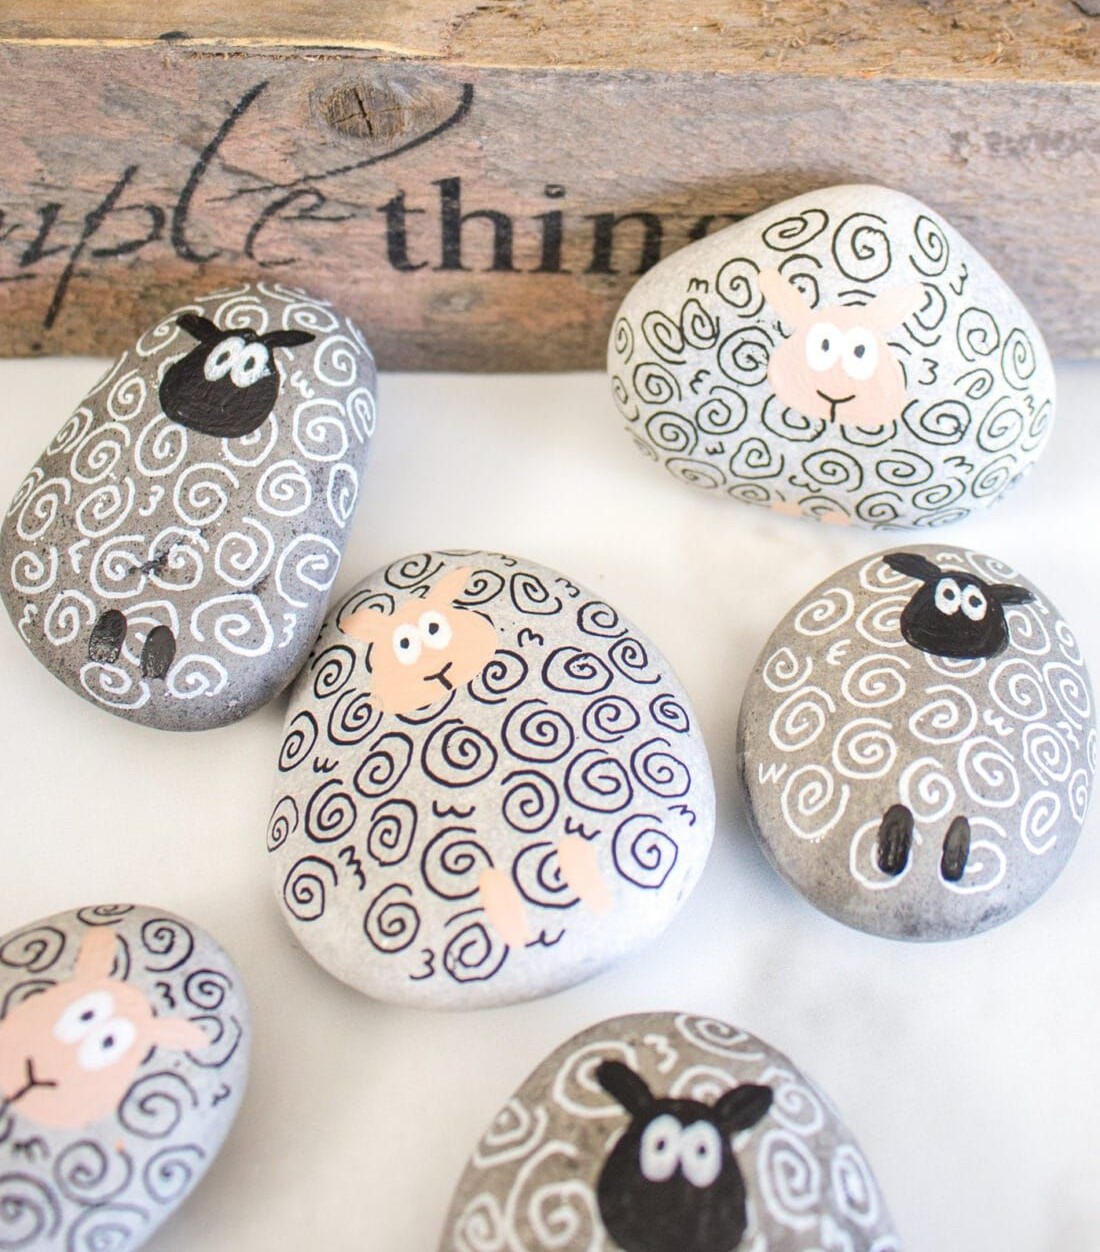
Meet the irresistibly charming sheep in question – they’re far from your average grazing companions. Their unique appeal lies in their delightfully whimsical nature, characterized by curly wool that’s just begging to be decorated with colorful markers. Before getting creative, ensure your chosen rocks are meticulously clean, dry, and free of any rough edges.
To give them a subtle, weathered appearance, apply a thin layer of watered-down black paint, then gently wipe away any excess with a paper towel. This will help achieve the coveted ‘washed-out’ look. With your base coat complete, it’s time to bring those curly lines to life! When crafting the sheep’s facial features, aim for understated yet endearing – after all, we want our finished product to be charmingly rustic, not cartoonish.
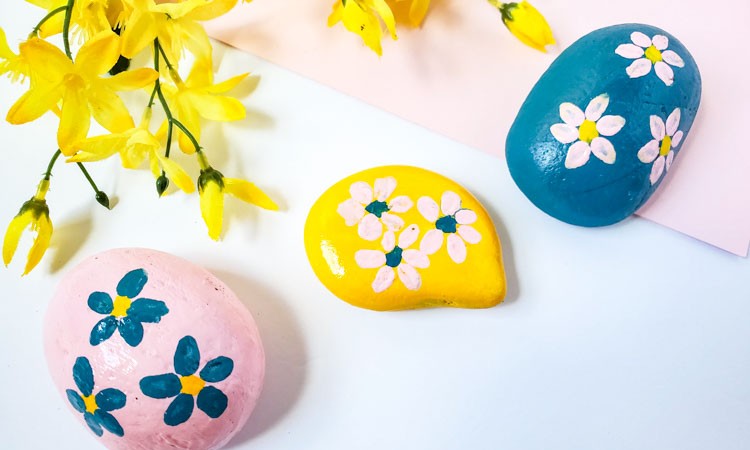
Spring Floral Painted Rocks
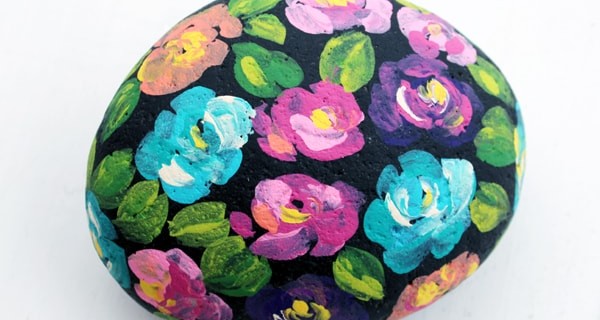
The vibrant colors of these rocks are truly captivating – a kaleidoscope of blues, pinks, purples, and yellows that demand attention. One can’t help but wonder what would happen if we added an extra layer of pop with neon paint from our collection? The flowers would likely take on an even more striking appearance, and the overall effect would be nothing short of breathtaking.
Believe it or not, recreating this stunning display is remarkably easy, even for those new to painting.
With a round brush in hand, anyone can achieve professional-looking results. Remember that slanted tip brush we discussed earlier? For this project, we’ll need something entirely different – a round paintbrush from our inventory.
If you’re eager to explore more budget-friendly creative endeavors like this one, I recommend checking out our curated list of Dollar Store crafts.
Painted Rock Chicks
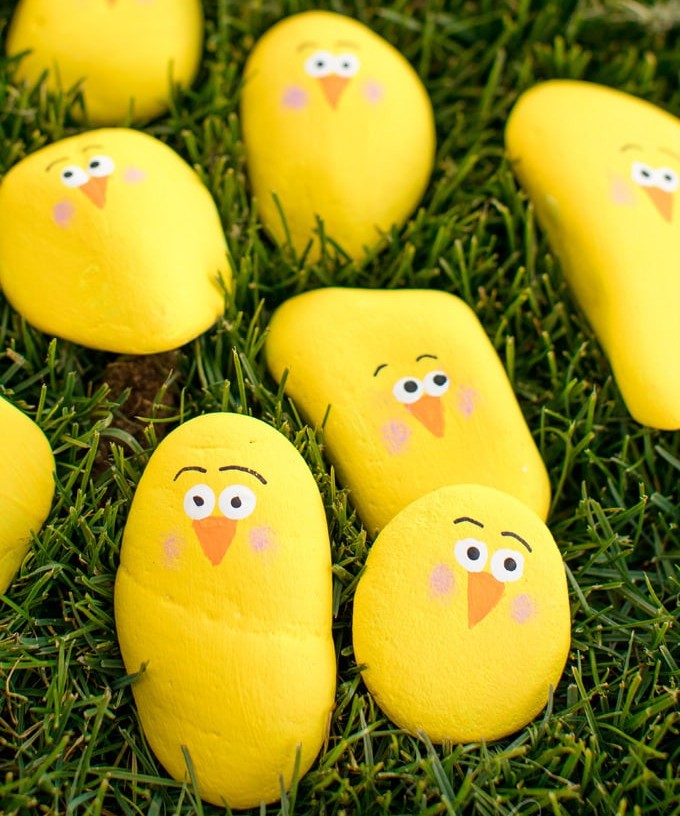
While I may have gotten your hopes up for a chance to paint iconic female musicians like Adele or Pink on rocks, I’m afraid we’re actually going to be focusing on an altogether different kind of rock chick. Yes, you guessed it – baby chicks! These tiny birds are sure to bring a smile to your face and add a pop of color to any room they inhabit. The vibrant shade of yellow is particularly eye-catching, don’t you agree?
If you’re interested in recreating this look for yourself, you can pick up a bottle of bright yellow paint at your local art supply store. When it comes to adding the finishing touches to your rock chicks, consider brushing on just the faintest hint of pink around their beaks. This subtle touch will give them adorable rosy cheeks and really bring their features to life.
Ladybug Rock

As you’ve been eagerly awaiting the appearance of a ladybug on this list, I’m excited to introduce one! There’s something undeniably nostalgic about painting a ladybug or two (or dozen) onto a rock. For many of us, it’s an activity that evokes warm summer afternoons spent outdoors, creating art and making memories. If you’ve never experienced the joy of rock-painting ladybugs, now’s the perfect time to give it a try!
To get started, gather your supplies: acrylic paint in red and black, paintbrushes, newspapers, and some paper towels or napkins for good measure. As you begin to bring these charming insects to life, be prepared for things to get a bit messy – but that’s all part of the fun!
Painted Spider Rock
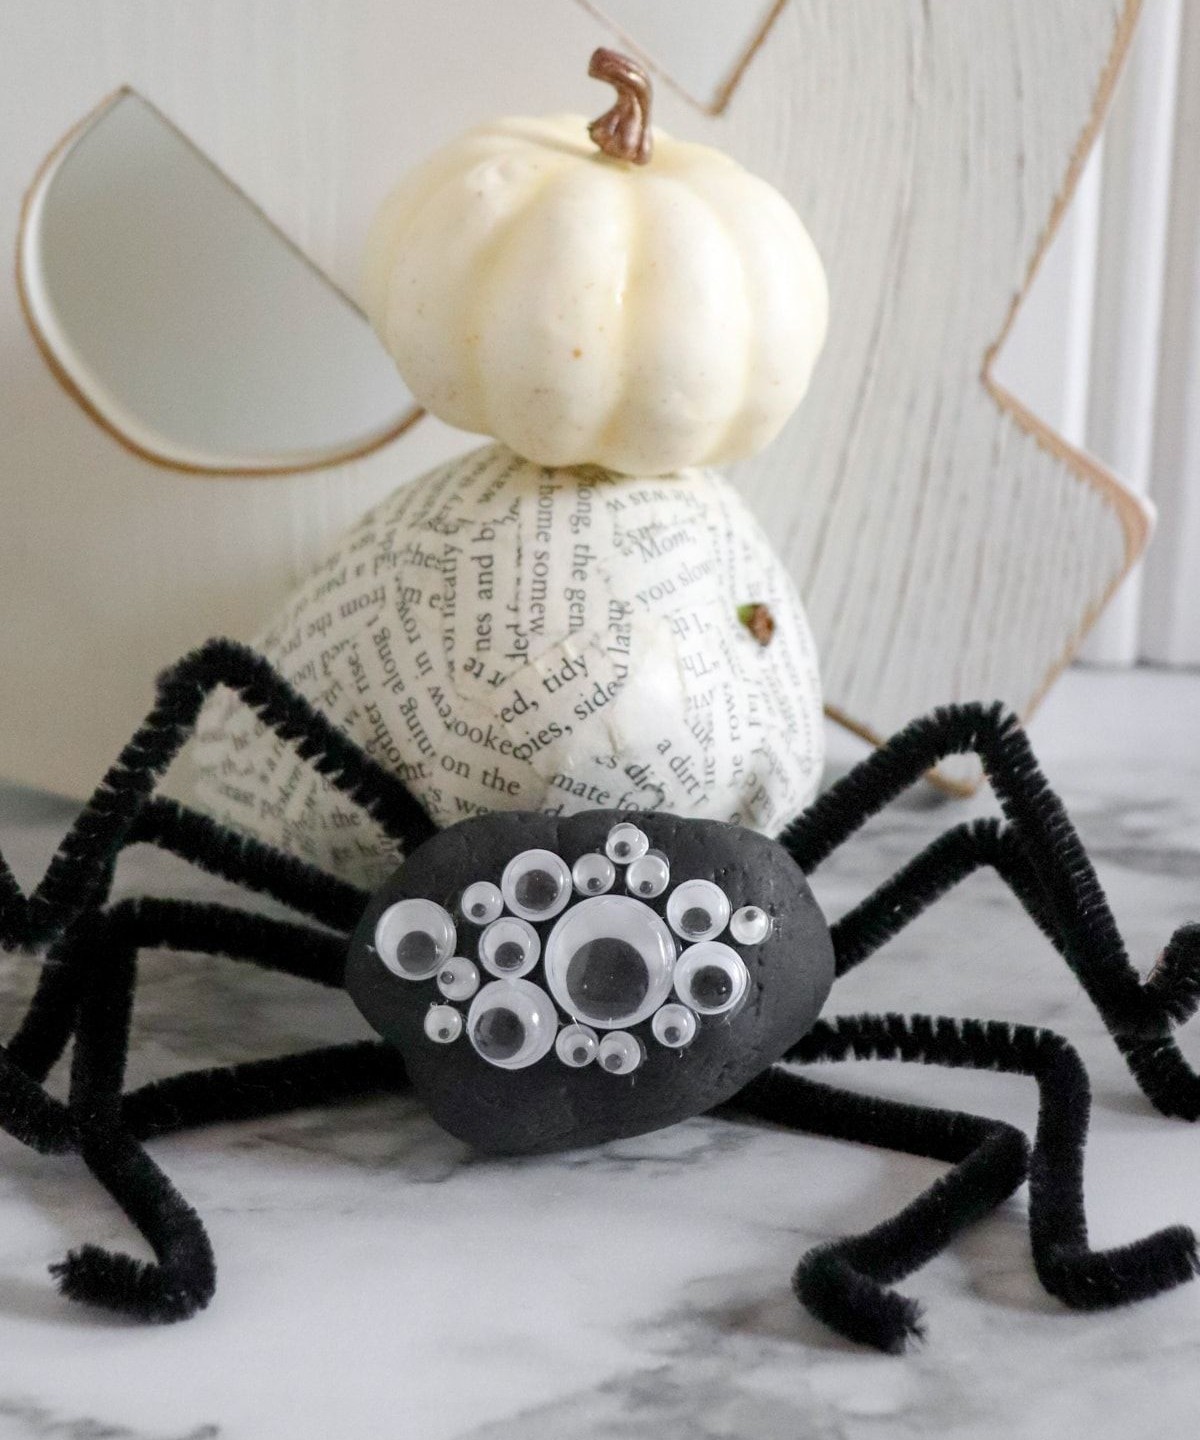
While spiders may not be the first creatures that come to mind when it comes to rock painting, they’re definitely a natural fit. In fact, they share a similar appeal to ladybugs and bees – all three are perfect subjects for your next rock-painting adventure. The key is finding the right rock, one with a flat surface and a wider middle section. Once you’ve got your base picked out, it’s time to add some personality. Grab a handful of googly eyes and attach them to the rock using glue.
For the legs, black pipe cleaners are an eerie and effective way to capture those long, spindly, hairy limbs. Even if you’re not typically fond of arachnids, it’s hard not to appreciate their unique charm. And who knows – you may just find yourself inspired by these eight-legged wonders. So why not take a look at some spider-themed crafts and see where the creativity takes you?
Rainbow Striped Rock Photo Holder
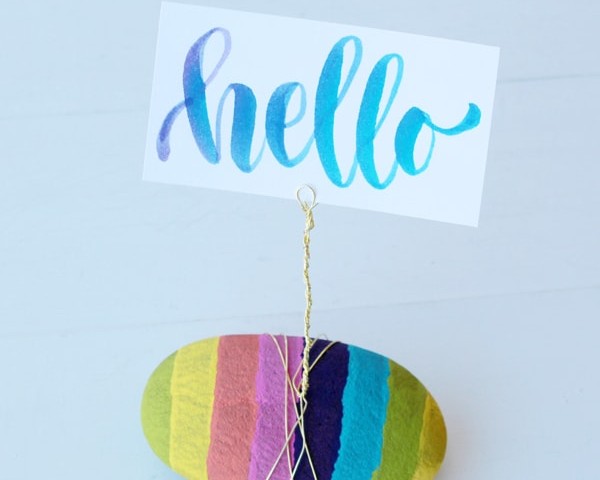
Here’s another creative idea for you: transforming a rock into a vibrant photo holder. The classic rainbow-striped design is always a winner – who can resist its charm? And what about using these photo holders as placeholders, too? Simply swap out the picture with a personalized name card, and voilà! You’ve got a unique solution for your next event or gathering.
Hand Painted Halloween Rocks
For those who have already explored a few Halloween-themed rock painting ideas, this one is particularly well-suited for younger kids. The simplicity of the design makes it an excellent choice for introducing children to the world of rock painting. With just a base coat and a few quick squiggles to create the mouth and nose, even the most novice young artists can join in on the fun.
What’s more, this design is not only easy to make but also gentle enough that it won’t scare off younger kids who might be hesitant about creating something too spooky. The addition of googly eyes takes things a step further, allowing you to tone down the monster factor altogether. If you’re looking for inspiration to keep the creative juices flowing, there are plenty more Halloween decorations to explore and draw from.
Fish Painted Rocks
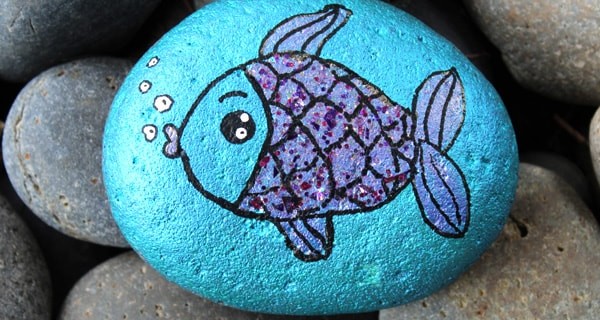
Consider incorporating a unique water feature, such as a small pond or birdbath, into your outdoor space. If you do, I have a creative project idea that can bring an extra touch of personality to the area: painted fish rocks. To make this craft work, you’ll need to use water-resistant paint specifically designed for rock painting. The vibrant colors will add a pop of fun to your little aquatic ecosystem, and you can even place them among the real fish just for a playful surprise.
Glittery Heart Rock Craft
To create your sparkly masterpieces, begin by meticulously cleaning and rinsing flat rocks, then carefully arrange them on a stable surface to air-dry. As they dry, prepare your workspace by laying down a layer or two of newspaper to protect your table from any stray glue or glitter. Once the rocks are ready, take out your art supplies and get creative! Start by sketching a few delicate hearts onto the rocks using a medium-toned writing instrument.
Next, apply a moderate amount of white glue to each heart, taking care to smooth out any excess at the edges. As you wait for the glue to set, it’s time to add the pièce de résistance: glitter! Don’t be shy – pour on as much sparkle as your heart desires. For added dimension and visual interest, consider combining plain white or clear glitter with pops of colorful glitter.
Mandala Ladybug
As we revisit our dot painting kit, let’s take on a new creative endeavor – crafting a mandala ladybug. To start, find a flat and smooth rock that will serve as the canvas for your masterpiece. Since dot painting requires a pristine surface to showcase its intricate patterns, select a stone with a flawless texture. Before diving into the design process, apply a base coat to the rock to provide a solid foundation for your art.
Baby Yoda Rock Art
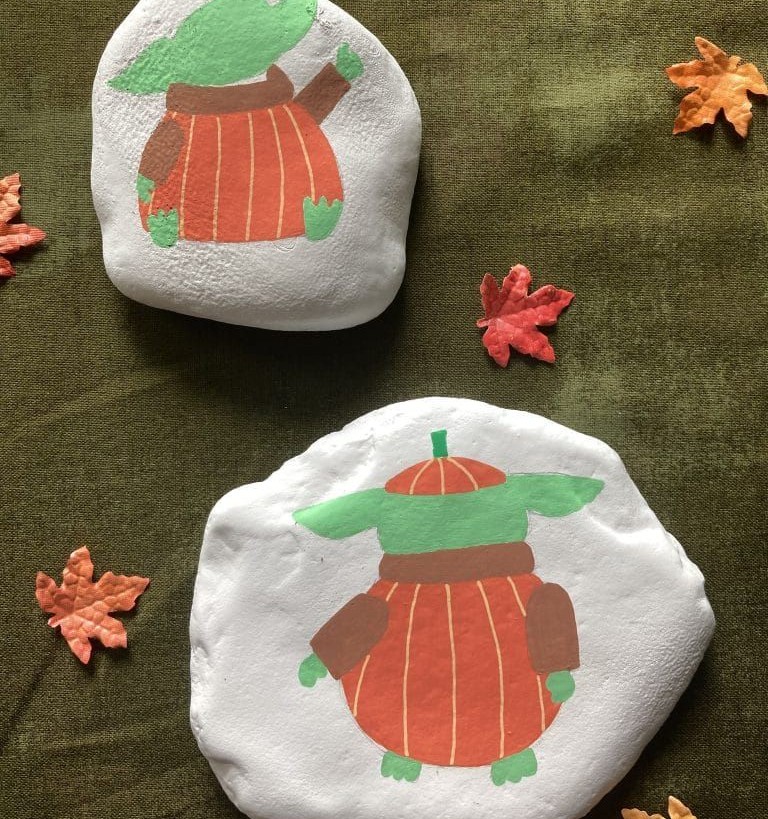
I’m completely smitten with Baby Yoda. Who wouldn’t adore the miniature version of wise old Yoda? His adorability is undeniable, making him a joy to work with, especially when it comes to creative projects like painting. The key to capturing his likeness lies in getting the shape of his head and ears just right. Once you’ve got that down, you’re almost there. But why stop at just a regular painting?
With Halloween just around the corner, I think it’s the perfect opportunity to give Baby Yoda a pumpkin-themed makeover. Imagine him donning a pumpkin costume, complete with a tiny pumpkin hat, and holding a trick-or-treat bucket filled with mini pumpkins. He’d be absolutely irresistible!
Halloween Ghost Rock Craft
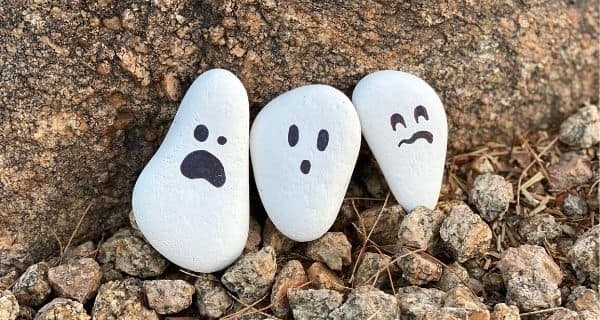
Transforming the ordinary into the extraordinary is what makes Halloween rock-painting so much fun. As you’ve conquered the monsters, ghouls, and creepy crawlies, it’s time to focus on the ethereal entities that add a touch of mystique to your Halloween decor: ghosts. The irregular shapes of odd stones or pebbles provide the perfect canvas for shaping your ghostly creations into whatever form you desire.
Once you’ve selected the ideal pebbles, apply at least two to three coats of white paint to create a smooth surface. Then, with a black permanent marker, bring your ghostly faces to life. Before you know it, you’ll have an impressive collection of at least a dozen ghosts to adorn your home and spread some spooky charm this Halloween.
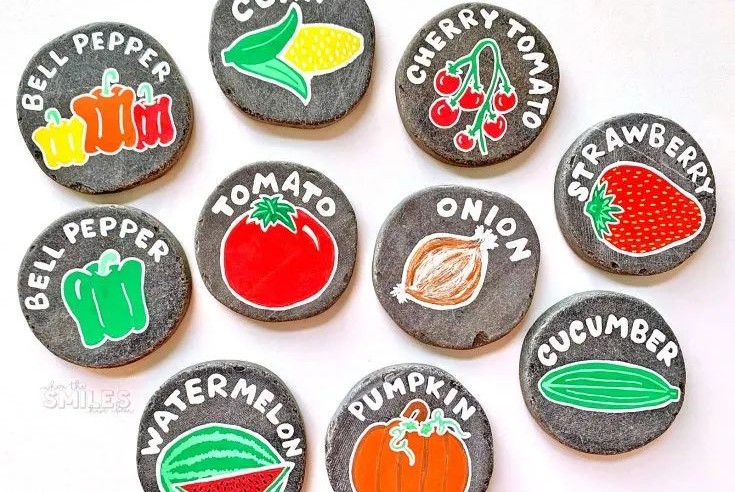
DIY Garden Rock Markers For Garden

In a lush outdoor garden, it’s essential to have a system in place for keeping track of what’s growing. While vegetable gardens are relatively easy to manage, flower gardens can quickly become overwhelming without some form of identification. To avoid confusion and ensure you’re nurturing your plants correctly, consider using painted rocks as labels. These natural markers will seamlessly blend into the garden surroundings. But why stop at simply labeling your crops?
Take it a step further by transforming the rocks themselves into representations of what you’re growing. Paint strawberry-shaped rocks, tomato-inspired stones, melon-patterned pebbles, and potato-themed pavers. This creative approach will not only make your garden more engaging but also provide an additional layer of fun and personalization.
Melted Crayon Rocks
Think back to that memorable heated rock painting experience. Now, let’s create something new and exciting! You know how kids tend to accumulate broken crayons over time? Instead of discarding them, we can breathe new life into this project. Preheat your oven and prepare the stones by heating them to the desired temperature. Once they’re ready, carefully remove them using oven mitts and place them on a paper plate. Next, grab a fragment of crayon and begin ‘painting’ the rocks.
As you apply gentle pressure, the wax will melt in harmony with the warmth of the stone, so be cautious not to burn your fingers.
Rock Garden Markers
When it comes to marking your gardens, there’s another way to do it without painting an entire rock into a veggie or fruit shape. Instead, you can paint the symbols onto the rocks themselves. This approach allows for greater flexibility and precision in identifying your plants. Additionally, using white paint or pens, you can spell out the names of your plants, making it even easier to keep track of what’s growing where.
Flat rocks with their smooth, rounded surfaces are ideal candidates for this type of marker. Their flat shape makes them resemble badges, perfect for labeling your garden’s various sections.
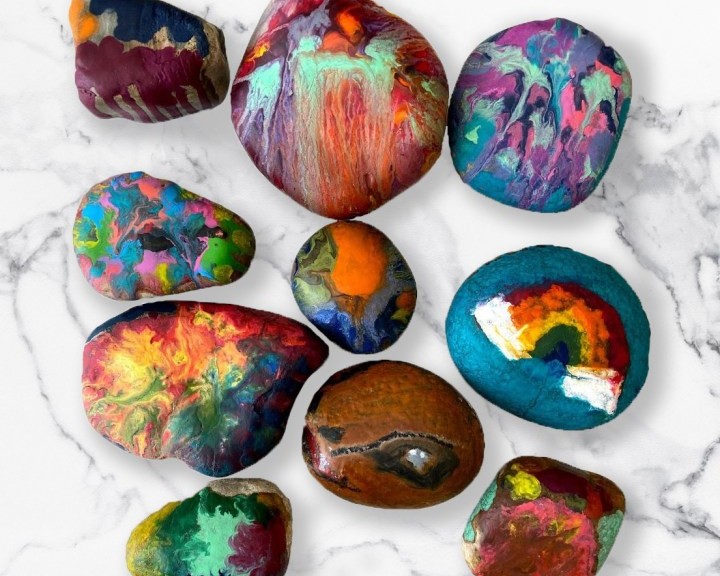
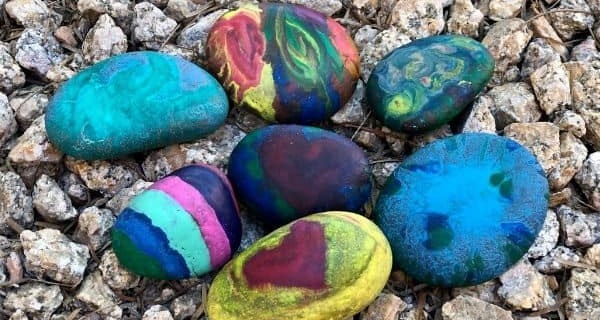
Rock Dip Painting
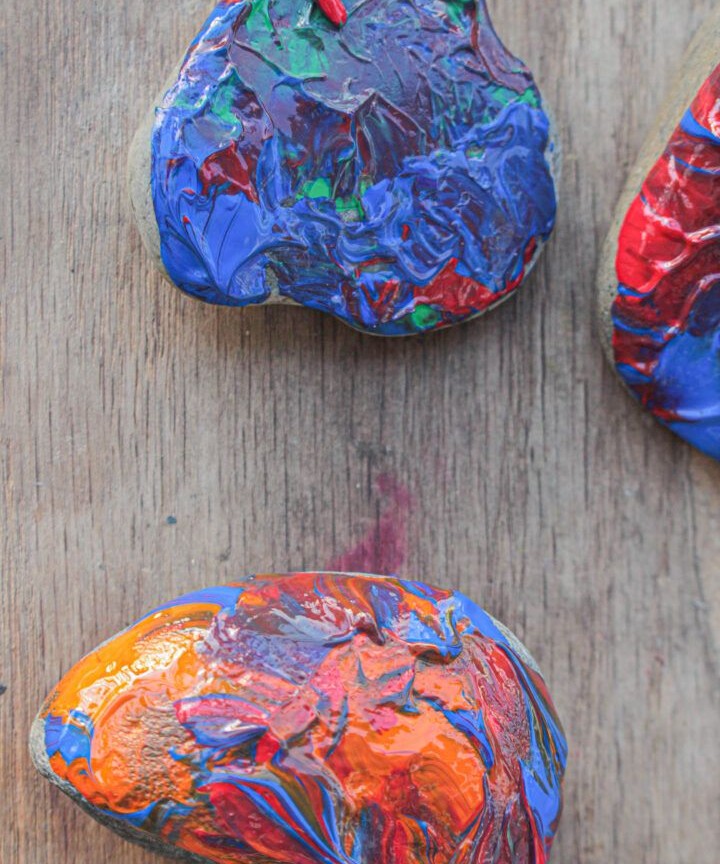
The art of ‘painting’ rocks is incredibly fulfilling, as it involves layering different colors of paint and swirling them together to create unique patterns. This process allows you to unleash your inner creative genius, much like Jackson Pollock or Van Gogh, by replicating the swirly textures found in their masterpieces. You can use a paper plate or plastic tray as a makeshift palette, allowing for easy color mixing and experimentation.
Once you’re satisfied with your design, place a flat rock on top of it and hold it in place for a brief moment before carefully lifting it off and placing it on a flat surface to dry. Be mindful not to smudge the pattern with a fingerprint during this process.
To add an extra layer of complexity and fluidity to your marbled design, you can incorporate a pouring medium into your artistic expression.
Additionally, these wooden skewers will prove useful in helping you swirl and mix the paint, allowing for even more dynamic patterns.
DIY Tic Tac Toe Travel Game
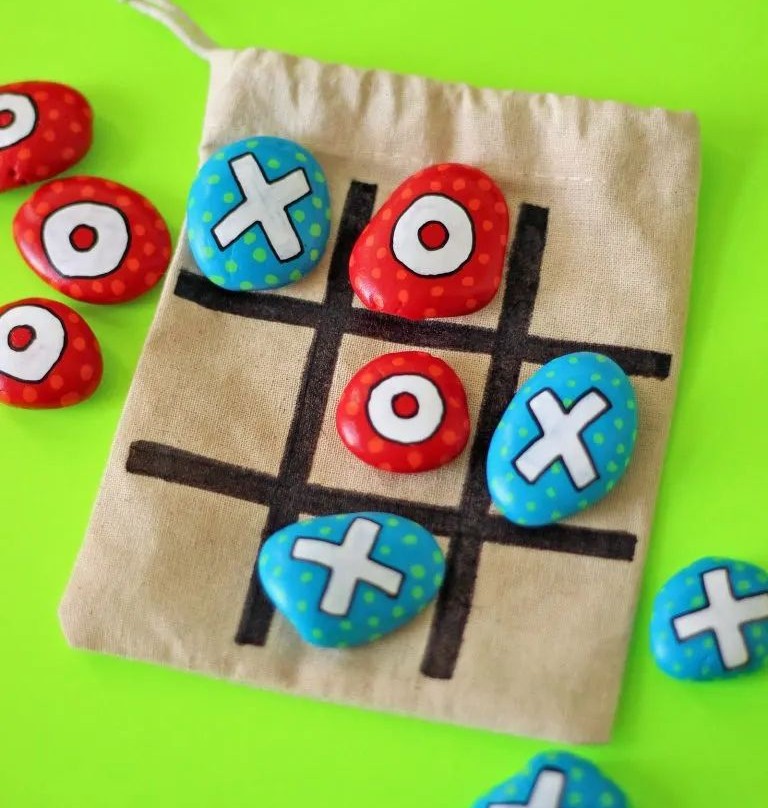
As we pause to admire this creative endeavor, I’m reminded of its sheer brilliance. Perhaps it’s even more impressive than the snowman mosaics on this list. To get started, grab a small canvas bag and convert it into your game board. Use a black Sharpie to create a grid with thick, visible lines. Once you’ve finished setting up the board, begin transforming the rocks into X’s and O’s using corresponding colors – red for X and blue or green for O.
Rainbow Colored Ladybugs
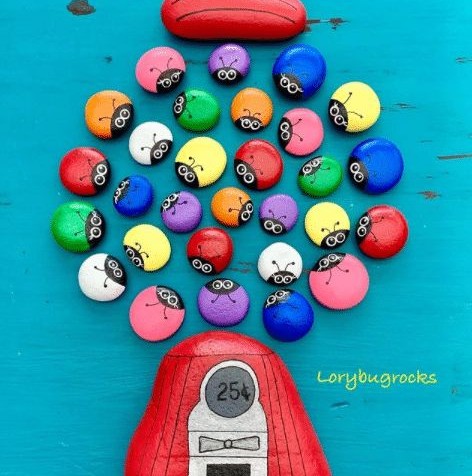
Who needs traditional norms when it comes to painting rocks? The creativity sky’s the limit! Why settle for classic red with black polka dots when you can unleash your imagination and create a purple ladybug with pink polka dots or go bold with a green and white square rock masterpiece? The world is indeed our oyster, and these rocks are simply waiting to be transformed into vibrant works of art.
So, let your colors shine and don’t worry about what others might think – after all, there’s no one-size-fits-all approach when it comes to crafting. Check out these 21 ladybug crafts for inspiration!
Star Wars Painted Rocks
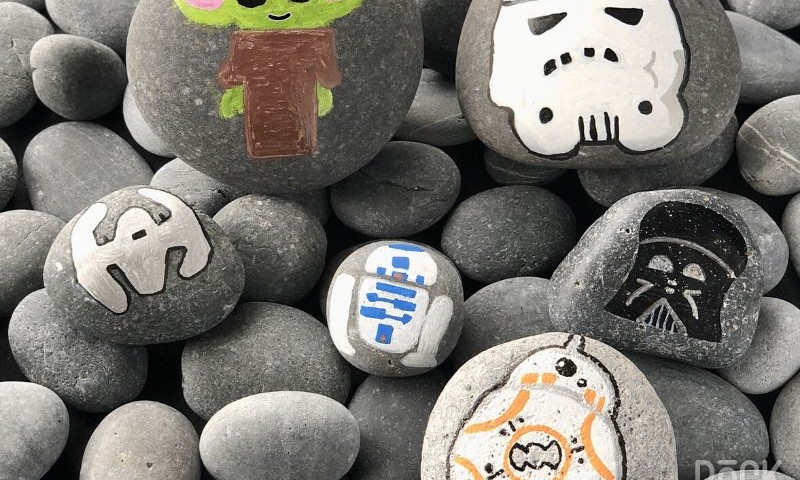
Want to grow your Baby Yoda rock painting collection? You can even create an entire series featuring Star Wars characters and beyond! For instance, adding the Enterprise from Star Trek could be a fun twist. If you have young children at home, there’s a good chance they’re obsessed with Star Wars – its timeless appeal has been known to bring out the kid in adults too.
To help you get started, follow these easy-to-follow step-by-step instructions and don’t worry if your drawing skills aren’t up to par; this project is designed to be accessible to everyone.
Painted Penguins
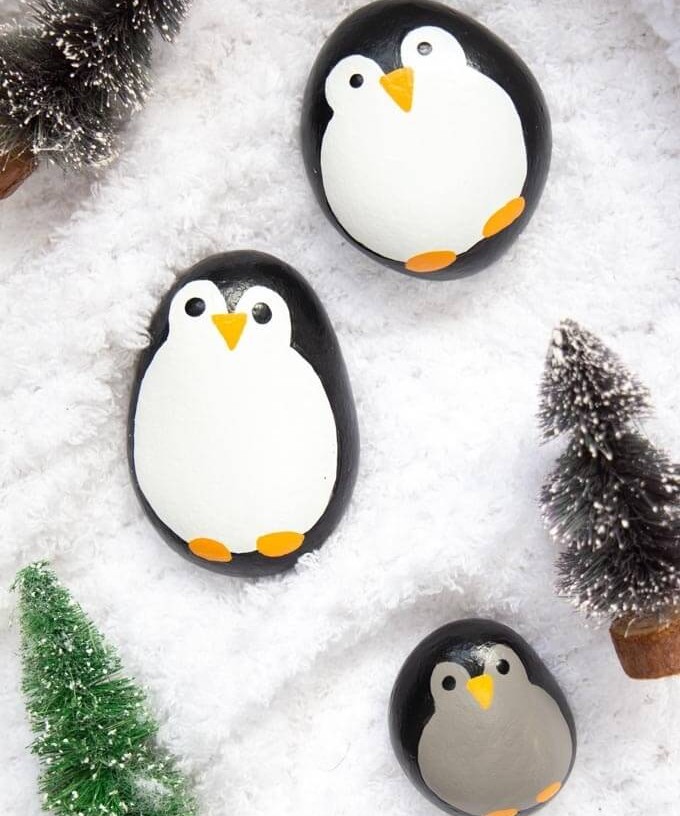
Penguins may be cute and cuddly, but they’re a species that’s full of quirks. Their unique characteristics have captivated many, and for good reason. Take, for instance, their mating rituals. It’s fascinating to learn that some penguins will spend days searching for the perfect pebble or rock to present to their mate. This peculiar trait is just one aspect that makes them so endearing. And did you know that you can even paint penguin designs onto rocks?
It’s a fun and creative way to express your admiration for these flightless birds. In fact, it’s not uncommon for penguins to spend hours preparing the perfect rock gift for their partner. It’s a testament to the importance they place on their relationships. If you’re as charmed by penguins as I am, be sure to check out some of the other creative crafts we have featured.
Camping Activity
Camping trips in our childhood were all about exploration and creativity. We’d venture out into nature, collecting an array of treasures like leaves, branches, and stones. While foraging, we’d often stumble upon unique rocks that would later become canvas for our artistic expression. On a rainy day at camp, the paintbrushes would come out, and we’d bring those collected rocks to life with vibrant colors and imaginative designs.
Leaves and twigs would also find their way into the creative process, serving as perfect embellishments to enhance our rock art masterpieces. The joy wasn’t just about the final product, but rather the experience of creating together with friends under the stars.
Monster Rock painting
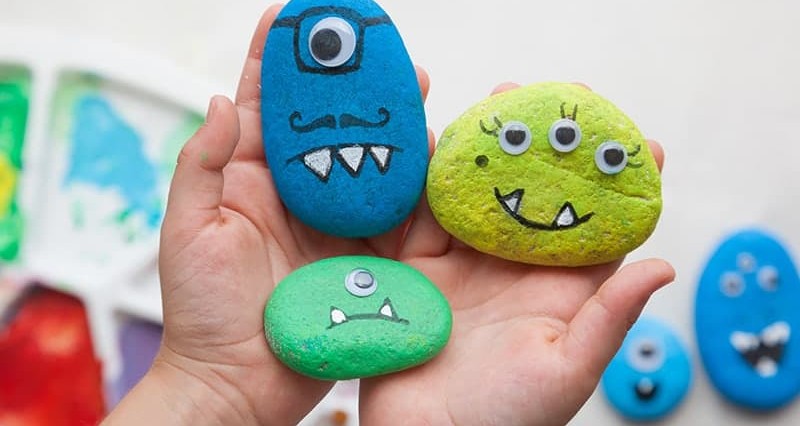
To cap off this list of Halloween monster rock painting projects, let’s dive into one final fun and family-friendly activity. This project is great for kids of all ages to enjoy together, as it allows them to express their creativity while still being tame enough not to be too scary. The idea is to create a set of five distinct monsters on differently shaped stones. You’ll need five colors to match the unique shapes. Begin by painting your monsters with various features, marks, and colors.
To add some personality, consider making one eye smaller than the other or giving one monster only one eye altogether. You could also give some fangs or create twins among your monsters. For more creative inspiration, check out these 20 easy Halloween crafts for kids.
