While many people may not consider weaving a practical craft, I’ve found it to be a therapeutic outlet that brings me great joy and relaxation. The process of creating something with yarn is both meditative and fulfilling. One of my favorite ways to weave is using everyday materials like paper plates, which can be transformed into functional items like bowls. In this DIY project, I’ll share the simple steps for making a woven bowl using a paper plate and some yarn.
Not only is it a fun and creative activity, but it’s also useful for storage purposes.
What You’ll Need
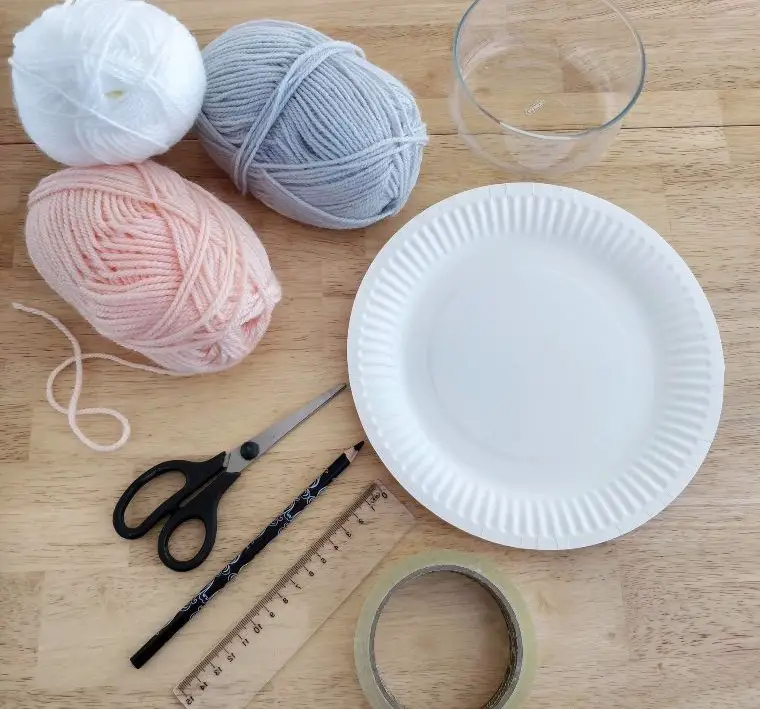
To get started on your creative project, you’ll need a few simple materials. A plain 1 paper plate is all it takes to begin crafting unique designs. You’ll also require some basic tools like scissors for cutting and shaping, a pencil for sketching out ideas, and a sturdy bowl for containing your creations. In addition, you may want to stock up on thick yarns for adding texture and dimension. For securing any loose ends or attaching pieces together, scotch tape will come in handy.
Finally, a trusty ruler will help ensure straight lines and precise measurements throughout your project.
How to Make DIY Woven Bowl
STEP 1
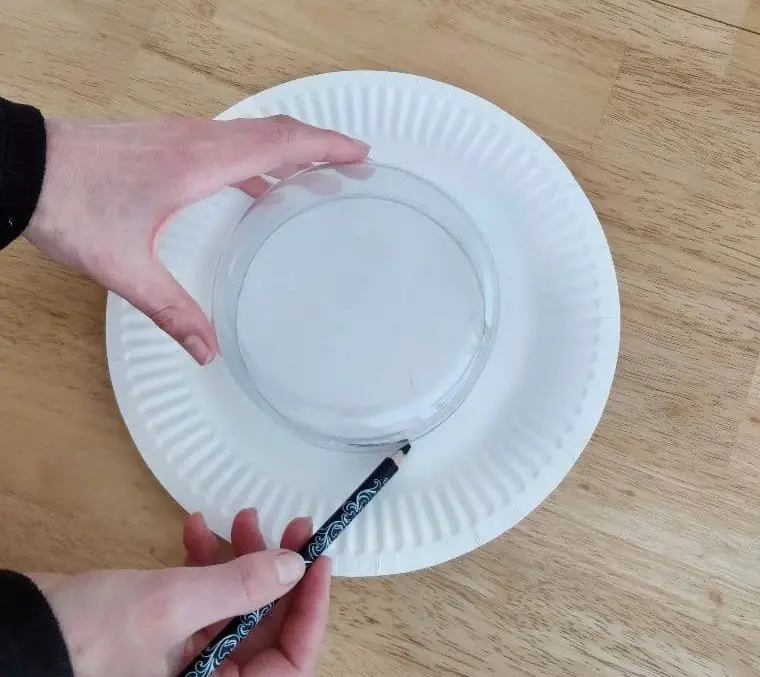
Begin by placing the paper plate with its flat surface facing upwards. Next, invert the bowl so that its base rests against the paper plate, aligning the bowl’s opening with the edge of the plate.
STEP 2
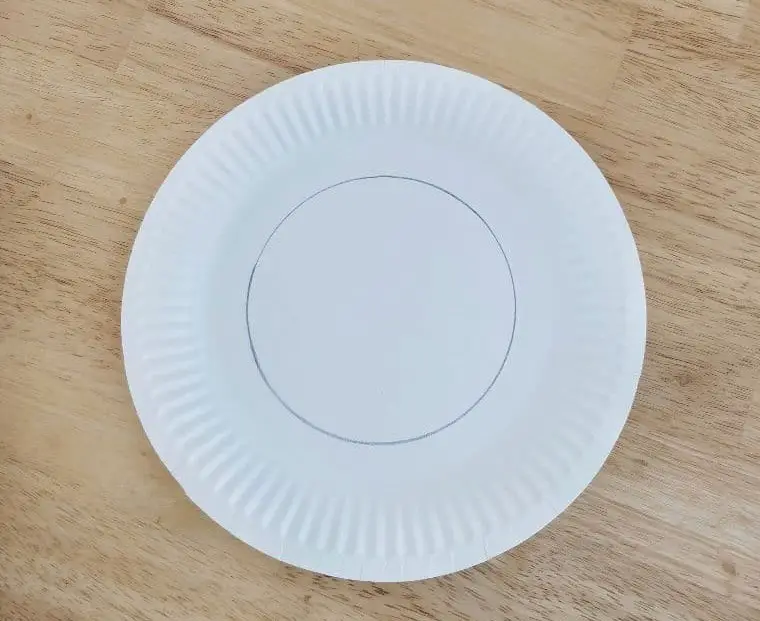
To achieve a precise circle, start by holding your pencil at a steady angle and carefully tracing the edge of the bowl onto the paper plate. Move the pencil in a smooth motion along the curve of the bowl, maintaining consistent pressure and speed to ensure an accurate outline.
STEP 3
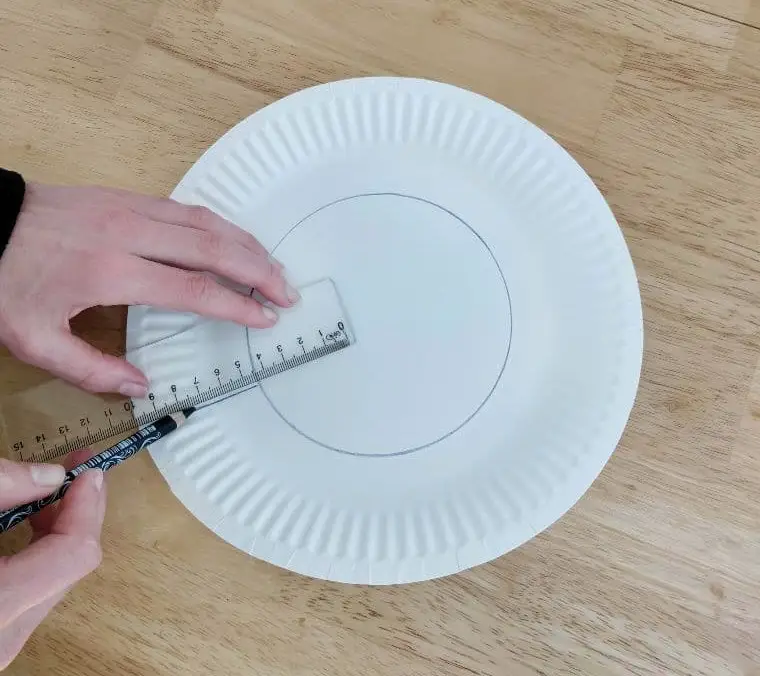
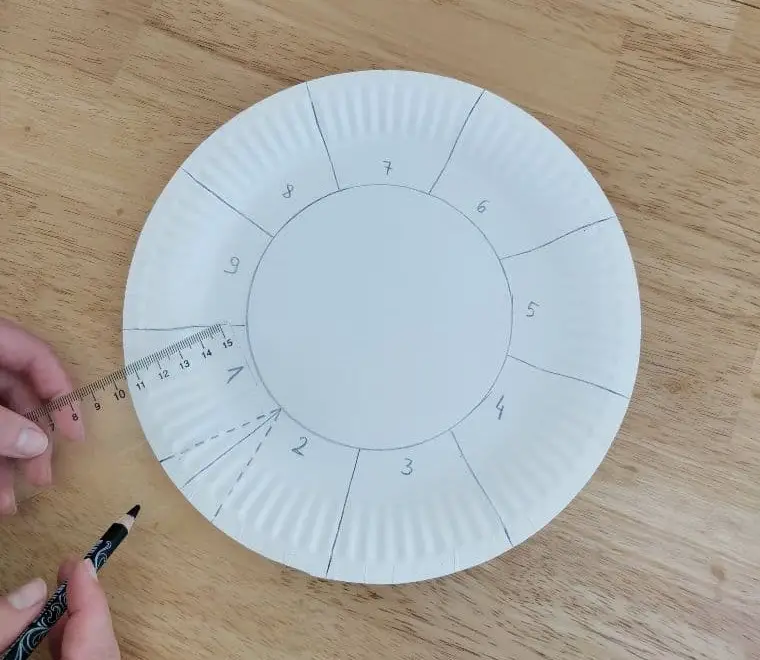
To create a precise edge, take out your trusty ruler and extend it from the outer rim of the circular object to the perimeter of the paper plate. The goal is to establish a consistent baseline for future measurements.
STEP 4
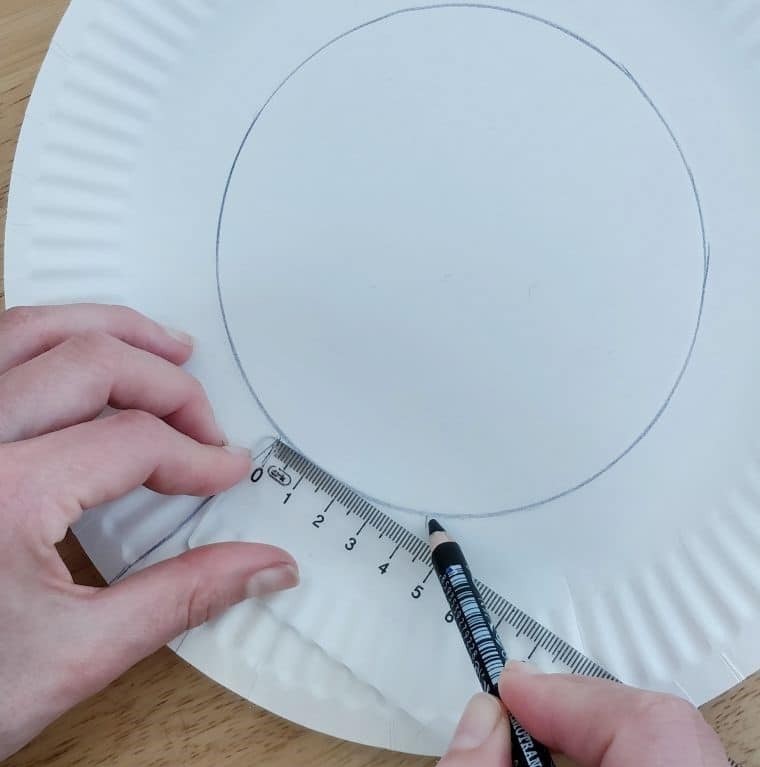
To begin creating the uniform gaps on your circular design, start by measuring 4.5 cm (1.8 inches) from the tip of your first line using your ruler. Mark this point with your pencil, marking the spot where you’ll place the first gap. From there, measure another 4.5 cm (1.8 inches) and create a second gap mark. Repeat this process until you’ve encircled the entire diameter of the circle, creating an even pattern of gaps that will serve as a guide for your design.
STEP 5
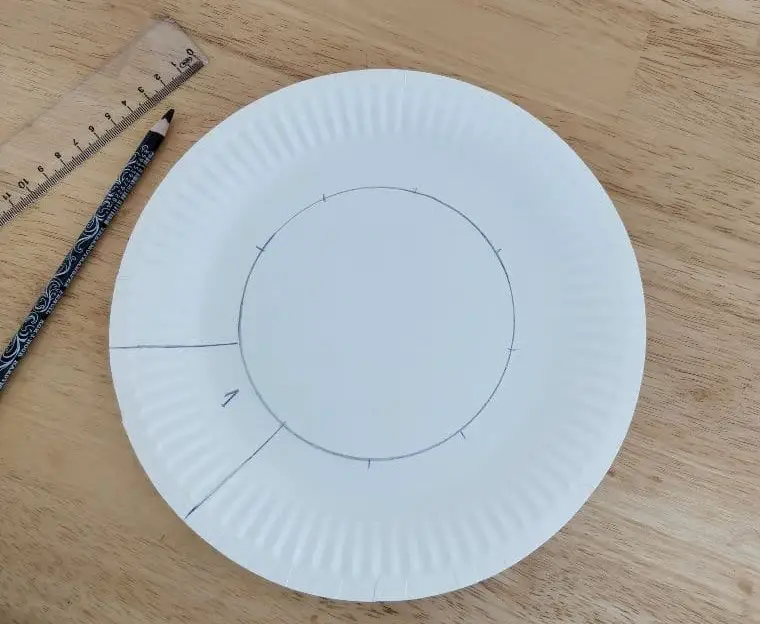
To complete the design, use your ruler and pencil to draw a new line that connects the initial gap mark to the edge of the plate. This will create a crescent-shaped outline, similar to the one depicted in the accompanying image. Once you’ve created this shape, label it with the number 1 for future reference.
STEP 6
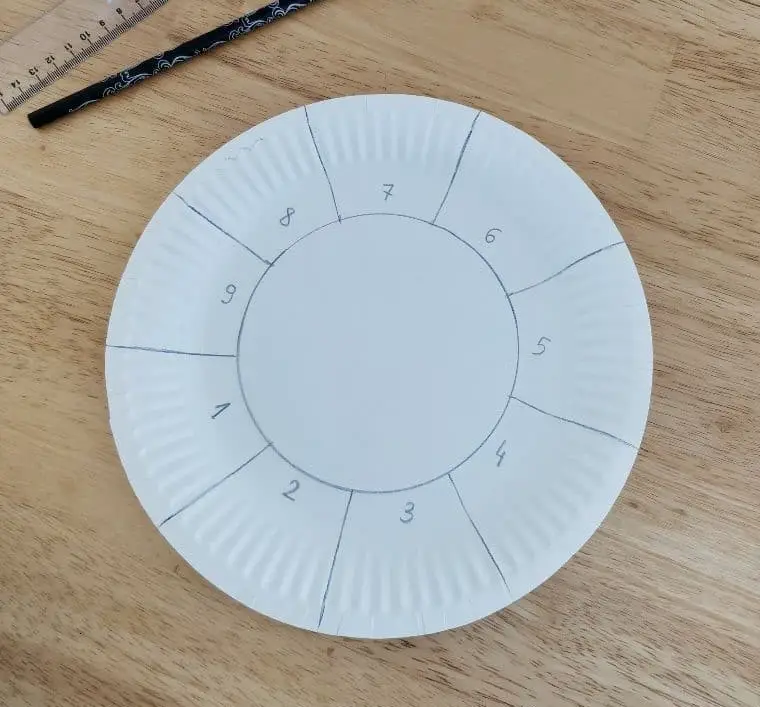
As you shape your cake into slice-like forms, draw lines from each gap mark to the edge of the plate. Ensure accuracy by numbering each completed shape in sequence. Upon completing this process, you should be left with nine identical shapes, each bearing its unique number.
STEP 7
As you continue to work on the art project, take a moment to create a triangular shape on the paper plate using your pencil and ruler as guides. To avoid any confusion with the previous solid lines, use dashed lines for the triangle’s outline. Repeat this process until the entire diameter of the plate is covered in triangles, creating a unique and intricate pattern.
STEP 8
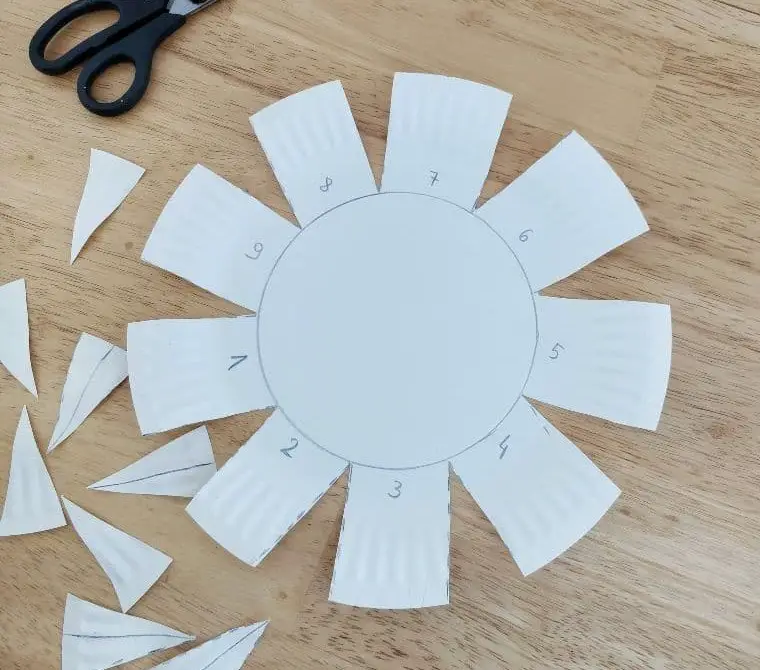
To complete the design, carefully use your scissors to make precise cuts along each of the dashed lines you’ve created. This should yield a total of nine distinct triangular shapes.
STEP 9
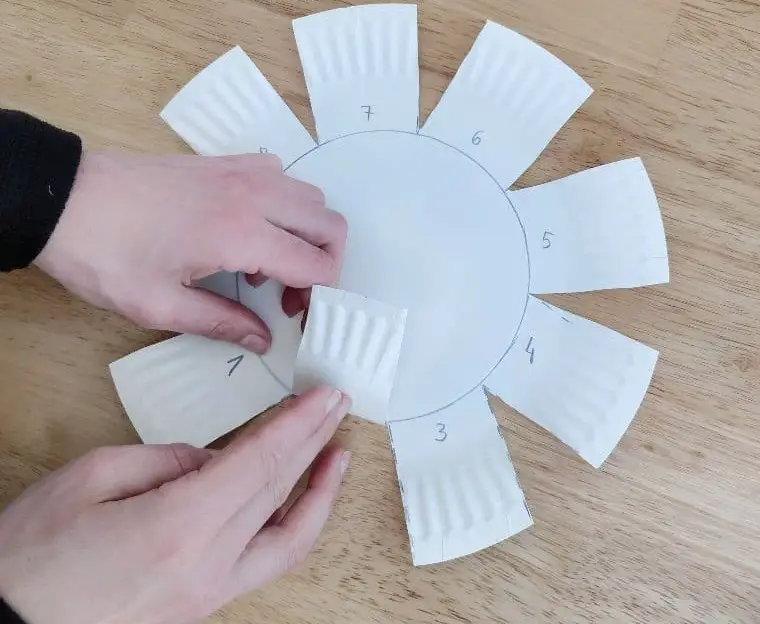
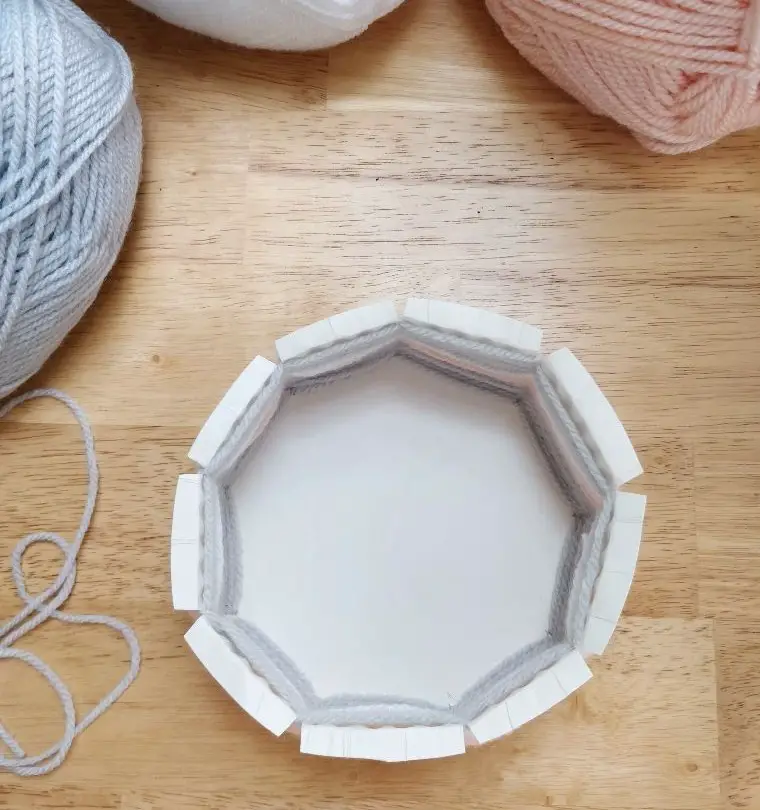
Begin constructing your DIY bowl by elevating the cut-out triangles and folding the sides upwards. As you create each flap, make a subtle crease to enhance the overall stability of the piece. This slight adjustment will allow your bowl to stand with greater confidence.
STEP 10
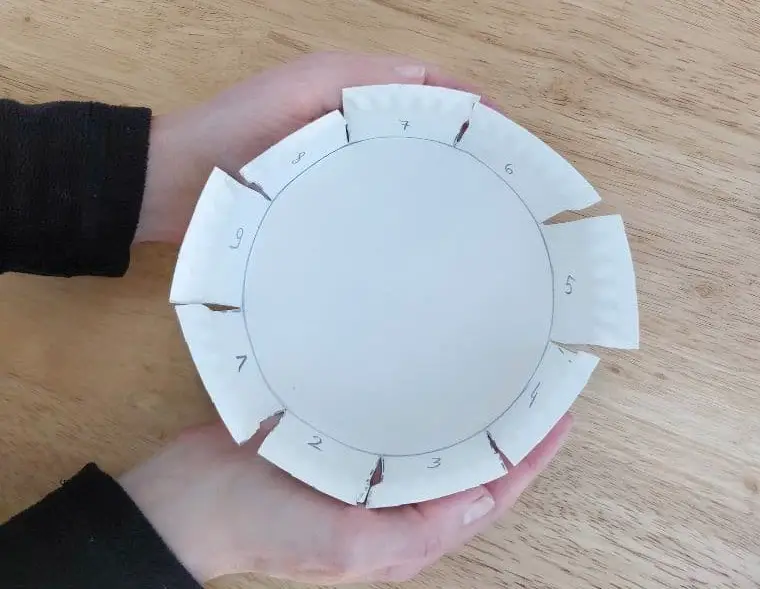
As you complete the next flap, continue the process for each subsequent flap, gradually folding them in succession. With each successful fold, your creation will begin to take shape, ultimately forming a bowl-like base.
STEP 11
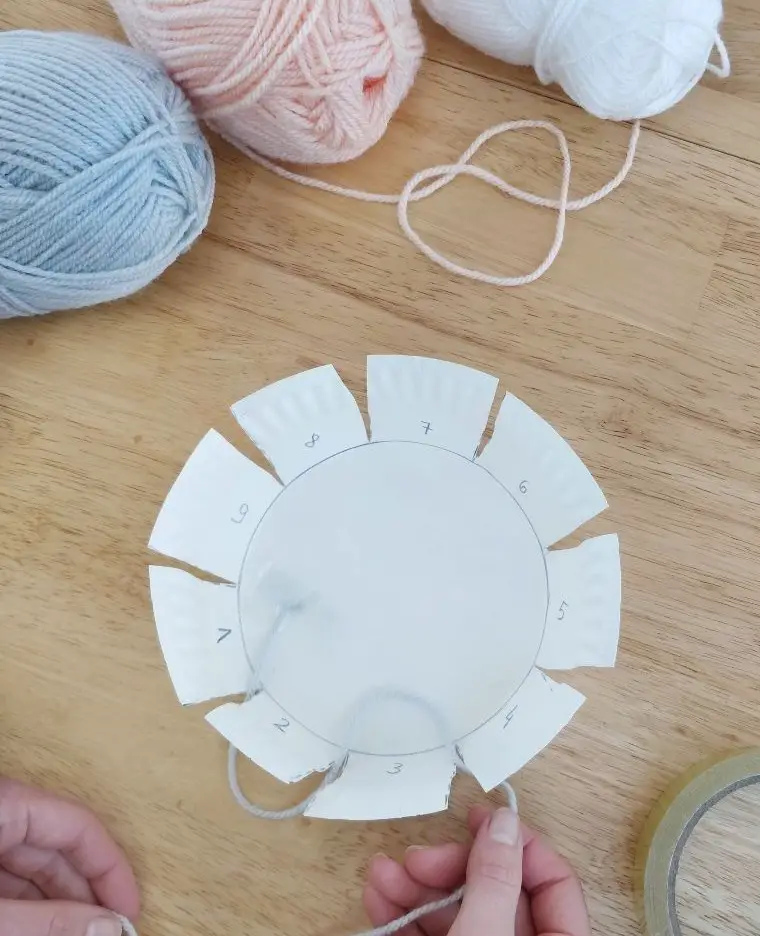
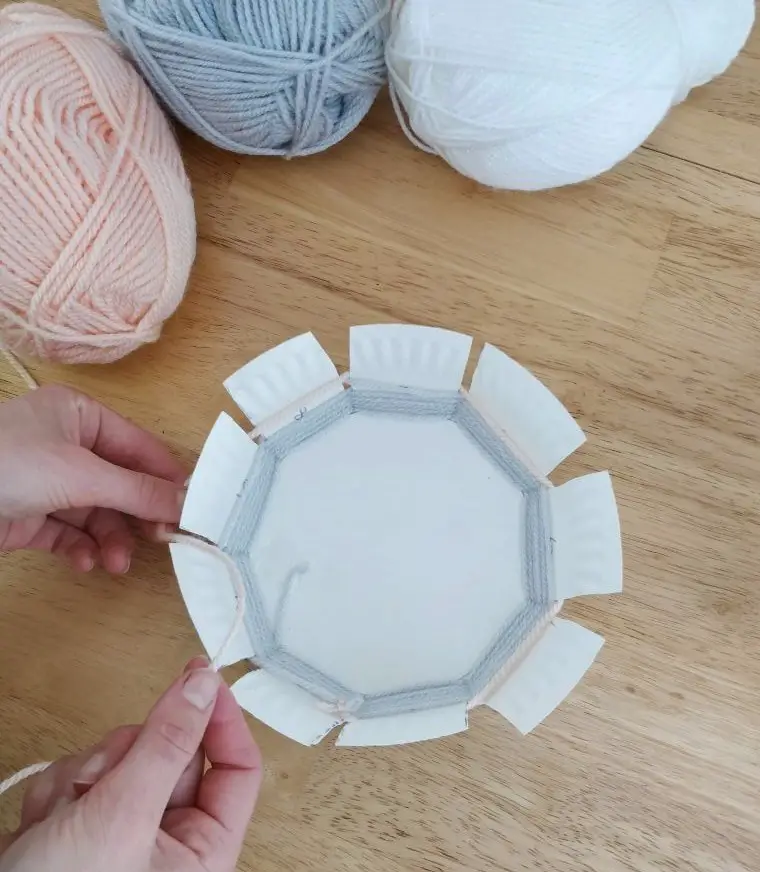
Now that the foundation is set, it’s time to bring the design to life! To start, take the first yarn color and secure it to the interior of your pre-drawn circle using Scotch tape. With a firm hold in place, begin weaving through the numbered flaps in an alternating pattern, moving from outside flap number 2 to inside flap number 3, then out again at flap number 4, and so on.
STEP 12
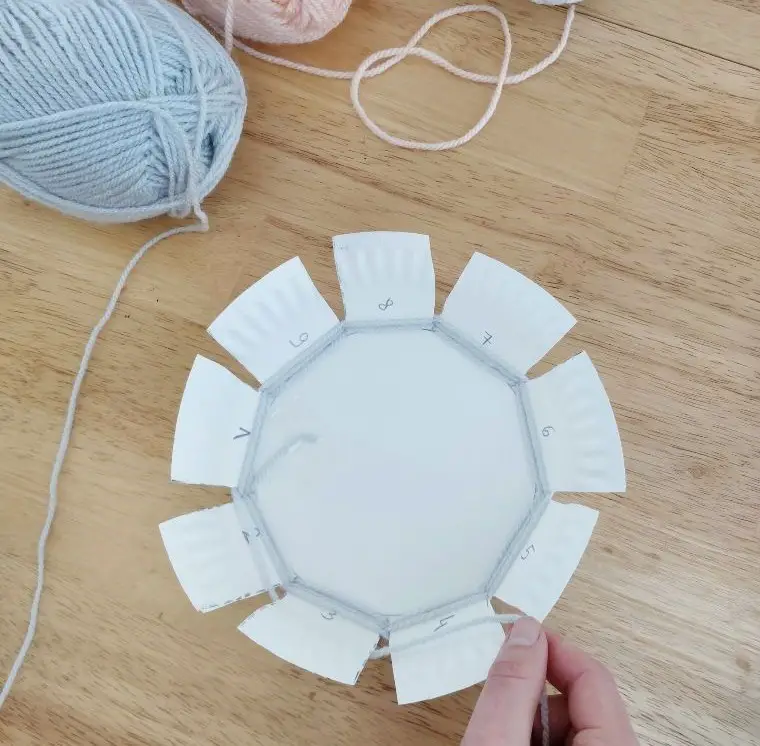
To achieve the woven effect, simply alternate between the different threads as you work your way around the entire circle. Continue this pattern for approximately five repetitions, or until you’ve reached your desired height for that particular color.
STEP 13
When you’ve achieved the desired height for your first yarn color, pause about two sections away from where you began weaving. Employ a pair of scissors to trim the yarn, ensuring at least a two-inch buffer remains beyond your latest weaved section. This excess length will cover the next two areas, but refrain from weaving just yet.
STEP 14
To seamlessly transition between two yarn colors, simply tie the new color around the existing one using a straightforward knot. This technique allows for a harmonious blend of hues, creating a visually appealing fabric.
STEP 15
To ensure a neat and tidy finish to your knotted strands, it’s essential to carefully trim away any excess yarn. This straightforward step can make all the difference in creating a professional-looking result that you’ll be proud to showcase.
STEP 16
As you begin weaving, it’s essential to keep the tangled ends of the yarn tucked away within the bowl, ensuring they don’t interfere with the flow of the fabric. To maintain the alternating pattern established in the initial stage, continue the sequence of colors, allowing each strand to smoothly integrate into the overall design.
STEP 17
When it comes to weaving, achieving a smooth and even finish is crucial. To ensure your project looks professional, make sure the final product has no visible knots or inconsistencies in the weave. One key aspect to pay attention to is maintaining consistency throughout the piece. This means that the second layer of yarn should align perfectly with the first, mirroring the same weave pattern.
By doing so, you’ll create a visually appealing and well-crafted piece that showcases your weaving skills.
STEP 18
As you progress, maintain the same gentle rhythm and subtle tension, allowing the second yarn color to flow seamlessly into the first. Repeat the process until you’ve reached the desired height for this new hue, carefully blending the colors together to create a harmonious transition.
STEP 19
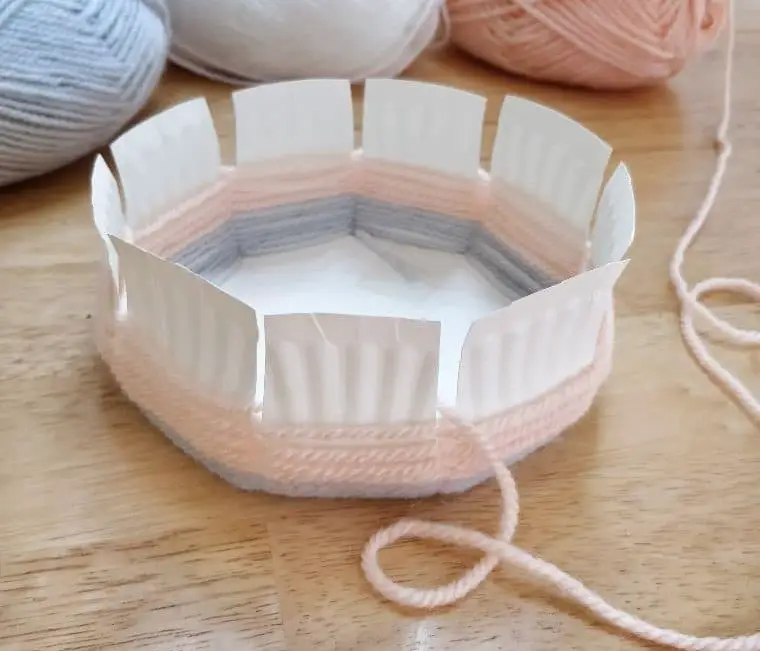
To complete the two-color weaving pattern, it’s essential to maintain consistency by ending the second color’s weave in a similar manner to how you finished the first. This means ensuring that the flaps of the second color’s weave are facing away from where you terminated the first yarn color’s weave. By doing so, you’ll create a visually appealing and balanced design that showcases your creativity and skill.
STEP 20
To complete the project, leave about two inches of excess yarn from your secondary color. This will ensure that you have enough yarn to secure the final two flaps effectively, providing a clean and finished look.
STEP 21
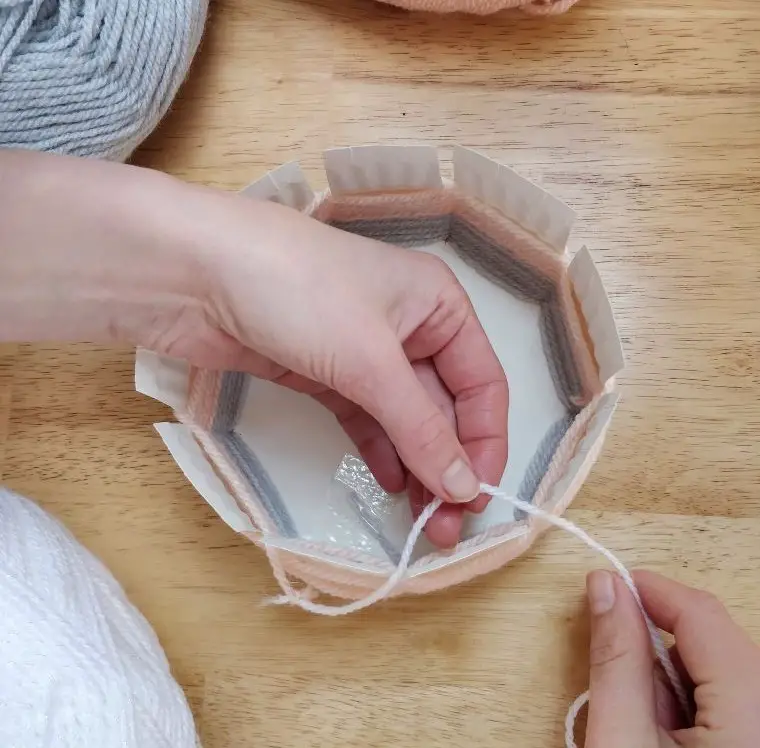
Continue by selecting the third yarn color and incorporating it into your project through a process of knotting and weaving, mirroring the steps taken to combine the initial two hues.
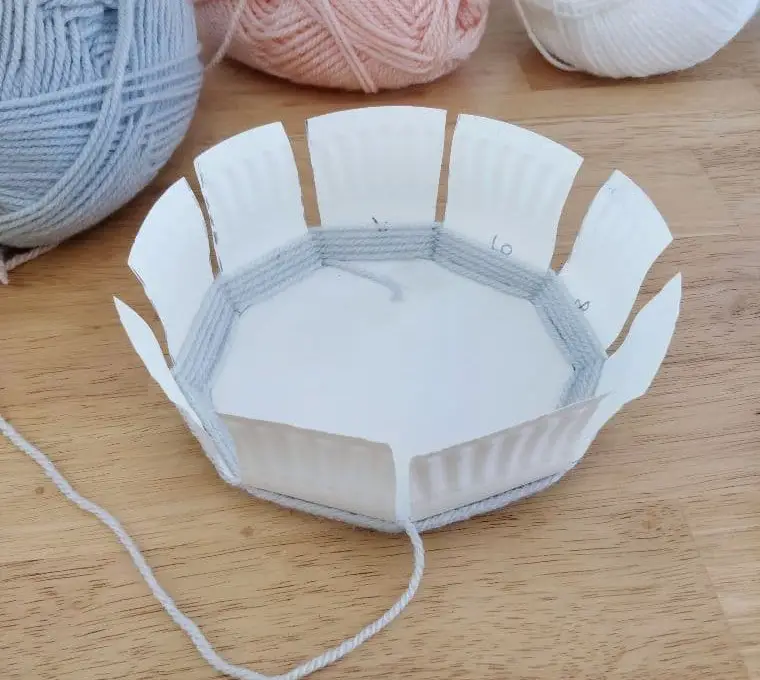
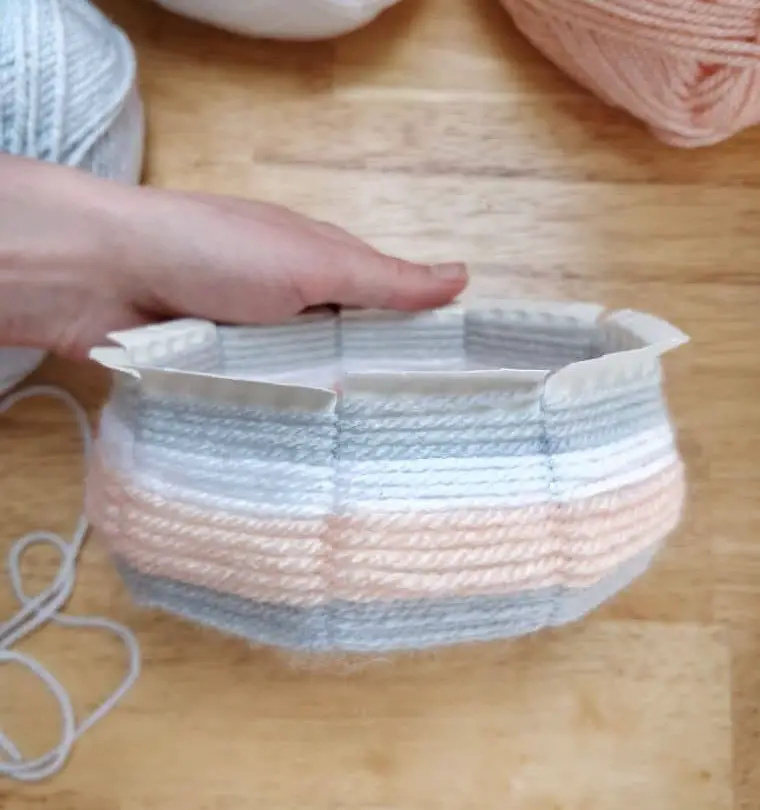
STEP 22
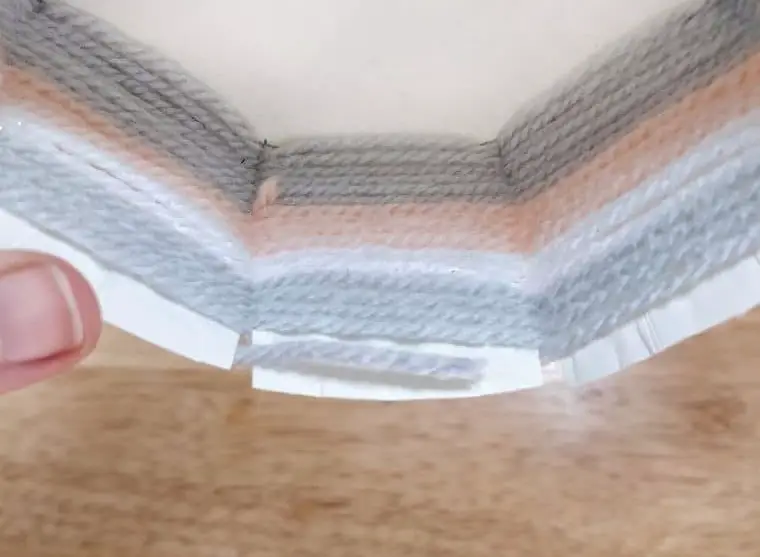
To achieve the ideal height for your woven bowl, be sure to stop weaving about 1 cm (or two) from the edges. It’s essential to leave a small border along the sides of the bowl, rather than covering it entirely. As you reach the end of your weave, bring your work in towards the center of the bowl, as illustrated in the accompanying photo.
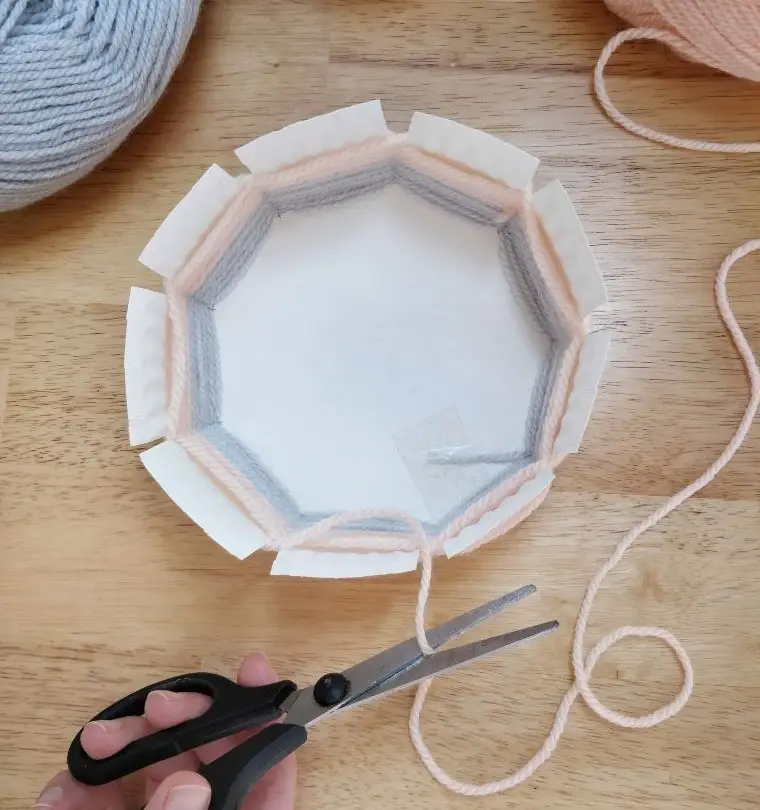
STEP 23
As you complete the final pass of weaving, use the tip of your scissor’s blade to delicately guide the loose strand beneath the existing yarn layers. This subtle yet precise movement ensures a seamless integration of the new fibers, eliminating any visible joins and creating a smooth, cohesive finish.
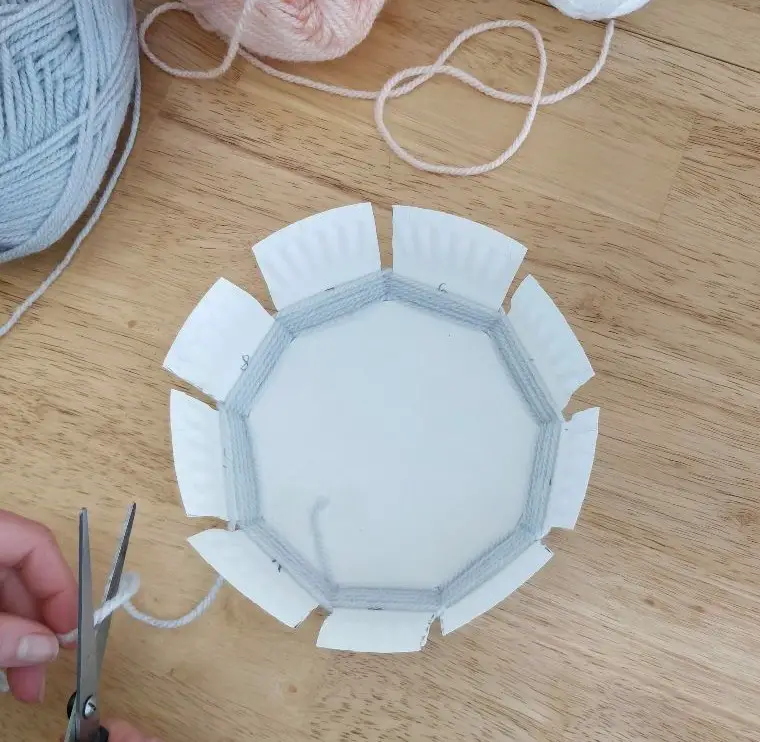
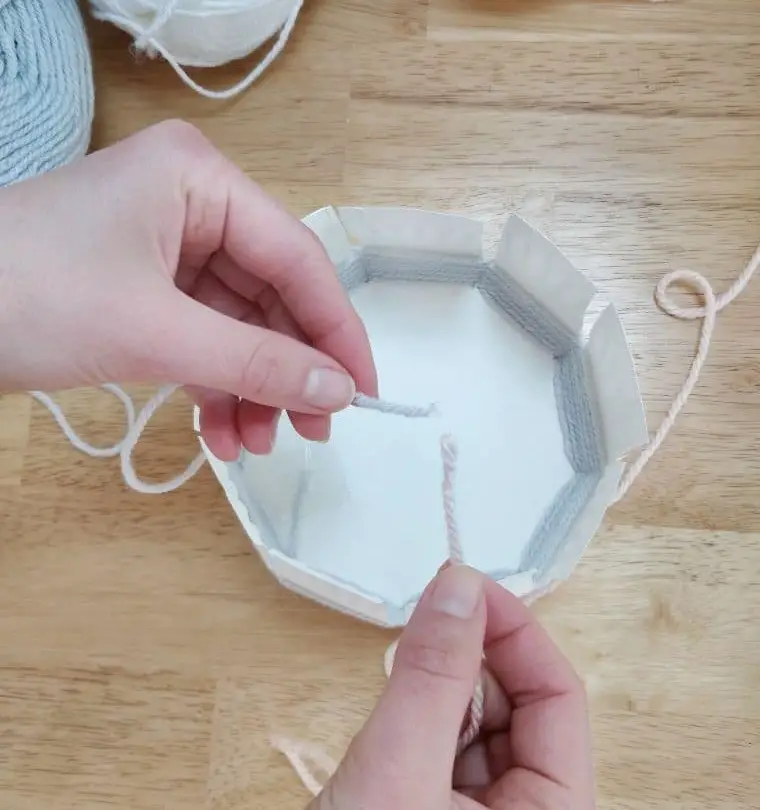
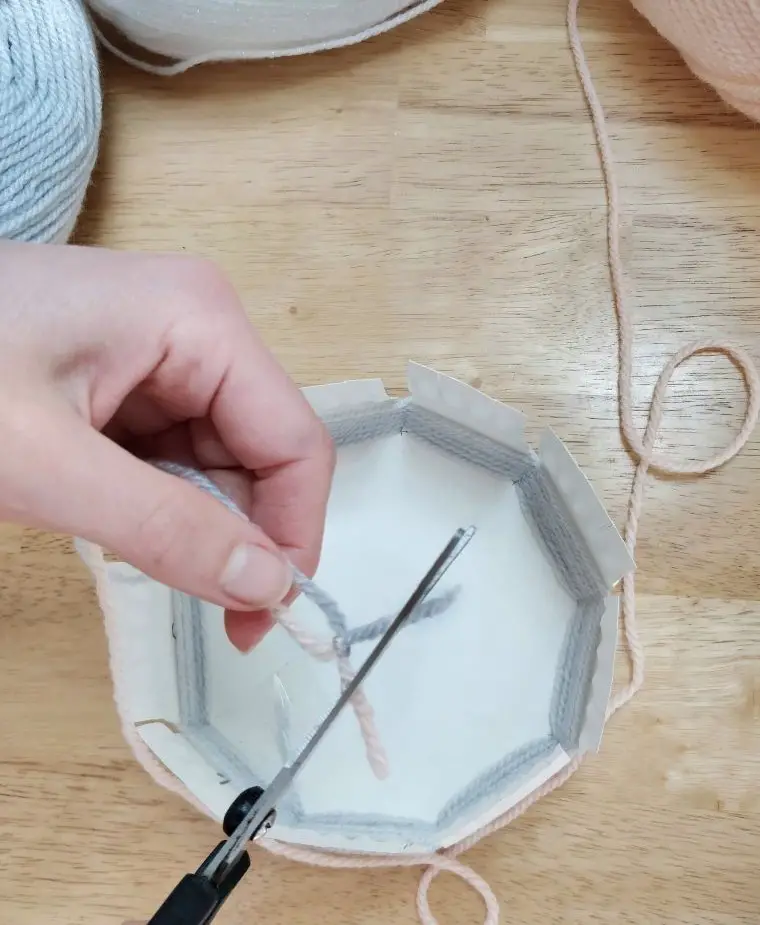
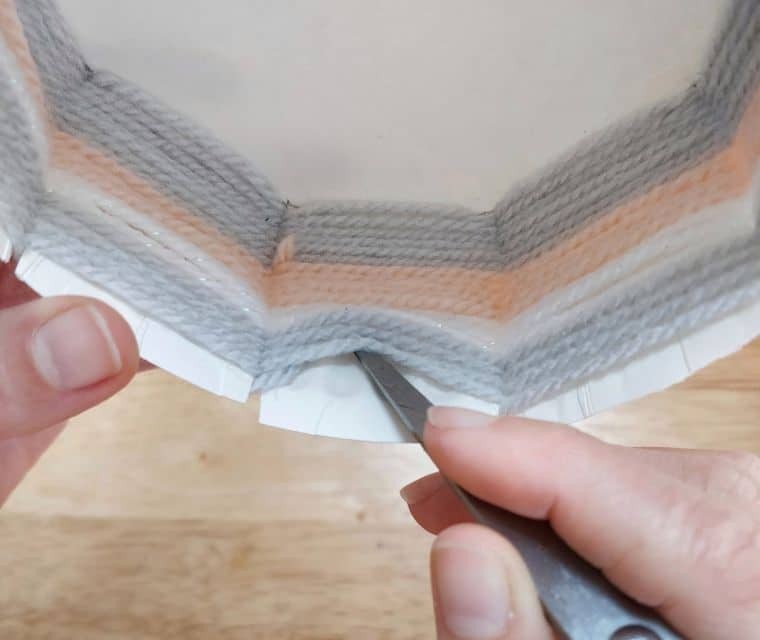
STEP 24


As you recall, the initial thread was secured with a piece of tape. To proceed, carefully remove the tape from the plate, taking care not to disrupt the surrounding yarn fibers. Next, employ your scissors once more to skillfully tuck this newly freed end into the layered yarn above it, ensuring a neat and tidy finish.
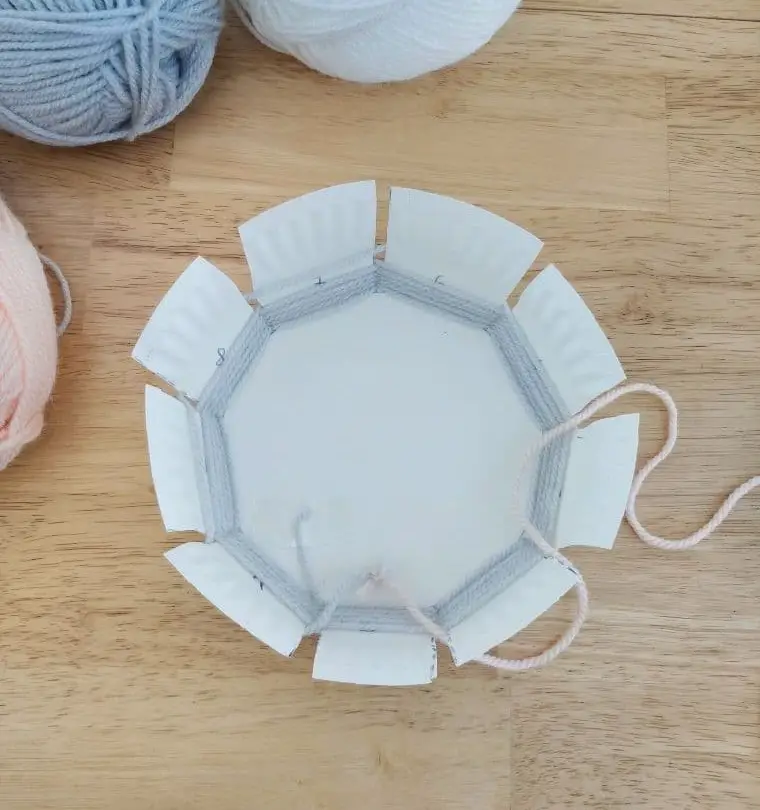
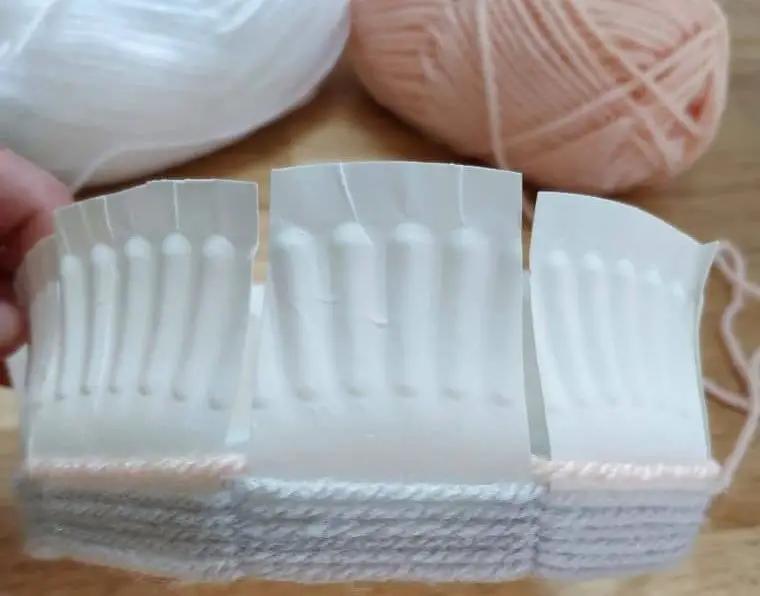
STEP 26
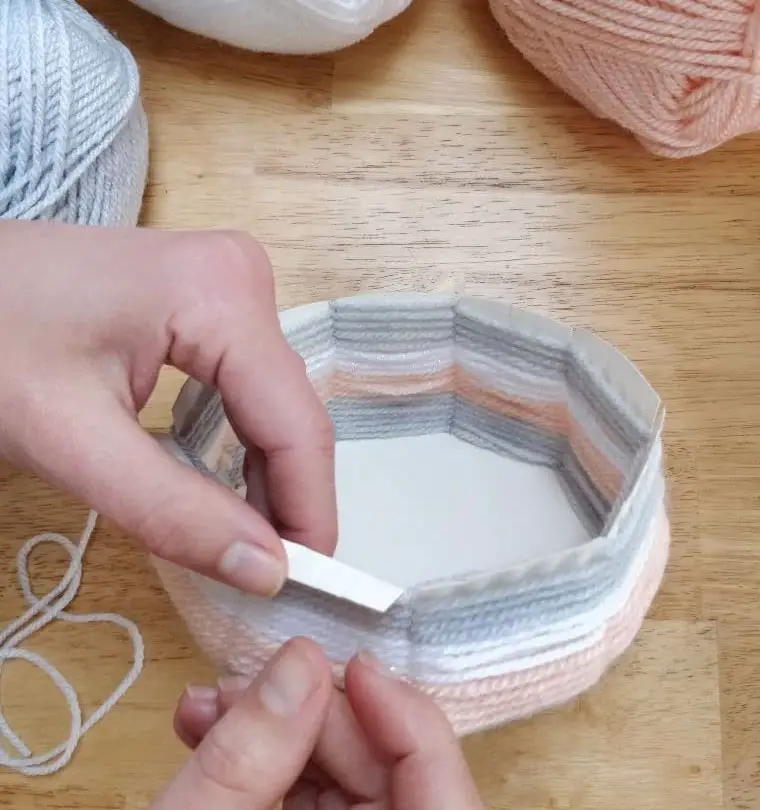
To achieve a visually appealing rim on your crocheted bowl, it’s essential to maintain a certain level of yarn coverage while still allowing for a defined edge. To accomplish this, carefully fold the yarn flaps outward, ensuring a smooth transition between the main body and the rim. By doing so, you’ll create a beautiful, even border that adds depth and visual interest to your finished project.
Where Can You Use These DIY Woven Bowls?
These woven bowls are incredibly versatile. They’re perfect for repurposing as desk organizers to keep tiny items like paper clips or pushpins tidy and within reach. You can also use them to corral your keys and other small essentials on a entryway table or in a mudroom. For a touch of whimsy, turn them into plant pot covers by wrapping yarn around the bowl to conceal unsightly indoor plant containers.
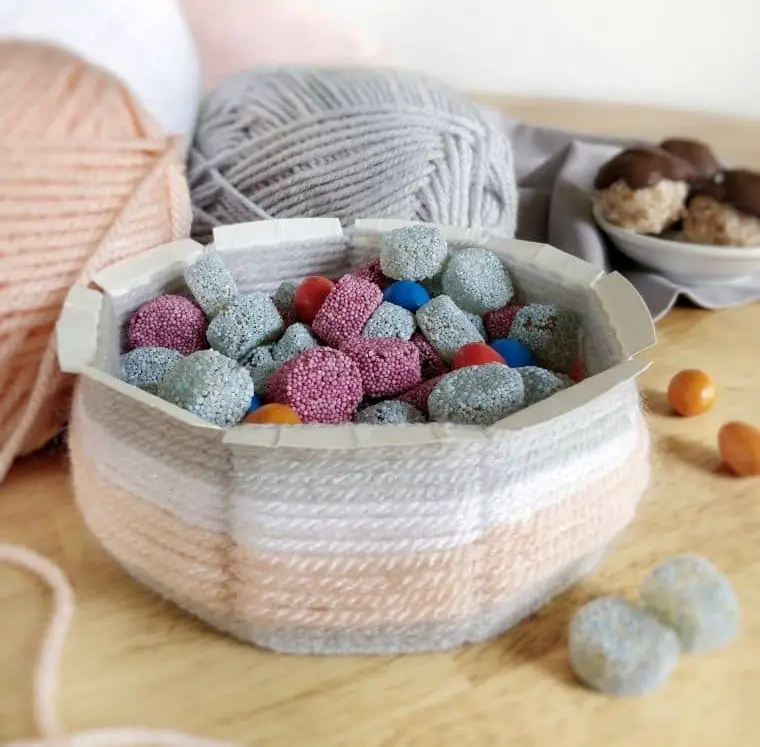
At parties, these bowls can double as creative food displays for wrapped treats like candies or cookies. Additionally, they make great holders for hair accessories, such as clips and ties, keeping them organized and easy to find. The possibilities are endless – if it’s dry and small enough, you can likely find a use for one of these bowls!
DIY Woven Bowl
In just 30 minutes, you can create a charming DIY woven bowl using yarn and a humble paper plate. Perfect for adding a touch of handmade charm to your kitchen storage needs! For this project, you’ll need only 30 minutes of active time, and the total duration from start to finish will be 30 minutes. The outcome? A single, unique woven bowl that showcases your creativity.
Equipment
Materials
Instructions
To begin creating your woven bowl, start by preparing your materials. Draw a circle pattern on a paper plate using the rim of a bowl as a guide, then use a ruler to draw one straight line from the edge of the circle to the plate’s edge. Measure 4.5 cm along this line and mark the spot, repeating this process until you’ve marked around the entire circle. This will help you create a cake slice-like shape with your lines. Number each shape as you complete it, aiming for a total of nine shapes.
Once you have your lines in place, use a ruler to draw triangles around each one, using the lines as the middle and drawing the edges with dashed lines. Cut along these lines to create a total of nine triangles. Next, fold up the flaps to form the sides of the bowl. To start weaving, apply Scotch tape to the edge of your plate and attach your first yarn color. Weave around the bowl in an alternating pattern until you reach your desired height for that color.
Then, take your second yarn color and knot it to the edge of the first yarn, before weaving it into place. Continue this process with each subsequent yarn color, leaving at least 1 cm of plate material between layers. Finally, use scissors to tuck the ends of your yarn into the layers below, then fold out any excess paper plate material to create an overlapping rim for the bowl. And that’s it – you’ve successfully created a beautiful woven bowl!