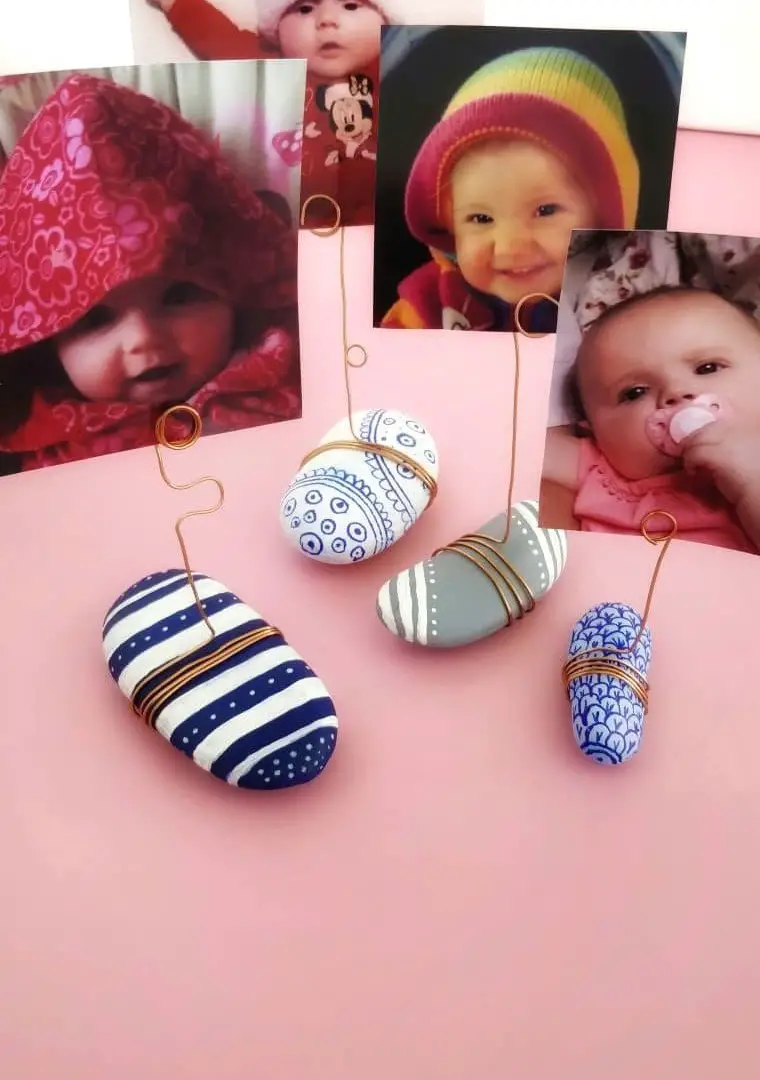
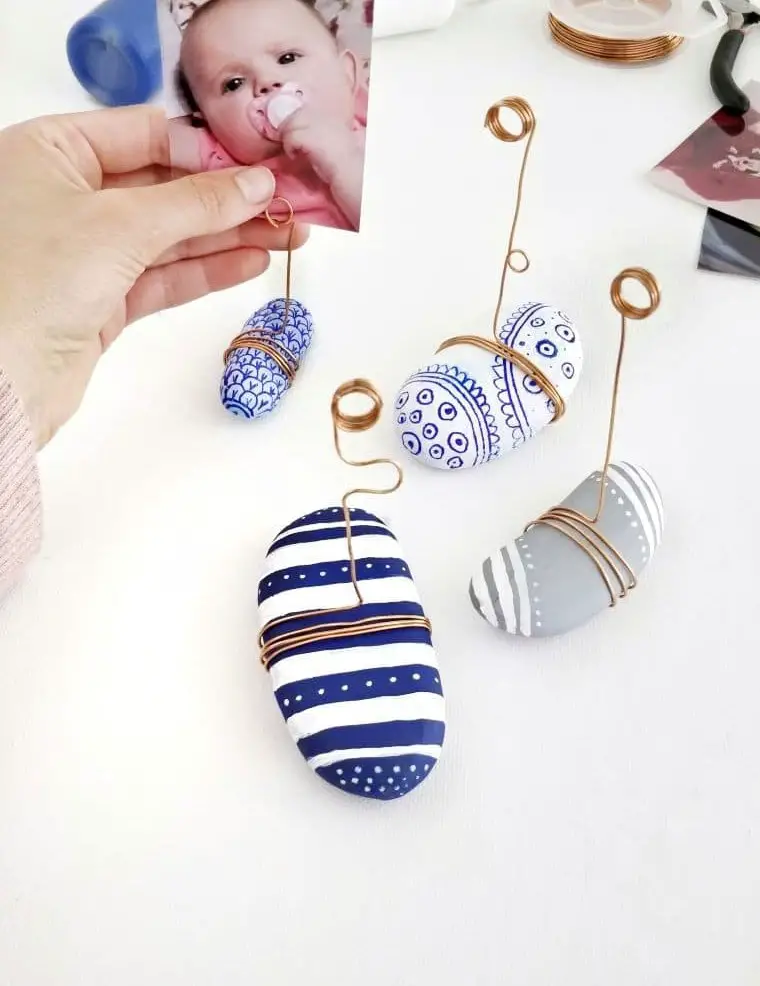
Transform your ordinary rocks into extraordinary photo displays by upcycling them into unique photo holders. Not only will you be preserving cherished memories, but also adding a touch of personalization and creativity to your home decor.
As a self-proclaimed analog enthusiast, I still revel in the joy of printing physical photos.
There’s something undeniably special about flipping through a tangible album or gazing at framed mementos scattered throughout my living space – it’s as if the memories come alive once again.
My abode is filled with carefully curated frames showcasing cherished moments and loved ones, yet I also have a selection of rock-based photo holders that allow me to easily swap out images in accordance with the changing seasons or my whims.
To create these one-of-a-kind DIY displays, simply follow along as we embark on this easy-peasy project.
You’ll Need
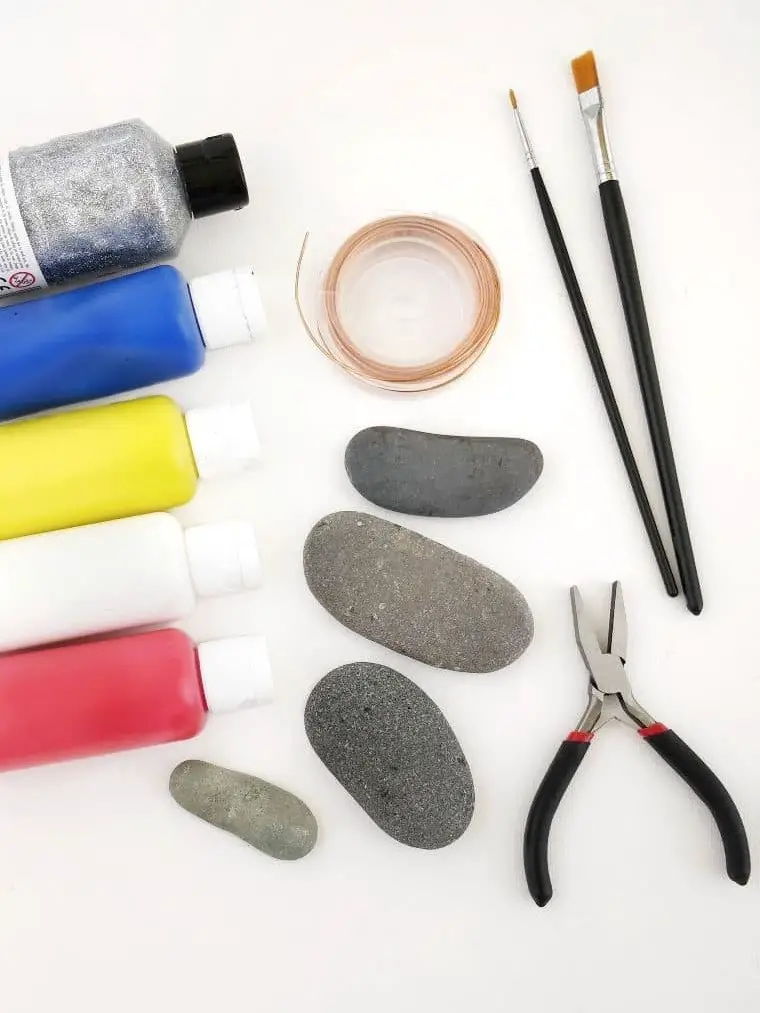
To create a unique and personalized piece, you’ll need a few essential materials. Start by gathering smooth stones that have natural textures or patterns that will add character to your finished design. Next, collect acrylic paint in a range of colors that resonate with you, from soft pastels to bold hues. You’ll also require needle nose pliers for shaping and bending the copper wire (18 Gauge) that will form the foundation of your piece.
For adding fine details, a pen, marker, or wooden stick will come in handy. Additionally, have some paintbrushes on hand to help you apply the acrylic paint with precision.
How to Make DIY Rock Photo Holders
STEP 1
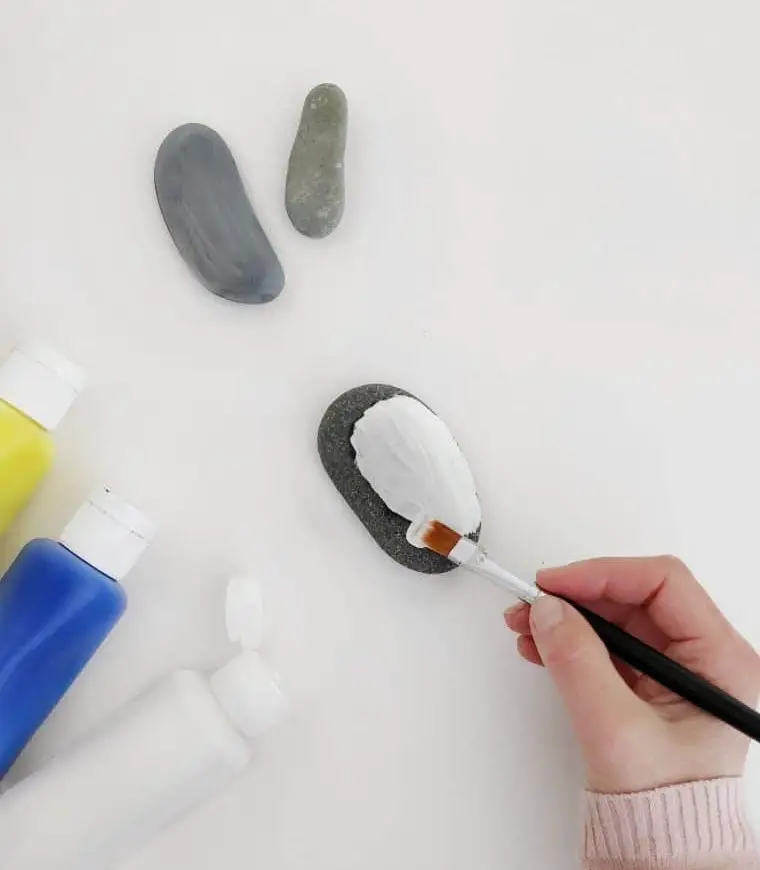
To add a personal touch to your photo holders, start by gathering your materials. I find that using variously shaped rocks can bring an extra layer of charm to the final product. When it comes to the size of the rock, match it to the size of the photo you’ll be displaying – smaller rocks for smaller prints and larger ones for larger images.
Begin by applying a solid color to your chosen rocks using your preferred painting medium.
For an added boost in vibrancy, consider starting with a base coat of white before adding your main colors. This simple trick can help your colors truly pop!
STEP 2
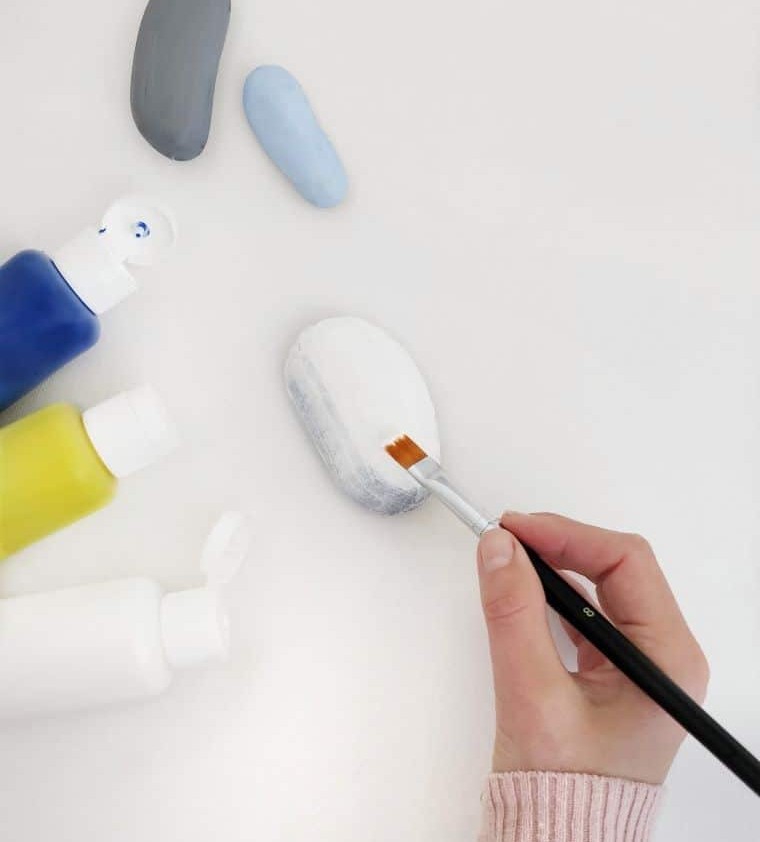
After the first coat has had time to dry, it’s likely you’ll need to apply additional layers to reach your desired level of opacity. As you build up the color, be sure to let each layer set before moving on to the next. Once you’ve reached the perfect shade, allow the painted rocks to sit for a period of time, giving the paint ample opportunity to fully dry and harden.
STEP 3
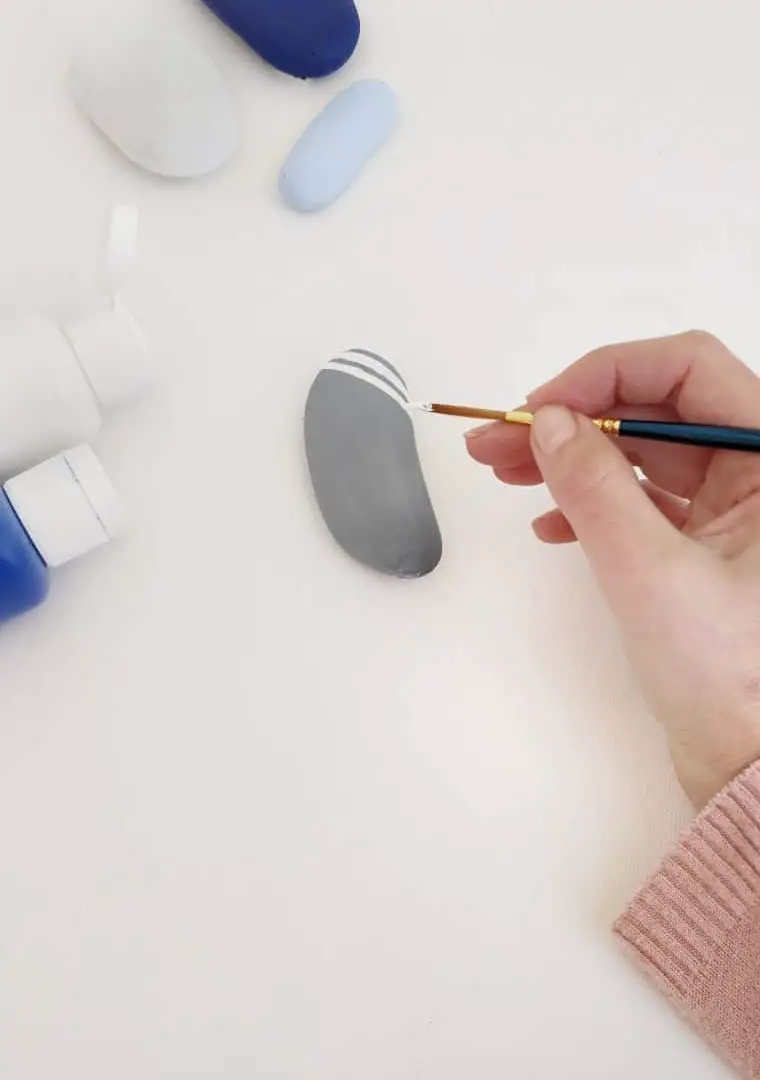
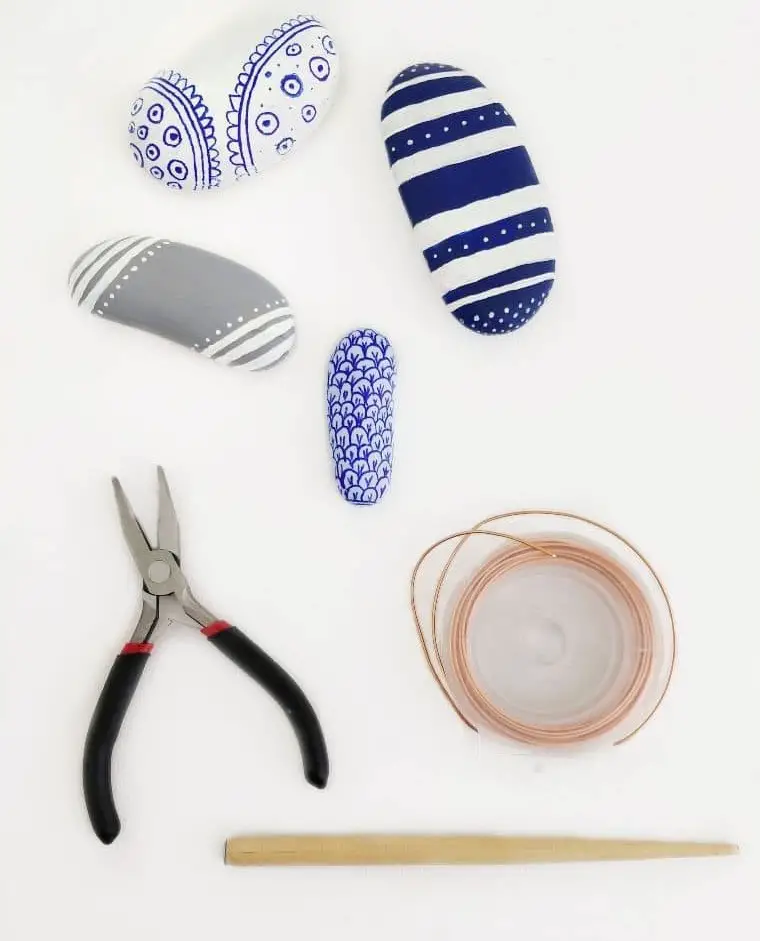
In this creative process, the possibilities are vast, allowing you to unleash your imagination and bring forth unique designs. You can opt for classic stripes, playful polka dots, vibrant illustrations, or even intricate mosaics. The key is to tap into your inner creative genius and let your design vision unfold. Once you’ve achieved your desired look, it’s essential to allow the paint to dry completely before handling the rocks again.
This step ensures that your masterpiece remains intact and protected from potential damage. For an added layer of protection and durability, consider applying a clear acrylic sealer to your painted designs. This will not only preserve your artwork but also extend its lifespan.
STEP 4
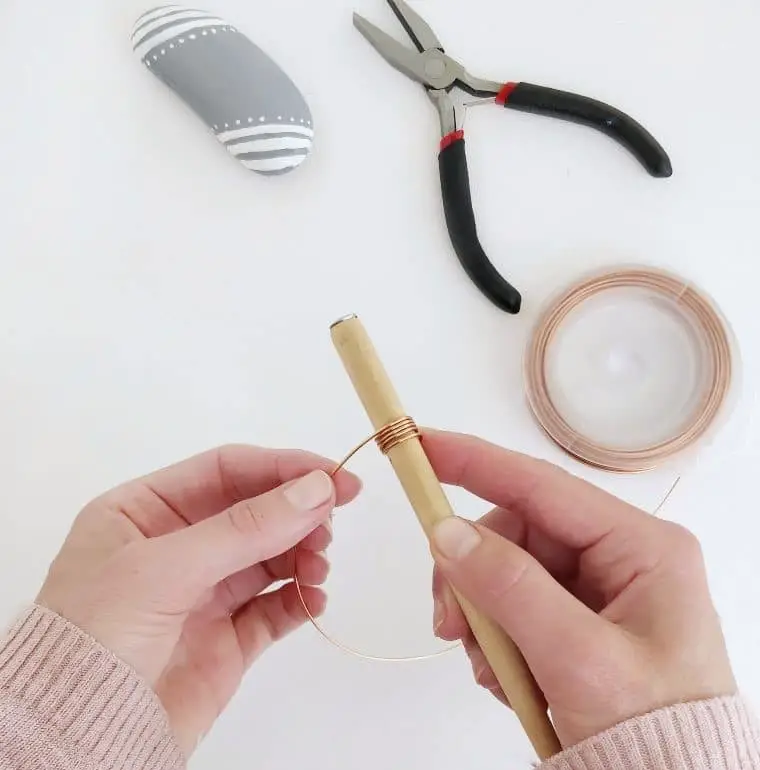
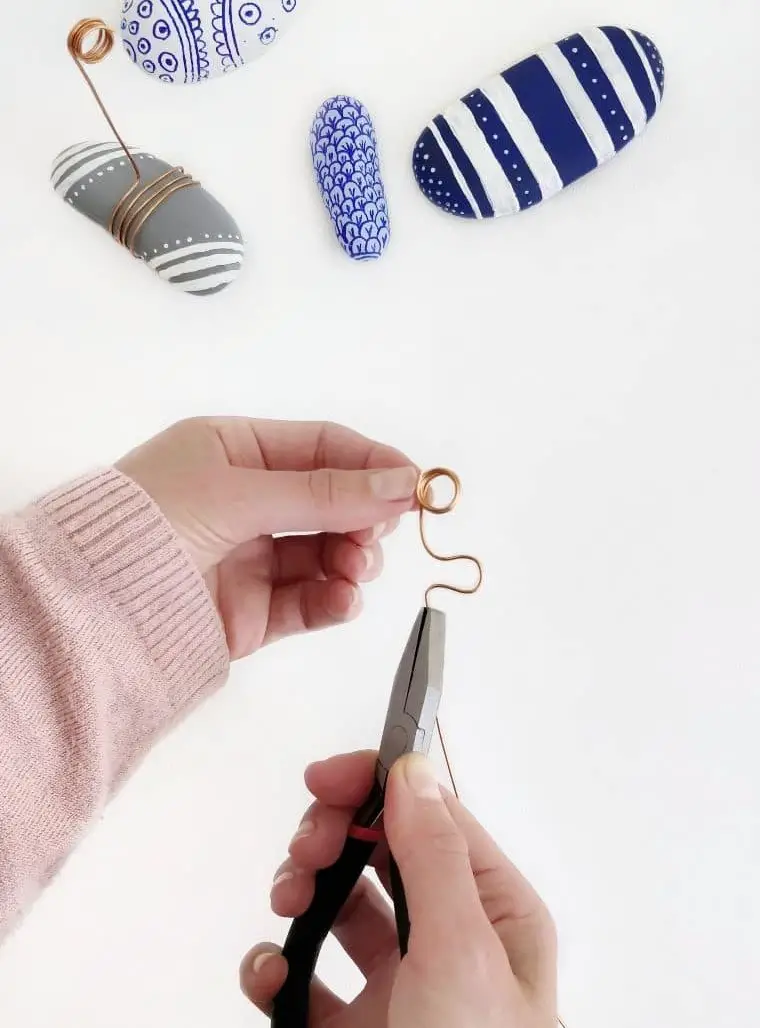
To begin, take hold of a length of copper wire and carefully wrap it around the wooden stick, pen, or marker in a consistent manner. Aim for three to five wraps, taking care not to overtighten or loosen the wire too much. This will enable you to easily remove the wire from the stick once you’ve achieved the desired level of tension.
STEP 5
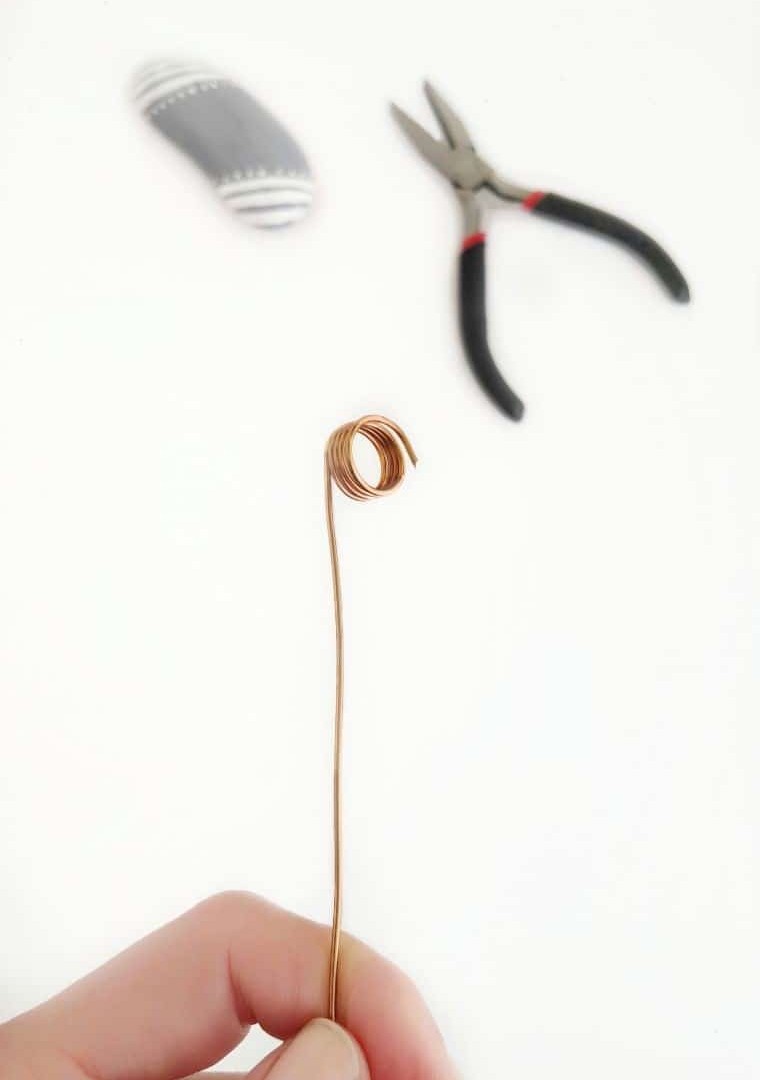
Optimize the remaining section of the wire by adjusting its length to suit your specific needs. While there’s no one-size-fits-all solution, a typical range for this step falls between 2 to 3 inches.
STEP 6
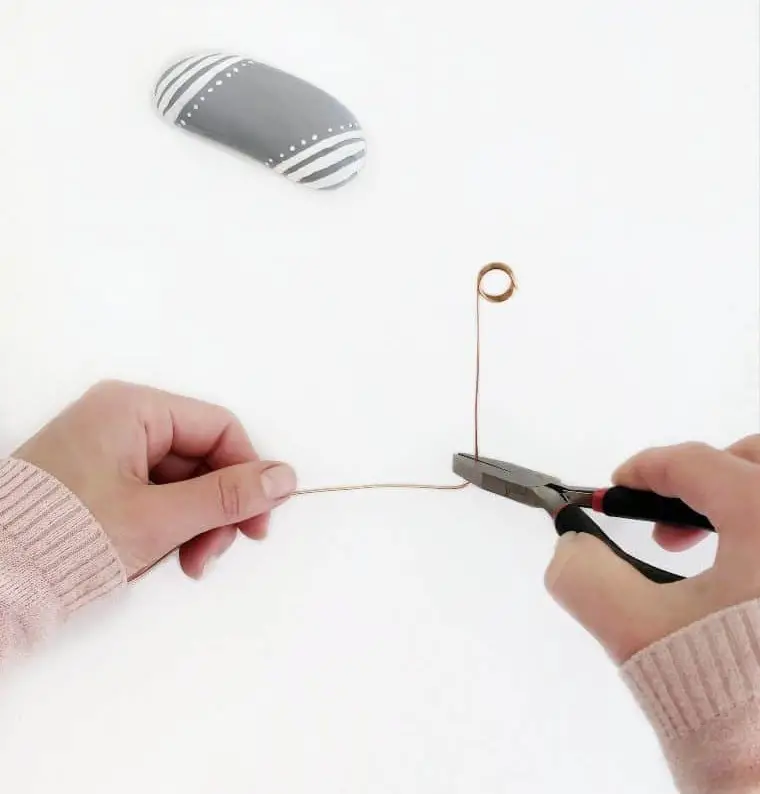
To shape the copper wire into the desired form, grasp the blunt end of your needle nose pliers firmly and position it at the point where you want the wire’s length to begin. Then, carefully bend the remaining portion of the wire to create a precise 90-degree angle, ensuring a crisp and clean connection.
STEP 7
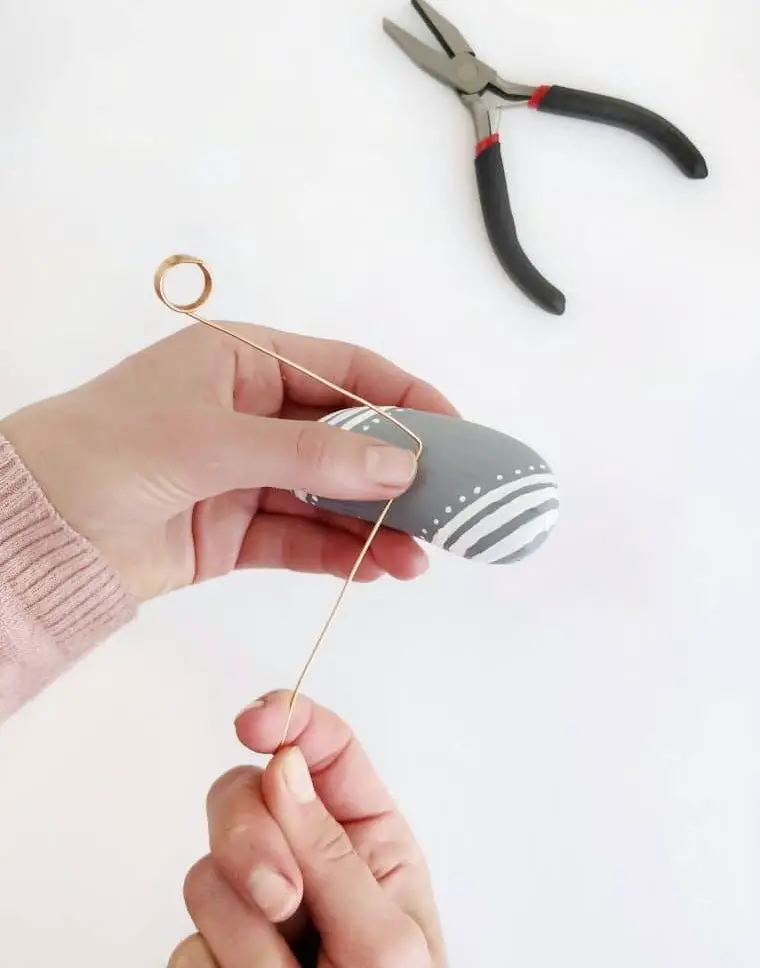
To secure the wire, grasp a sturdy object – such as a rock or a metal rod – and wrap the horizontal section of the wire around it, ensuring a snug fit. This simple technique will prevent the wire from coming undone and provide a reliable foundation for your project.
STEP 8
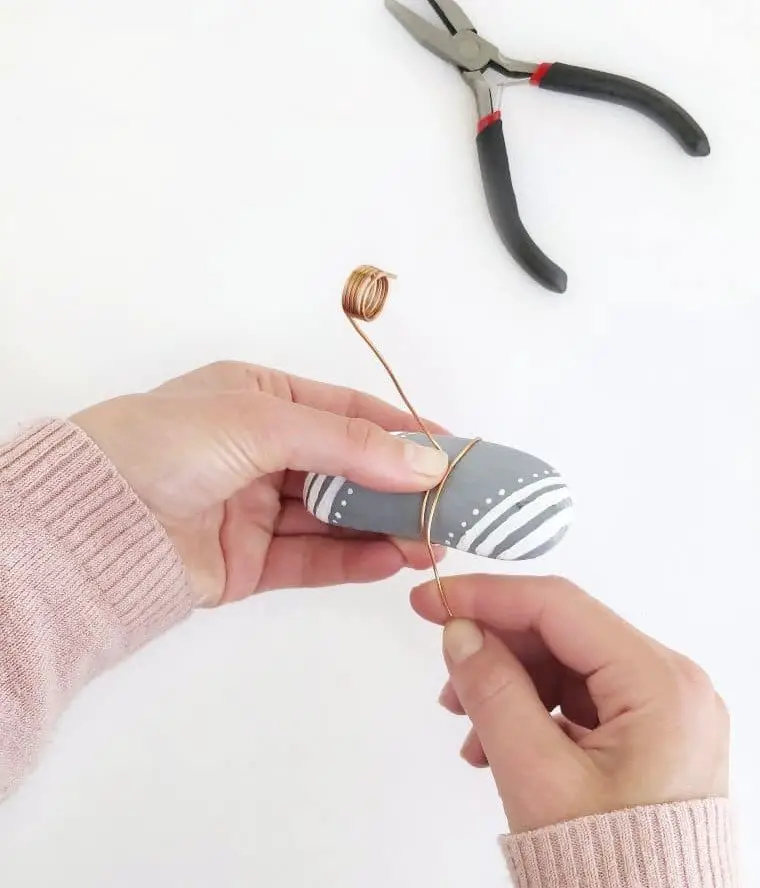

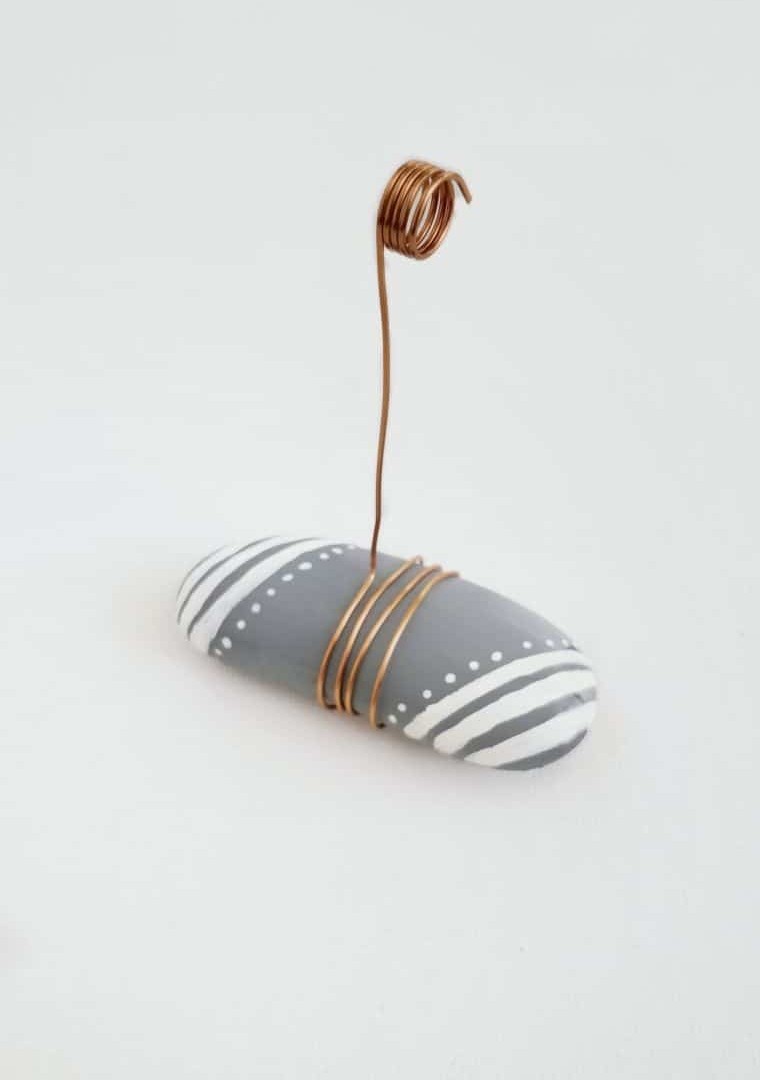
As you near the completion of your DIY rock photo holder, take an extra moment to fine-tune its stability by adding a few more rotations. This will guarantee a solid grip on the surrounding surface, ensuring your prized possessions remain securely in place.
STEP 9
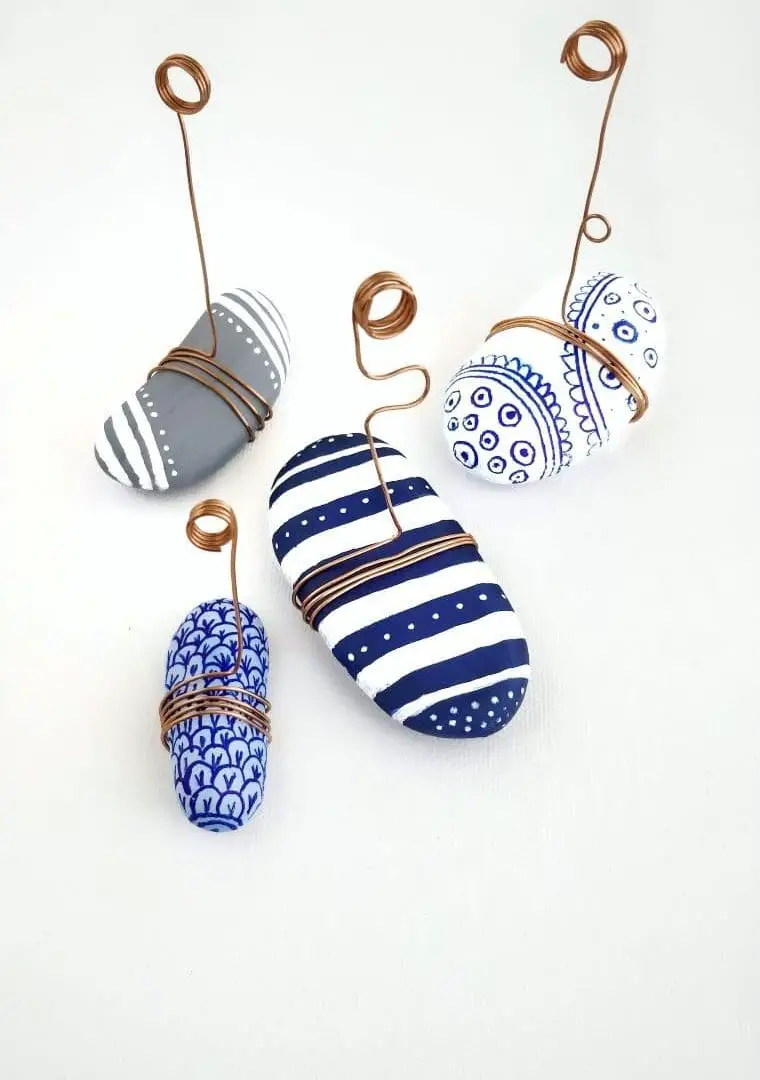
To further elevate your rock holder’s character, consider adding an optional step that involves crafting unique wire patterns. Before creating the 90-degree angle and wrapping the rock, use your pliers to shape the wire into visually appealing designs. For instance, you could create subtle curves or small full-loops to add depth and visual interest. The key is to let your creativity shine through and make it your own.
As you weave these patterns onto the wire, notice how they give the overall design a three-dimensional quality, as if the curves and bends are imbuing the rock holder with a newfound sense of life.
Other Ways to Use DIY Rock Photo Holders
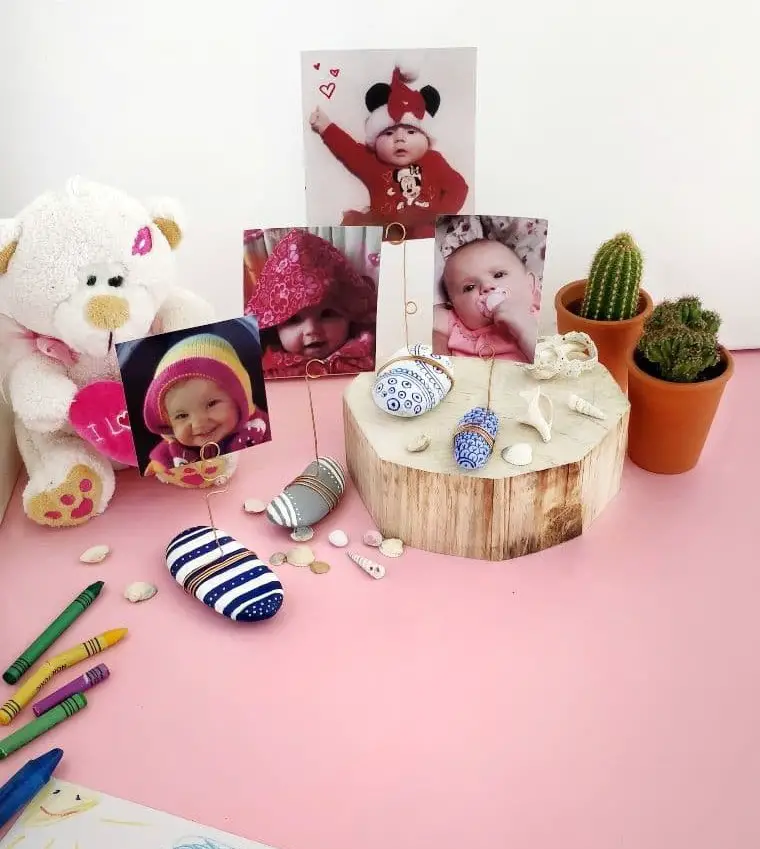
These versatile rock holders aren’t just limited to holding your favorite photos. They can also be used as decorative accents for various items around your home. For instance, display postcards from places you’ve visited or add them to your bookshelves as a unique accent. In our household, we have two of these rock holders on our hallway table.
One is used to hold reminders and notes, such as ‘don’t forget soccer practice’ or ‘pick up my coat from the dryers’, while the other is used by the kids to collect their mail. Instead of displaying artwork on the fridge, why not use a rock holder to showcase smaller pieces? This can be a great way to encourage your kids’ creativity and display their work in a unique way. You can also use these rock holders as mini calendars or message centers for each child’s study table.
Simply place a small calendar or notes from family members inside the holder, providing a fun and interactive way for kids to stay organized and receive encouragement. I personally like having one on my home office desk, where it holds inspirational quotes I’ve written on little cards. The design of these rock holders makes it easy to swap out the quotes daily, providing a constant reminder of positive messages. These rock holders are also great for incorporating into party décor.
For example, you could create 12 of these and use each one to display your favorite photo of the celebrant for each of their first 12 months. Alternatively, you can use them as place cards on your tables, with smaller rocks and cards working best in this scenario. I’m sure there are many other creative ways to use these beautiful rock holders. Can you think of some? Share your ideas in the comments below.
DIY Rock Photo Holders
Transform your space with a unique and effortless DIY project – these rock photo holders are incredibly easy to make, requiring just 10 minutes of prep time. Once you’ve gathered the necessary materials, it’s simply a matter of devoting 30 minutes to assembly and waiting out the 4 hours for everything to dry. The end result is a charming decoration that will proudly display your favorite memories, all while adding a touch of natural beauty to your home.
Equipment
When working with small parts or intricate designs, having the right tools can make all the difference. In addition to the obvious choice of a needle-nose plier for reaching into tight spaces, there are several other options worth considering. A pen, marker, or even a wooden stick can serve as an improvised tool for precision tasks, while paintbrushes offer a gentle yet effective means of applying pressure.
By incorporating these versatile instruments into your toolkit, you’ll be better equipped to tackle a wide range of projects with ease and finesse.
Materials
Instructions
To bring your decorative rocks to life, start by painting them with acrylic paint. Choose your desired color and apply it in thin coats until you achieve the desired shade or opacity. If you want a brighter hue, begin with a base coat of white paint first. Once your rock is painted, use additional coats of acrylic paint to add decorations or embellishments.
Next, prepare your copper wire by wrapping it around a wooden stick or marker four to five times and then straightening the bottom end to create a 2-3 inch length. Use pliers to mark the desired angle and bend the remaining wire into a 90-degree shape. If you’re feeling creative, use the pliers to add funky designs to the wire before shaping it. Wrap the horizontal part of the angle around your rock for two to four times to secure it in place.