
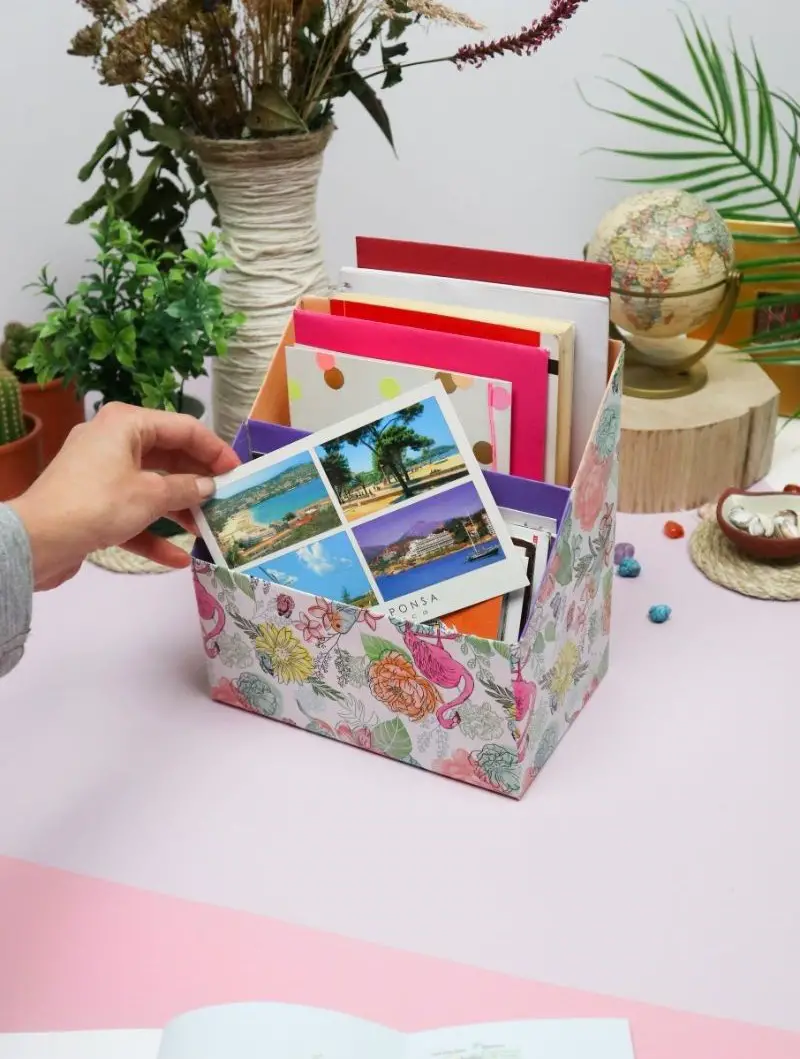
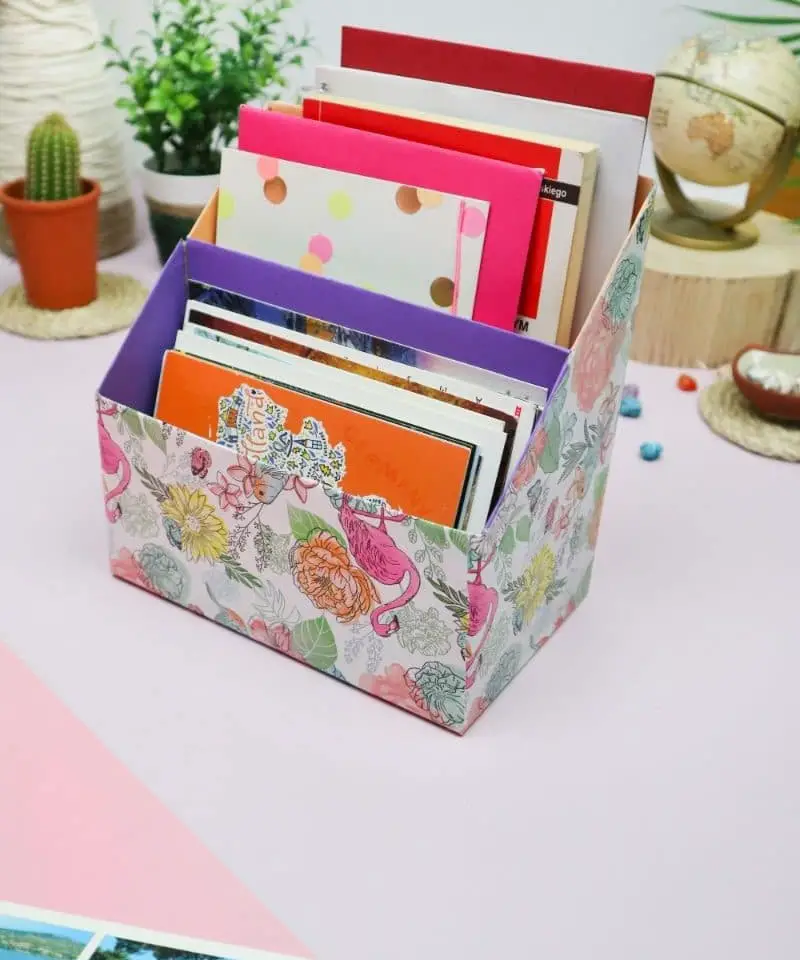
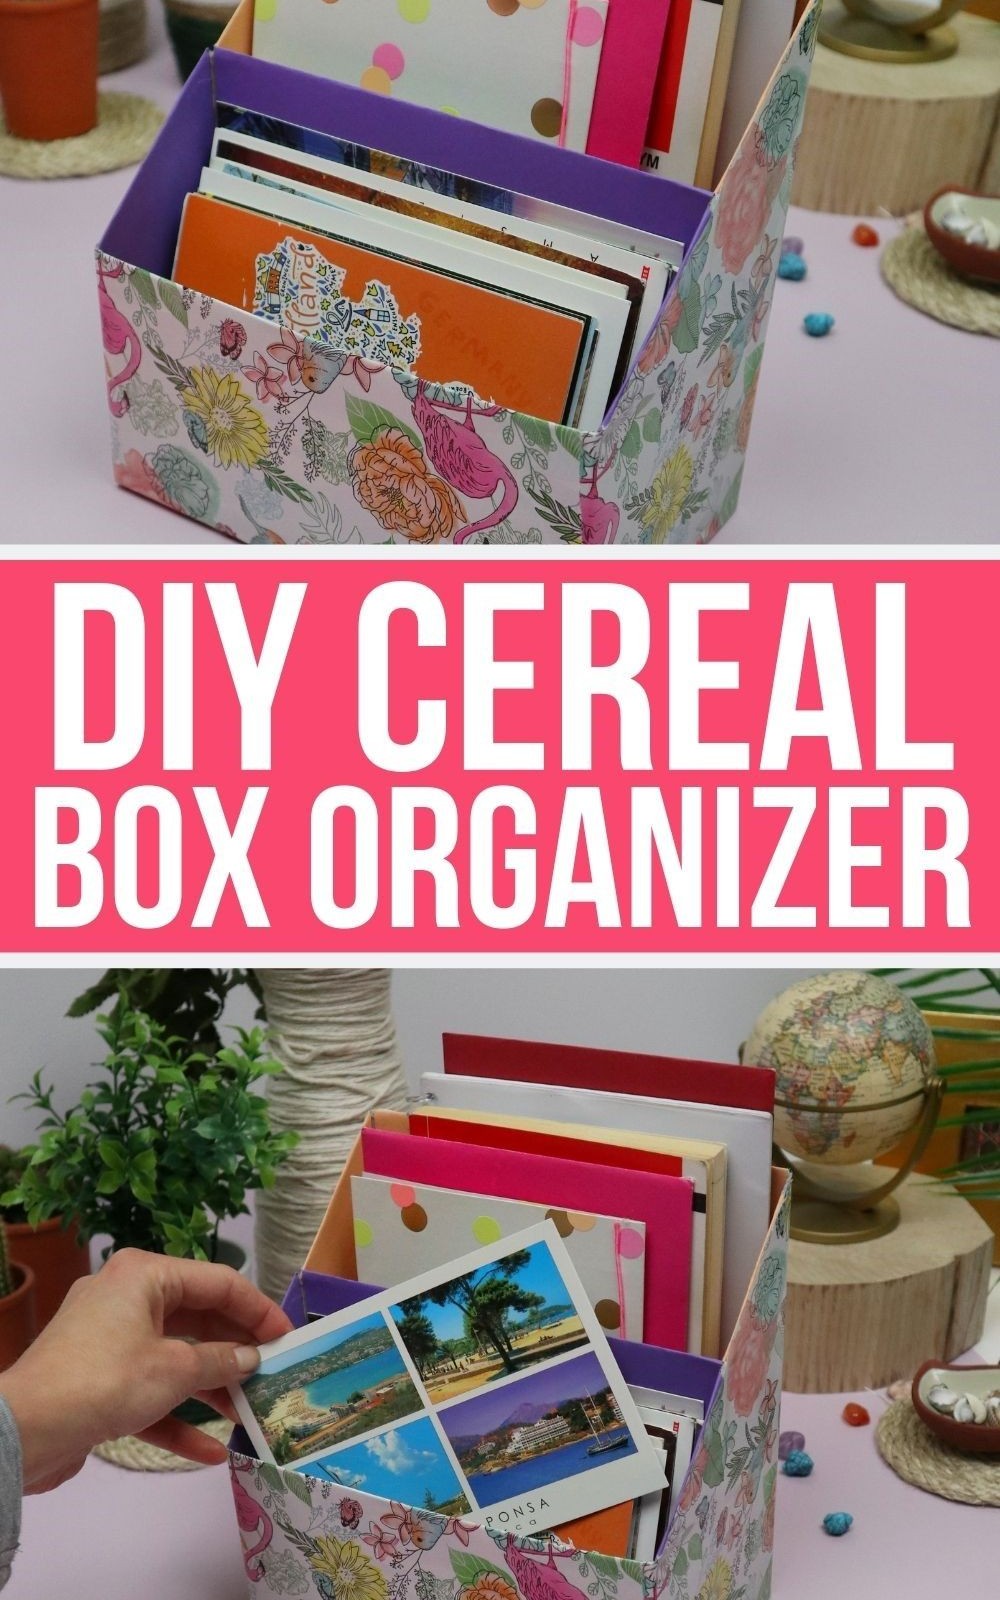
Transforming cereal boxes into functional organizers is an innovative way to upcycle and live more sustainably. With this DIY tutorial, you can create a desk organizer that’s not only practical but also visually appealing.
The key to success lies in the vibrant colors you choose for your project. I opted for a striking wrapping paper on the exterior and bold contrasting hues on the interior, resulting in a beautiful piece that will add a pop of color to any room.
As an added bonus, this organizer will effortlessly keep your space organized and clutter-free, making it perfect for placement on a desk or nightstand. And the best part? You won’t need to break the bank to create it.
So, what are you waiting for? Dive in and learn how to turn cereal boxes into a functional and stylish organizer that’s sure to delight.
What You’ll Need to Make the Organizer
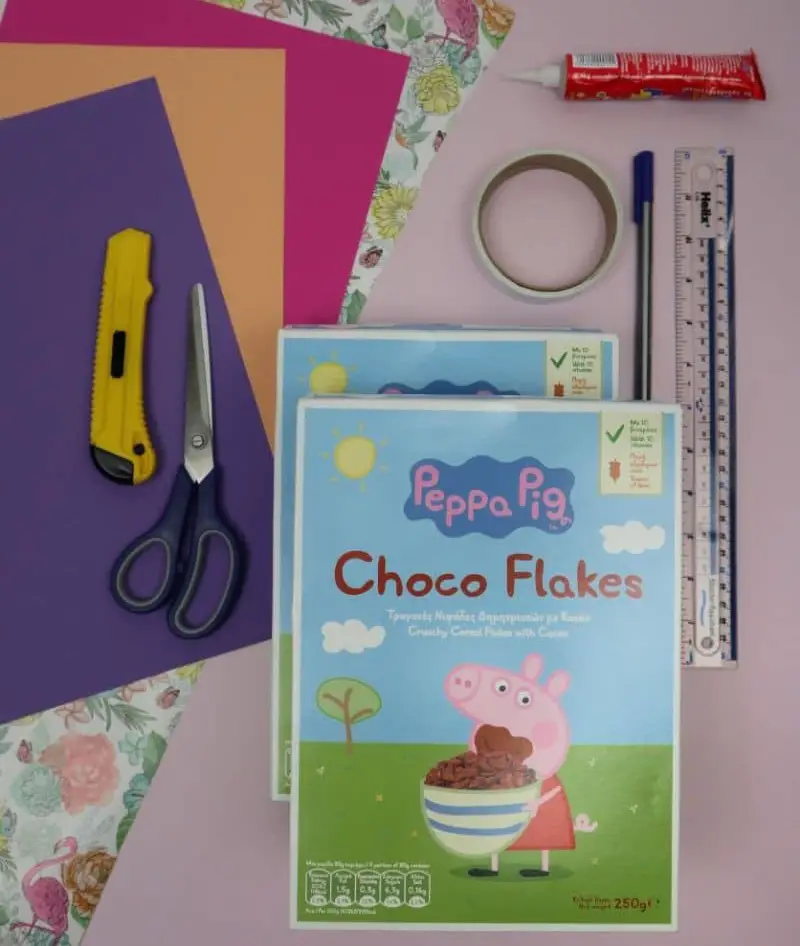
When it comes to preparing for a fun and creative activity, having the right materials is essential. For this particular project, you’ll want to make sure you have a few key supplies on hand. These include two boxes of cereal (which will come in handy as we get started), some vibrant paper, wrapping paper to add a decorative touch, and a variety of adhesives like double-sided tape and glue.
Of course, no craft project would be complete without the proper cutting tools – that’s why scissors and a retractable knife are must-haves. To ensure your creations turn out straight and true, don’t forget to include a ruler in your arsenal. And finally, a pen is always useful for adding those all-important finishing touches.
How to Make This DIY Organizer
To transform your cereal boxes into functional desk organizers, follow this simple, step-by-step guide. By repurposing these everyday items, you’ll effortlessly boost storage capacity in your workspace.
Step 1
To begin with, we’ll need to gather the necessary materials. While either glue or double-sided tape can serve as a suitable adhesive, I find double-sided tape particularly appealing due to its instant drying properties, eliminating any unnecessary wait time.
Step 2

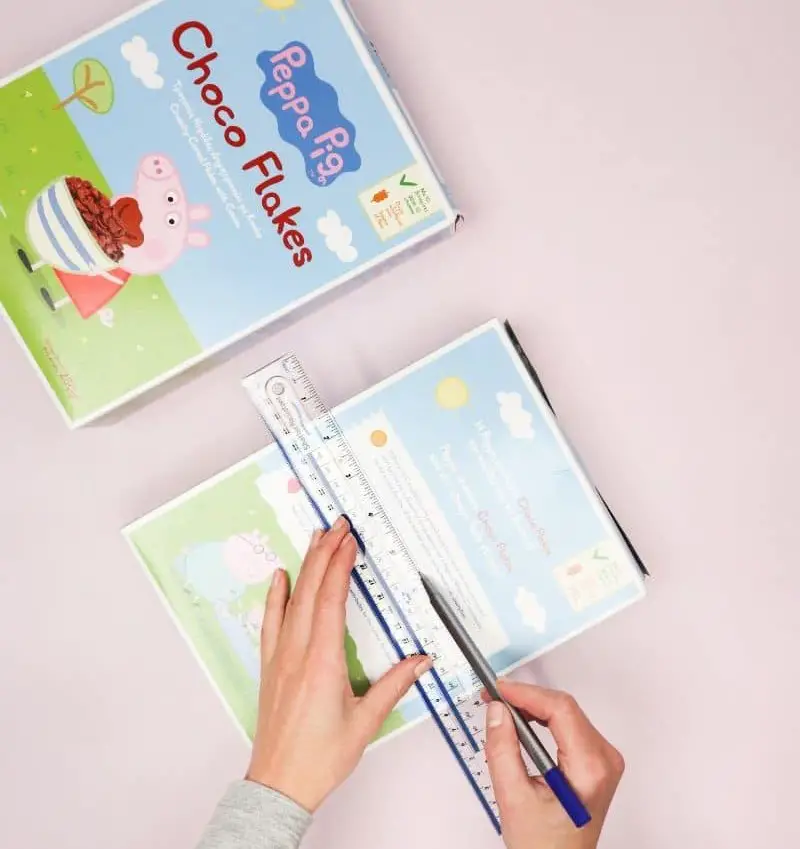
To create the cutouts, start by accurately measuring the dimensions for each cereal box. The measurements are entirely up to personal preference! However, it’s crucial that the height of the small box’s back panel matches the larger box’s front edge (as depicted in the following illustration).
Next, draw a higher line on the back of the smaller box and a shorter line on the front of the larger box.
Then, use your craft knife or scissors to carefully cut along these lines, ensuring a smooth and precise separation.
Step 3
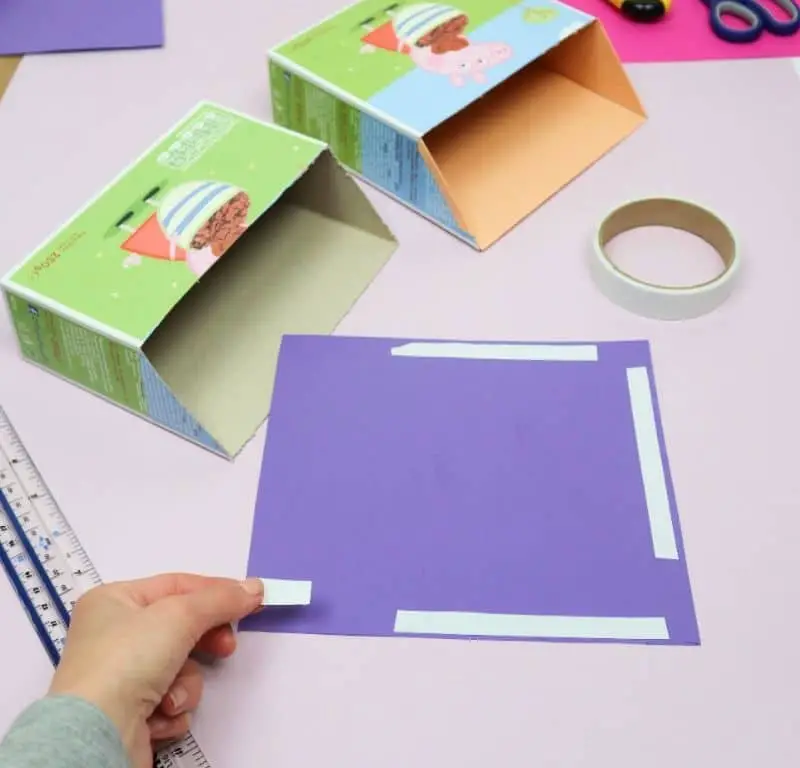
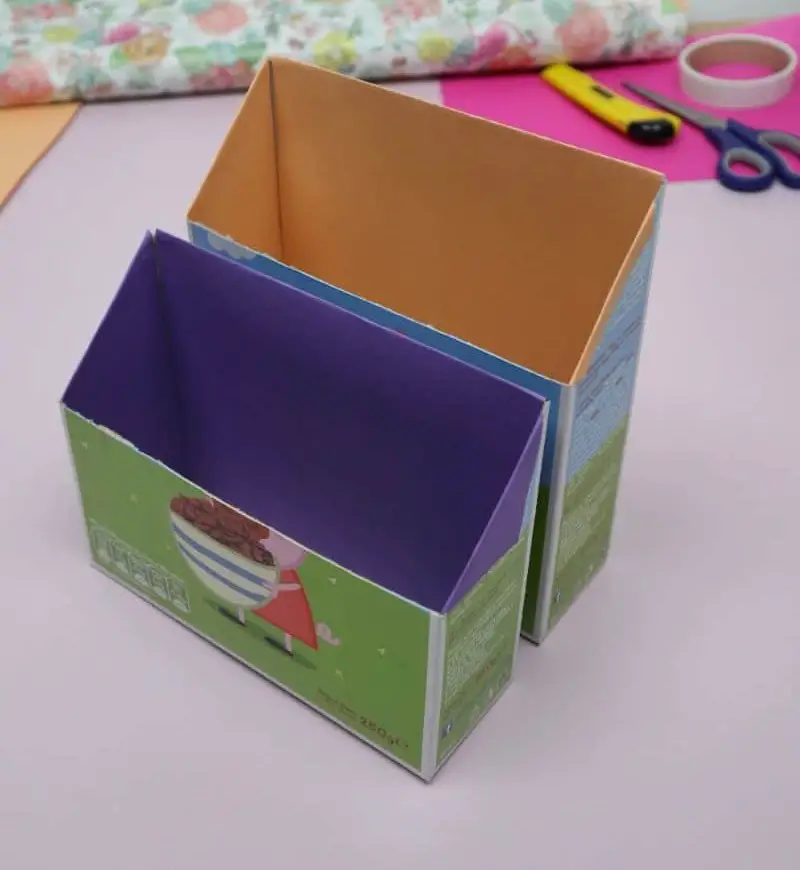
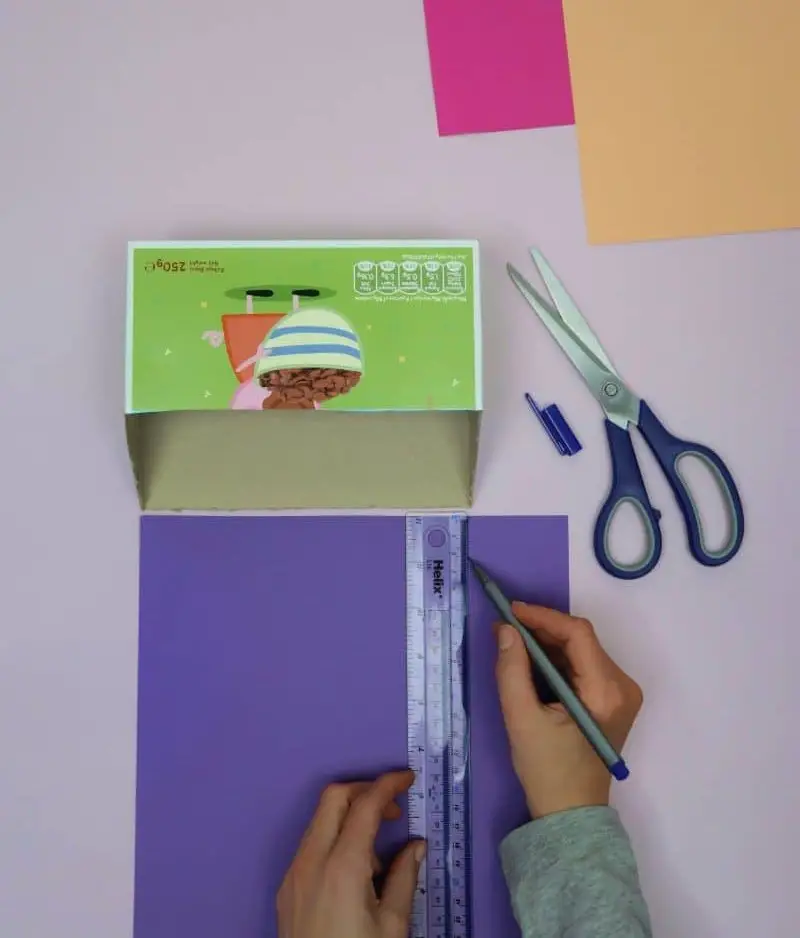
To give your boxes a personalized touch, start by decorating their interior panels. This process is similar to wallpapering – simply measure out each panel on your colored cardstock, cut it out, and attach it accordingly. To secure the paper in place, I opted for double-sided tape, but you can also use glue as an alternative. When using glue, be mindful not to apply too much, as this can cause the paper to become soggy and difficult to work with.
Step 4
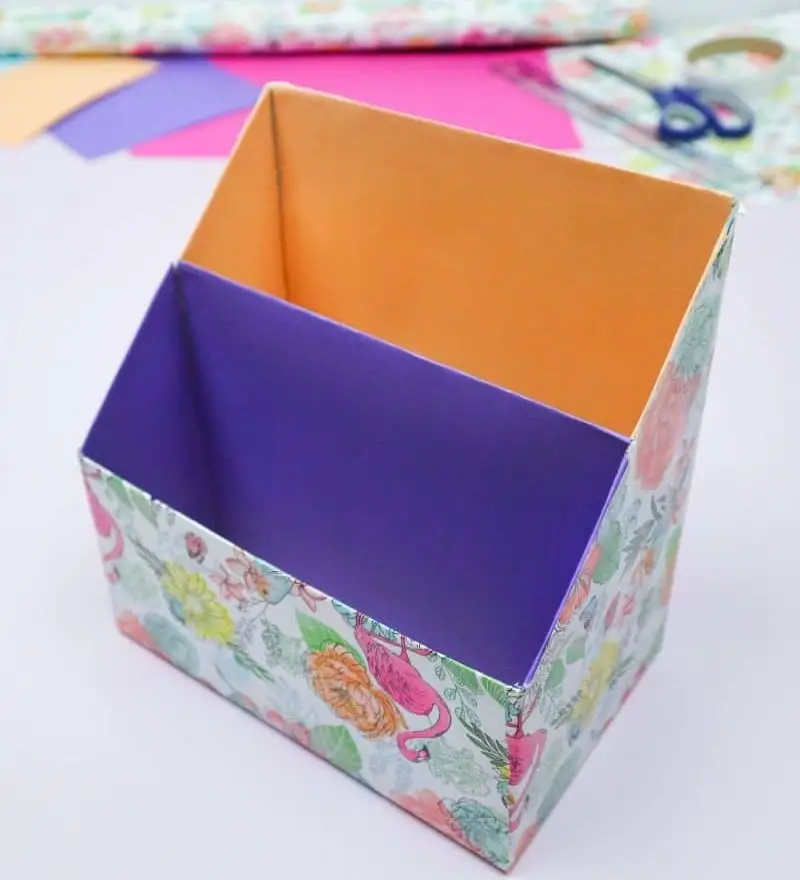
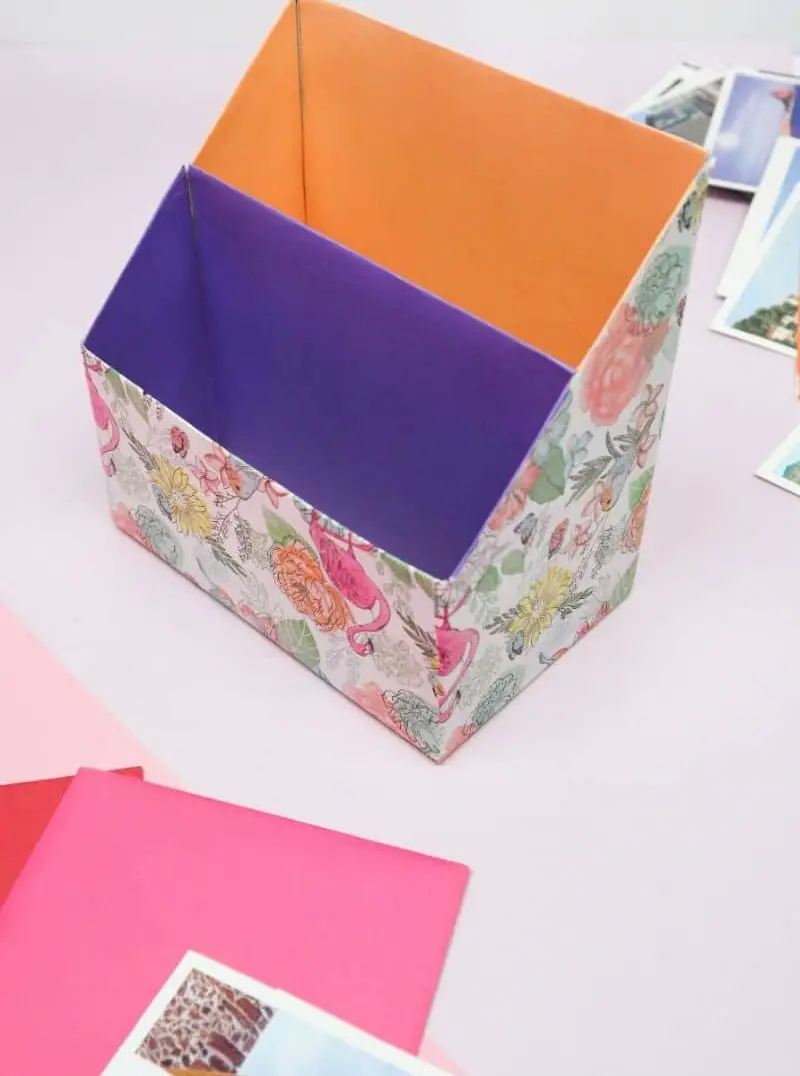
To take your planner to the next level, use a contrasting color scheme for your second box. I opted for purple and orange – there’s something about their harmonious clash that really gets me going! If you want to add some serious visual interest, try selecting colors that are directly opposite each other on the color wheel. This little trick can make all the difference in creating a planner that truly reflects your unique personality.
Step 5
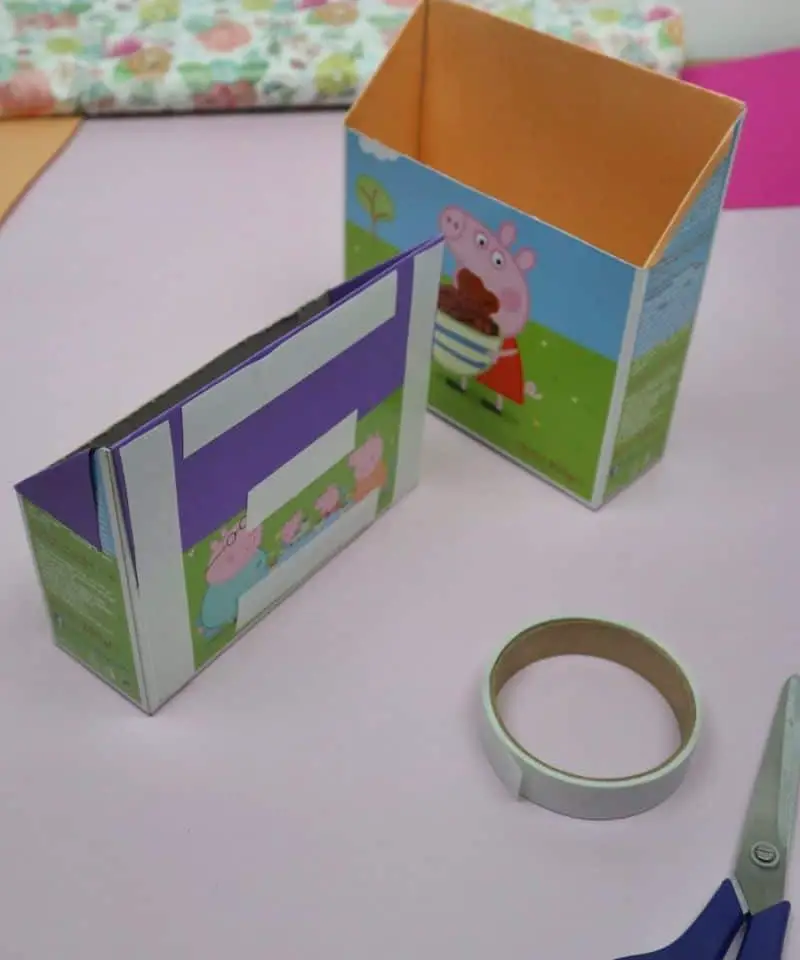
To bring the organizer to life, start by preparing the base structure. This involves attaching the smaller box to the larger one. Begin by securing the back of the smaller box using a suitable adhesive, such as tape or glue. Once the bond is established, carefully align the smaller box with the front edge of the larger one and press gently to ensure a secure fit. With the foundation in place, you’re ready to start adding your organizing components.
Step 6

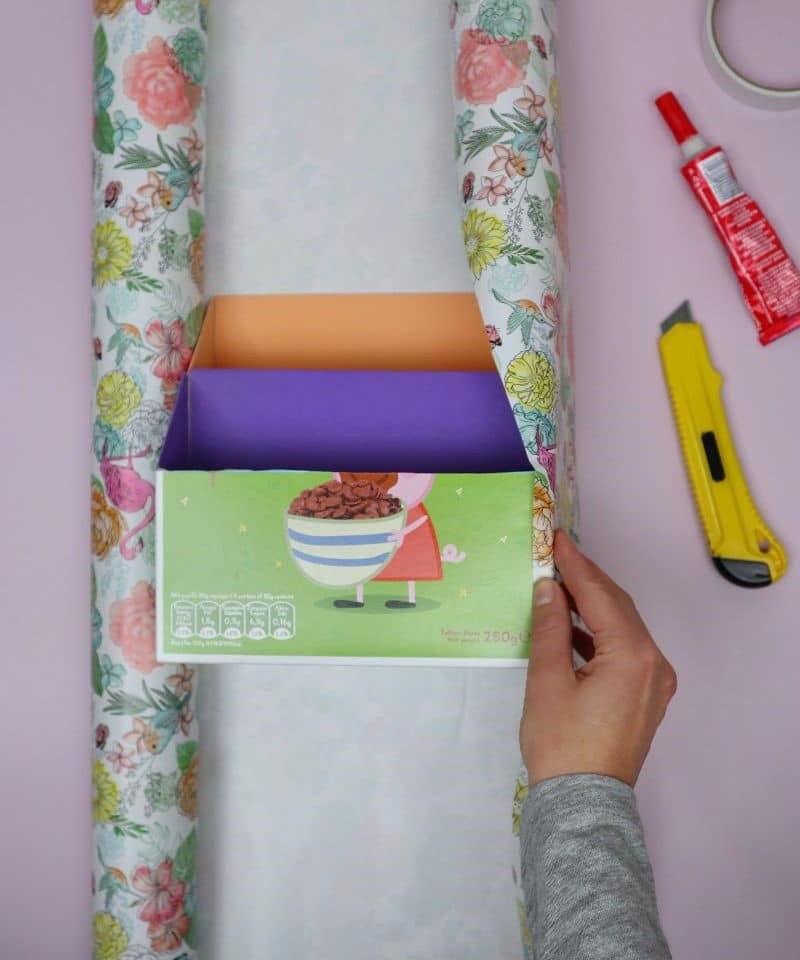
As you near the end of your gift-wrapping journey with this customizable organizer, it’s time to put the finishing touches on it. If you’re a skilled wrapper, this part will be a straightforward process for you. Begin by laying the wrapped shape back down on the wrapping paper and then roll it gently to cover each of the large panels. Once you’ve secured all the main areas, use an envelope fold technique to tuck the bottom of the organizer under the wrapping paper, keeping everything in place.
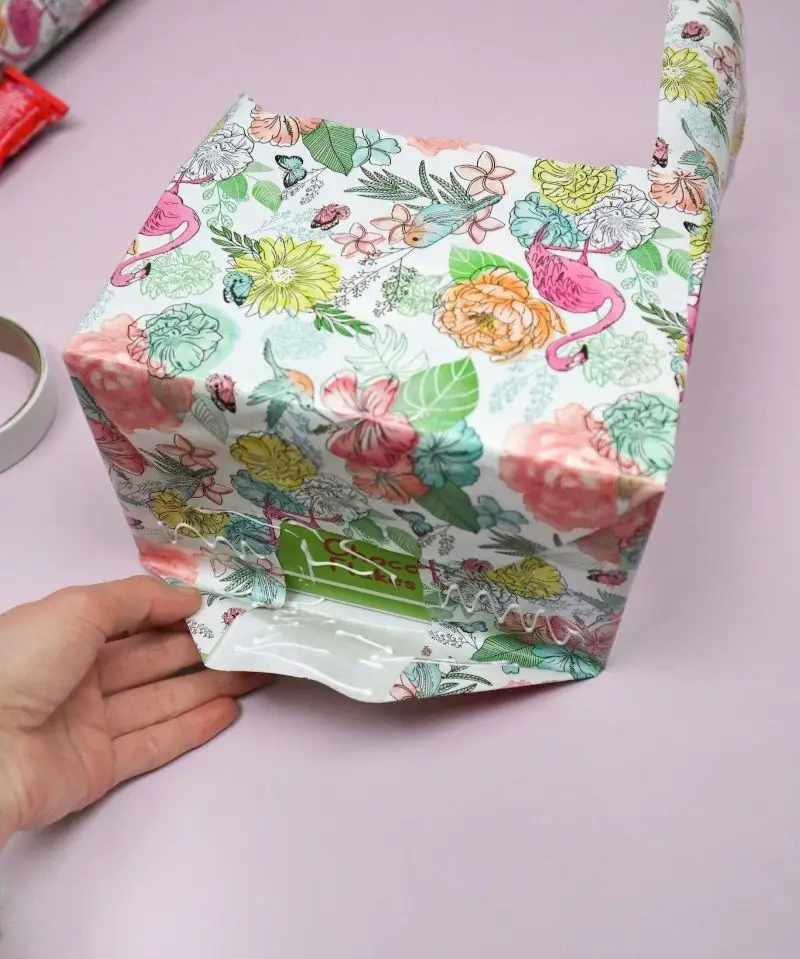
Step 7
When preparing your gift for wrapping, take note of the extra paper flapping up from the top. To achieve a seamless finish, it’s essential to trim this excess away. Due to the design constraints, you won’t be able to fold the paper inside the box to secure it. Instead, focus on ensuring the wrapping paper is securely fastened at the edges. Use a sharp craft knife to carefully slice off the unwanted portion, resulting in a crisp and clean edge.
Step 8
With your DIY organizer now complete, you’re just a few steps away from transforming your workspace into a tidy oasis. I’m thrilled by the simplicity and affordability of this project, which can be accomplished in a relaxing afternoon session. Say goodbye to cluttered desks and hello to a sense of calm and control as you fill your new organizer with all sorts of knick-knacks and treasures.
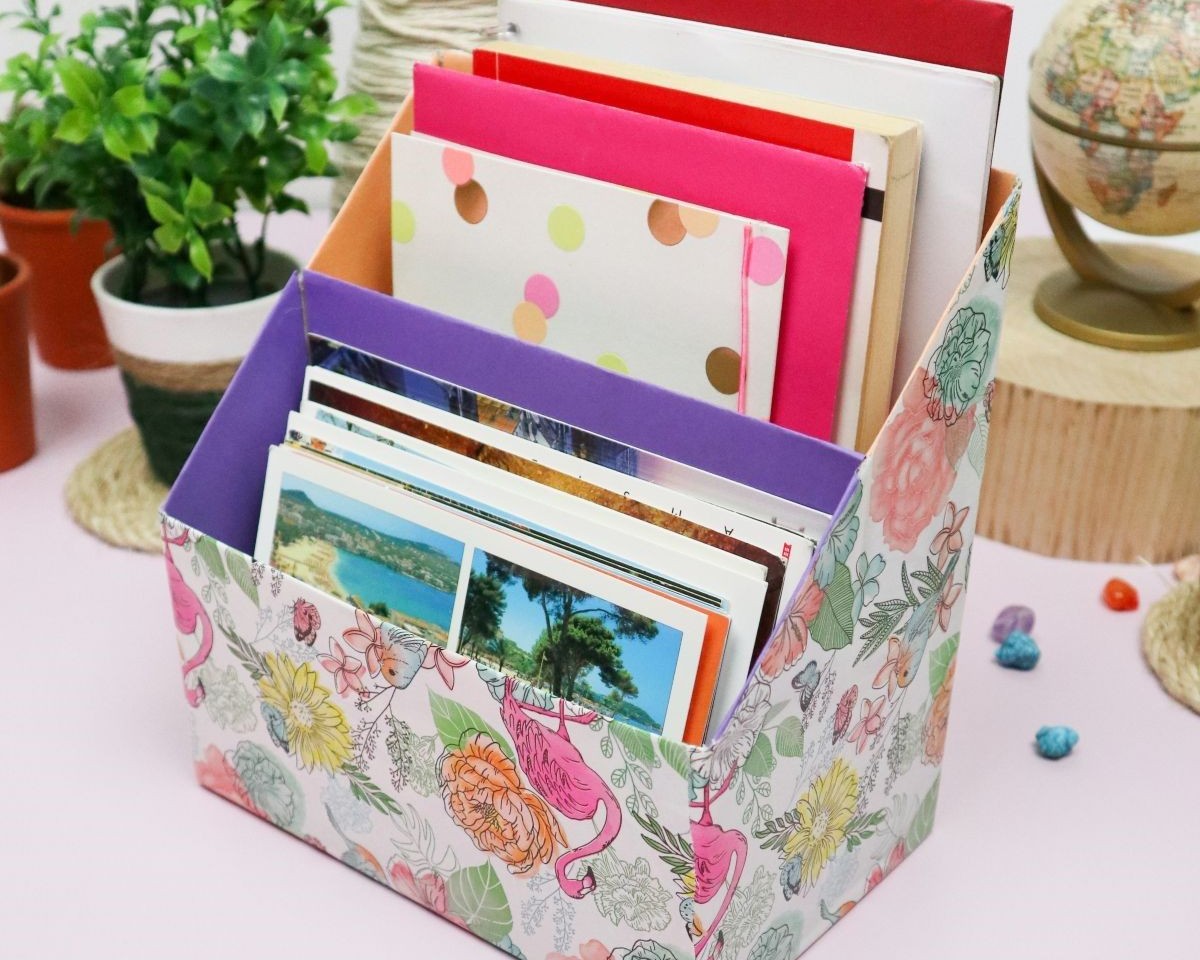
What Can You Store in This Cereal Box Organizer?

With its versatility and functionality, the cereal box organizer is more than just a storage solution – it’s a game-changer for your daily routine. Not only can you stash away personal stationery, making it easy to jot down notes or write thank-you letters, but you’ll also have a dedicated space for notebooks and journals, keeping them organized and within reach.
But the possibilities don’t stop there.
This dynamic desk accessory is perfect for storing cherished memories, such as photos, holiday cards, and other keepsakes that bring joy to your daily life. And let’s not forget about the practical side – with its bright and vibrant design, you’ll never forget to pay a bill again or miss an important piece of mail.
Who Can Make This Organizer?
Good organization is a skill that can be enjoyed by everyone, regardless of age or ability. This DIY organizer project is an excellent way to bond with family members while teaching valuable lessons about cleanliness and responsibility. If you’re creating this organizer with younger children, please exercise caution when handling sharp tools. As the parent or guardian, it’s essential to take charge of the cutting tasks and leave the wrapping and finishing touches to the kids.
DIY Desk Organizer Out of Cereal Boxes
Transform your workspace into a tidy oasis by repurposing a humble cereal box. This ingenious DIY project requires mere minutes of effort, yet yields a functional and visually appealing desk organizer that’s perfect for keeping office supplies in check. With just 30 minutes of active time invested, you’ll be marveling at your handiwork in no time. Plus, the additional 5 minutes spent on preparation will barely register on your radar. The total time commitment?
A mere 35 minutes, and you’ll be enjoying the fruits of your labor with a desk organizer that’s as functional as it is eco-friendly.
Equipment
A typical crafting box or DIY enthusiast’s toolkit might include a variety of essential tools, such as double-sided tape for securing papers and materials in place. Next to it, glue is often used to bond different surfaces together, while scissors are handy for cutting various shapes and sizes of paper. For more precise cuts or trimming, a retractable knife can be utilized.
Finally, a ruler provides a straightedge for measuring and drawing lines, whereas a pen is always at hand for jotting down notes, sketching out designs, or signing off on projects.
Materials
Gathering the necessary materials is a crucial step in creating a unique and personalized gift box. For this project, you’ll need two cereal boxes that can serve as the base structure for your design. Additionally, you’ll require some colorful paper to add a pop of vibrancy to your creation. To give it an extra special touch, consider incorporating wrapping paper into your design as well.
Instructions
Measure up your cereal boxes and get cozy with Netflix – it’s time to craft! Start by taking precise measurements of each box’s back and front, aiming to create a small box and a large box with smooth diagonal lines formed by the sides. To achieve this, ensure the back of the small box is at the same height as the front of the large box. This will give your organizer its signature clean look. Now, it’s time to add some color and texture to the interior.
Cut panels from colored cardstock and adhere them to the inside of each box for a pop of personality. For an extra touch, choose contrasting colors to create visual interest. When using glue, be mindful not to soak the paper, as this can cause it to sag. If you’re using tape, apply it carefully along both edges and the interior to achieve a crisp finish. Next, wrap your boxes with your chosen wrapping paper, treating them like presents by folding the excess under the bottom of each box.
To complete the look, grab your craft knife or scissors and trim off any excess paper at the top of each box. And that’s it! Place this organizer on any flat surface and watch as clutter disappears, replaced by a bright and vibrant space.