Don’t toss that cardboard just yet! With a little creativity, it can be transformed into an array of unique DIY projects, home decor items, and storage solutions. And the best part? Upcycling your cardboard stash will help declutter your space and reduce waste. Cardboard is one of the most versatile craft supplies out there, rivaling mason jars and hot glue guns in terms of creative potential. From boxes to sheets to cutouts, the possibilities are endless!
Let’s dive into 41 amazing and innovative cardboard craft projects that will inspire you to get crafting.
DIY Drawer Dividers
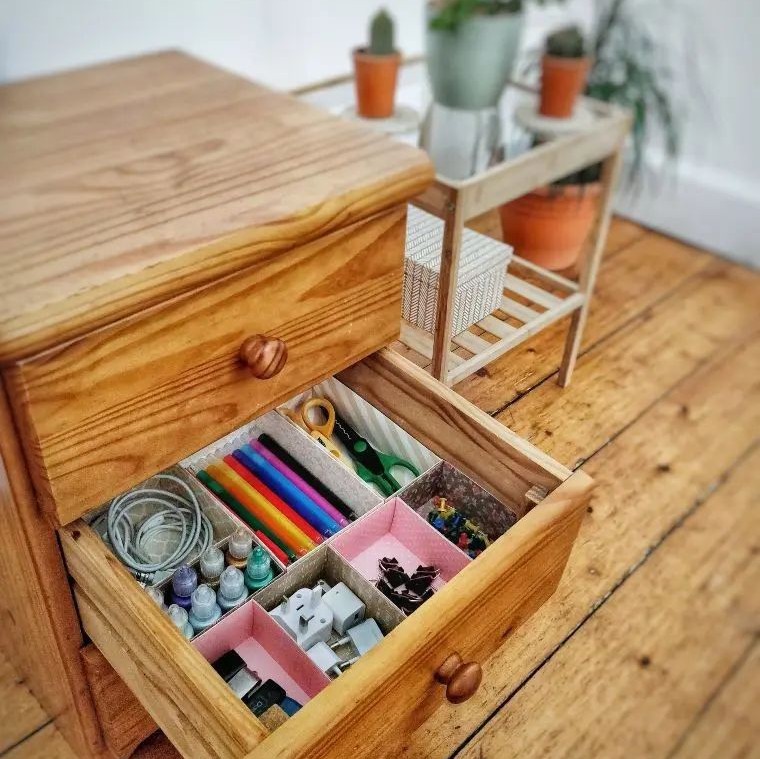
While we may not be able to eliminate our tendency to accumulate clutter in our drawers entirely, there are simple steps we can take to regain control. One effective solution is to implement drawer dividers, which allow us to categorize and organize the contents of our storage spaces with ease. By dedicating specific sections for distinct categories of items, we can avoid the frustration of rummaging through disorganized clutter later on. The best part?
This process requires minimal investment, as a few sheets of cardboard are all that’s needed to get started. For an added touch, consider lining these cardboard dividers with vibrant and stylish cardstock, transforming your drawers into tidy and visually appealing spaces.
Giant Gingerbread Man Christmas Craft
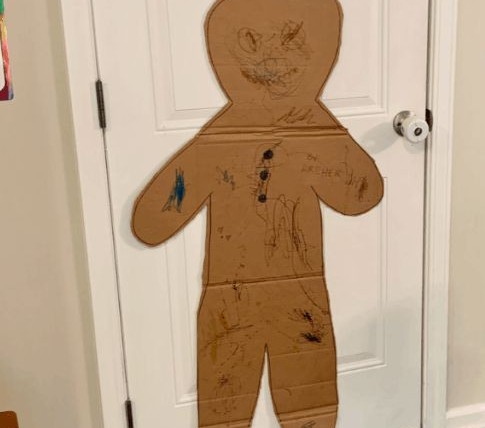
While some might think it’s just another gingerbread man craft, this one takes the cake – literally, because it’s not edible. But put aside any initial reservations and join me in creating a giant gingerbread man out of cardboard with your little ones. With a bit of creativity and some marker magic, even the scariest of gingerbread men can become a work of art. The real fun starts when you use their tiny hands to trace an outline for this behemoth of baked goods.
Grab those markers and let’s get started on this fun project!
Postman Pat Van
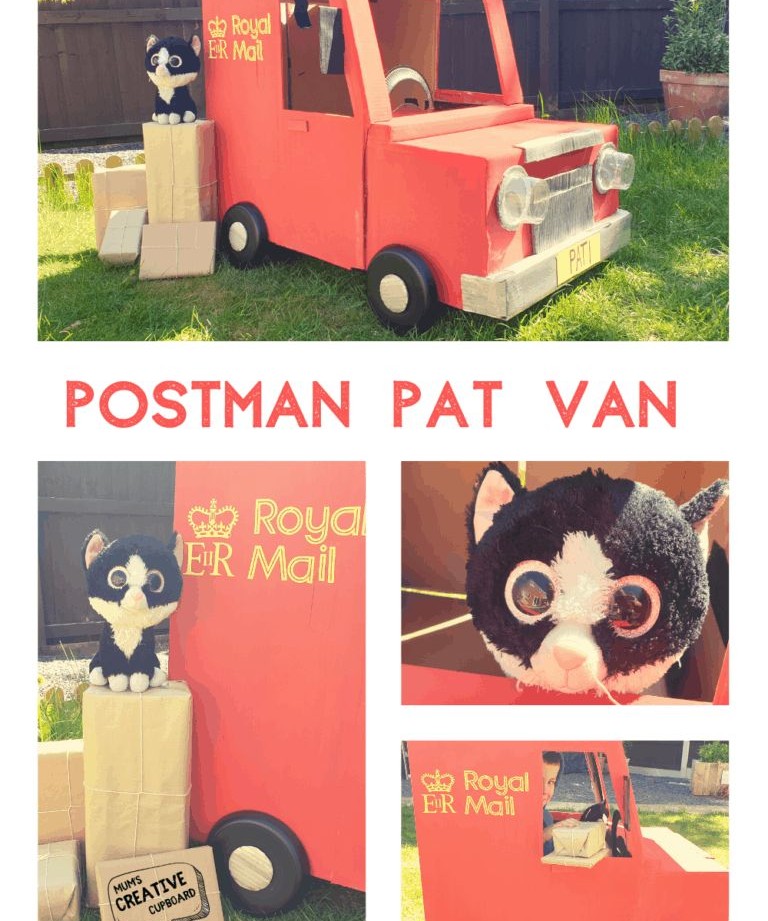
Do you recall the catchy tune from that beloved cartoon? ‘Postman Pat, Postman Pat, Postman Pat, and his black and white cat…’ It’s a nostalgic trip down memory lane! But did you know that with just a few simple materials, you can recreate the iconic red truck and bring it to life? All you need is some cardboard boxes, a hot glue gun, and a set of basic crafting tools. And if you’re feeling extra creative, why not take it a step further and set up an entire display?
Add the distinctive number plate, the British Royal Mail logo on the side panel, and a few parcels strategically placed against the truck’s frame for a truly authentic look.
DIY Rope Basket
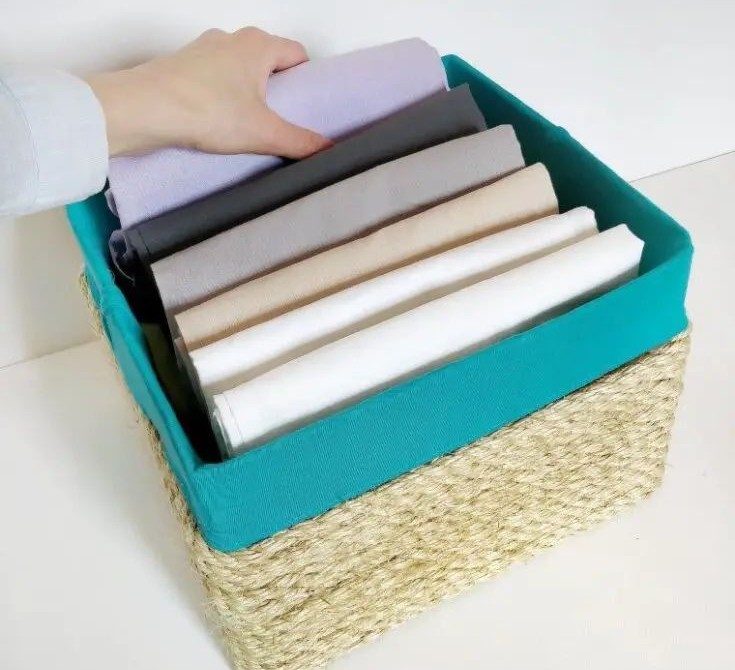
Imagine the frustration of searching for affordable storage containers only to be met with high prices. The ones that catch your eye are often accompanied by a hefty price tag. However, what if I revealed that this seemingly rustic rope basket is actually just a transformed cardboard box? This upcycling project is surprisingly easy and you’ll likely find yourself creating multiple masterpieces.
To get started, gather some materials: fabric of your choice, hemp rope, a hot glue gun, and a cardboard box in the size you prefer. This DIY endeavor not only saves resources but also breathes new life into discarded cardboard boxes, making it a great way to reduce waste.
Fish Tank
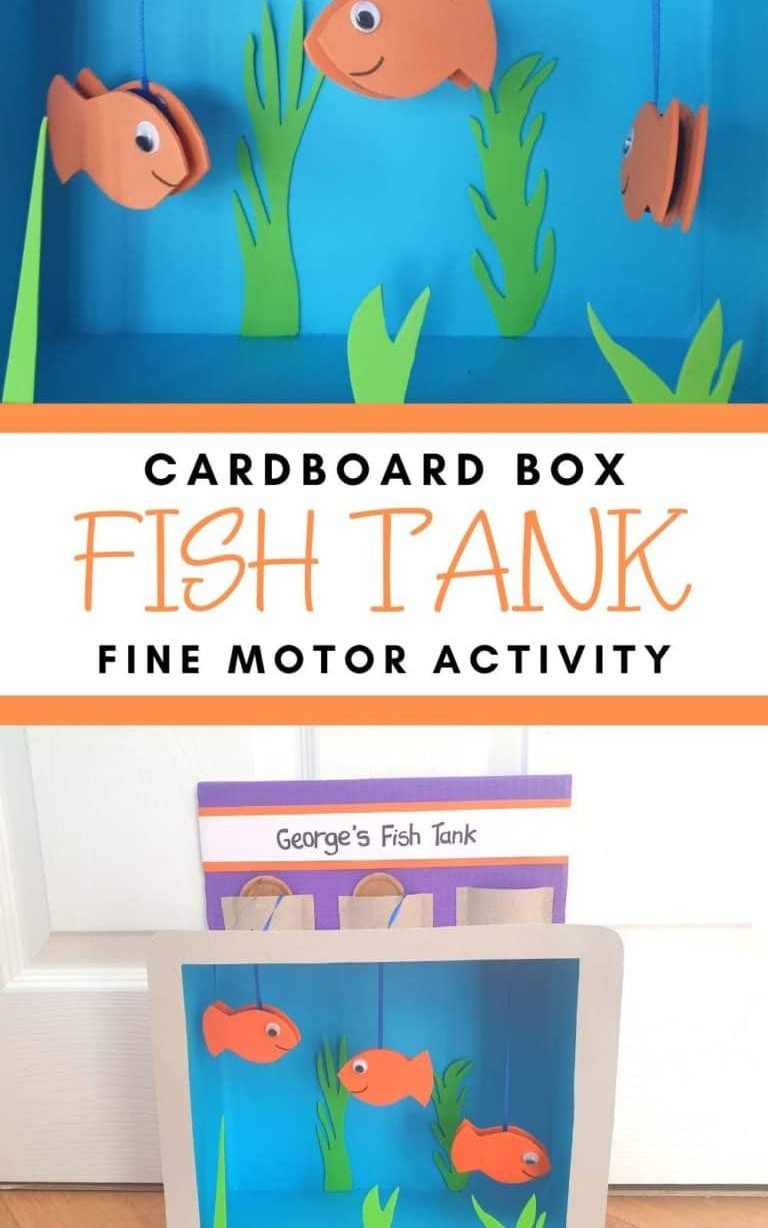
When considering setting up and maintaining a fish tank for kids who are enthusiastic about aquatic life, it’s essential to find a balance between their desires and the demands of the project. A creative solution can be achieved by creating a cardboard-based fish tank that not only saves money but also reduces the risk of neglecting the tank’s inhabitants. This DIY approach involves transforming cardboard sheets and a box into an interactive aquarium. The best part?
The ‘fish’ inside will remain safe even if you forget to feed them, as they are merely cardboard cutouts. To add a touch of realism, line the box with blue paper or paint, and use craft foam to create fish and other underwater elements like plants. For an extra layer of authenticity, incorporate googly eyes to give your faux fish some personality. If you enjoy this craft project, you may also appreciate creating other ocean-inspired crafts that bring marine life to life.
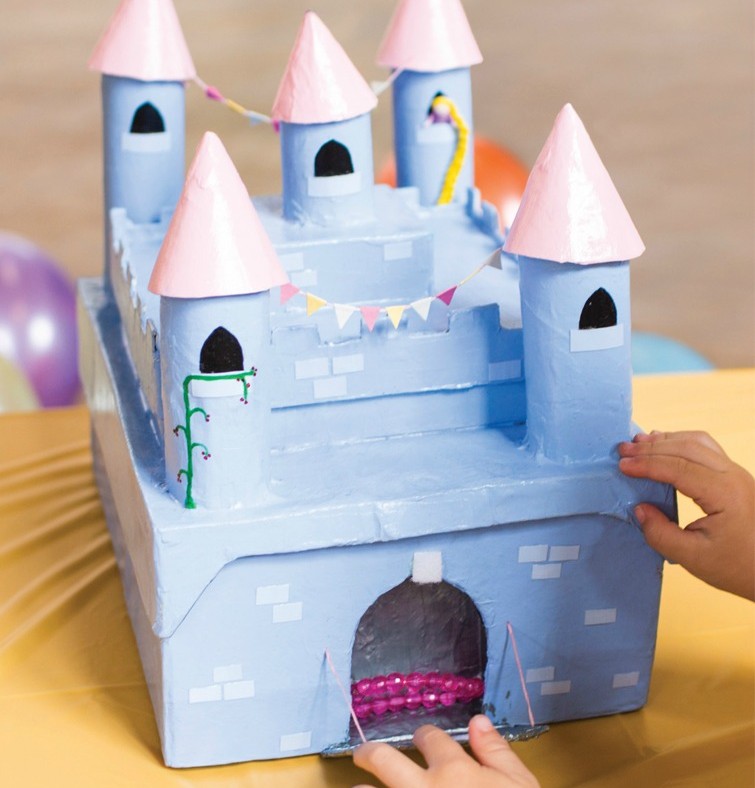
Dollhouse

Imagine having the freedom to design your very own dollhouse, tailored to your unique tastes and preferences. While commercial options can be lovely, they often lack a personal touch. But what if you could create your dream dollhouse from scratch? With features like a sauna or home theatre, the possibilities are endless!
To get started, you’ll need just a few simple materials: some cardboard boxes, a reliable adhesive like gorilla tape or duct tape, and a few basic crafting tools such as scissors, a craft knife, or this box cutter. The journey begins with these humble beginnings.
DIY Table Centerpiece
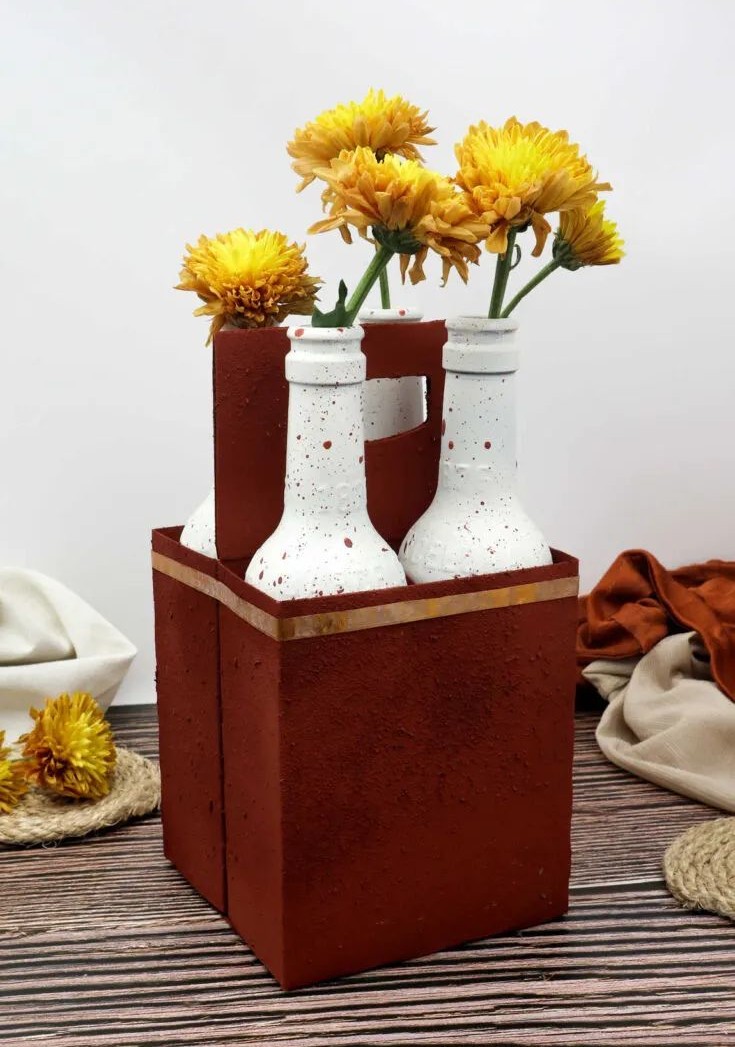
Transforming discarded materials into stunning works of art is a hallmark of creative upcycling. Take this gorgeous table centerpiece, for instance. What appears to be a rustic beer caddy on the surface is actually crafted from cardboard, while its elegant counterpart is made by repurposing four empty beer bottles. This dichotomy of design styles not only showcases the versatility of materials but also demonstrates the limitless possibilities of DIY projects.
Whether you’re looking to adorn your dining table at home or create a memorable wedding centerpiece, this upcycled beauty has got you covered. Fill it with flowers and foliage for a whimsical touch or leave it as is – the choice is yours. To get started on your own creative journey, simply grab some decorative tape and let your imagination run wild. For more inspiration and DIY table centerpiece ideas, check out our comprehensive guide.
Valentine’s Day Hang Tag
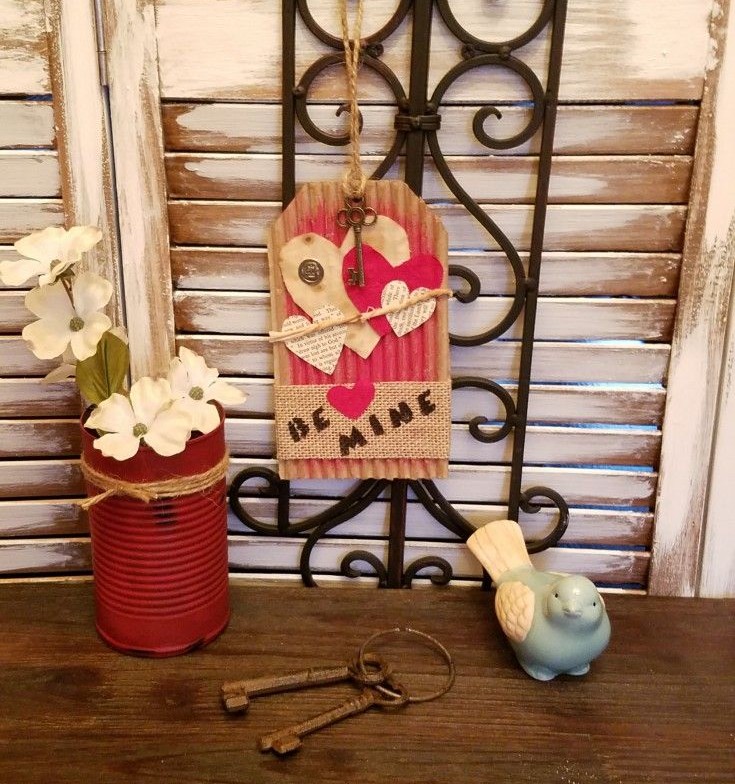
As Valentine’s Day approaches, it’s time to start thinking about gifts for loved ones. To make your present even more special, consider adding a personal touch to whatever gift you’ve chosen. One way to do this is by creating a customized hang tag instead of a traditional greeting card.
Gift Box
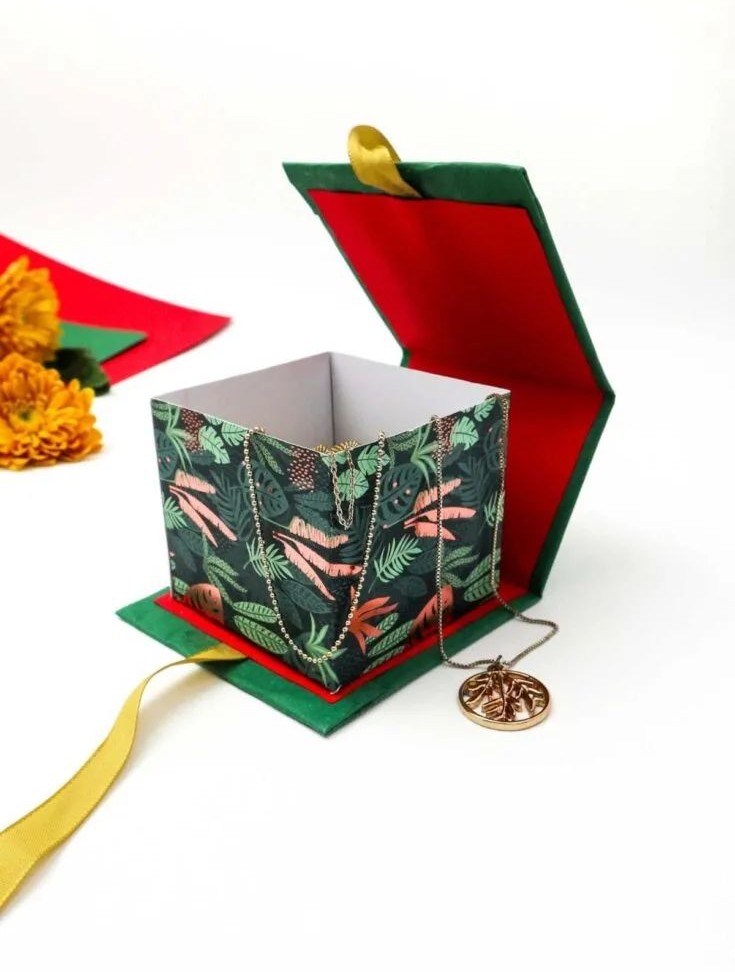
While store-bought gift boxes can be pricey, making your own using cardboard and crafting supplies can be a cost-effective and creative solution. One way to do this is by repurposing cardboard tubes into mini gift boxes. To give them an extra touch of elegance, you can design a pull-over lid that adds a pop of sophistication. For the box itself, select a patterned cardstock that’s sturdy and colorful. This will provide a beautiful backdrop for your gifts.
In addition to the cardstock, you’ll need some ribbon, a hot glue gun, and scissors to bring your creation to life.
Cardboard Treehouse
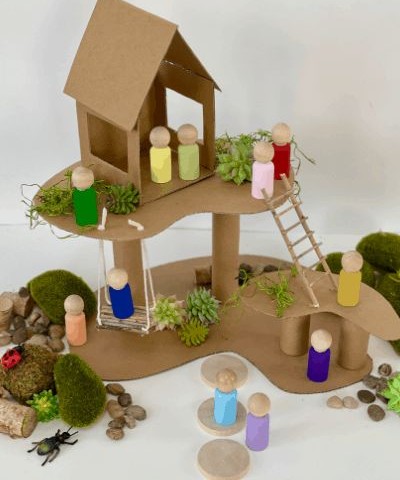
For many kids, having a cool hangout spot is a dream come true – think treehouses or secret hideouts. But what if you’re an urban family, stuck in a city apartment with no yard to speak of? Fear not! You can still give your little ones the treehouse experience they crave, without breaking the bank or moving to the countryside. Simply grab some cardboard and get creative.
With a few simple supplies – like skewer sticks to prop up the walls – you can construct a mini-treehouse that’s all their own.
DIY Copper Snowflakes Ornament
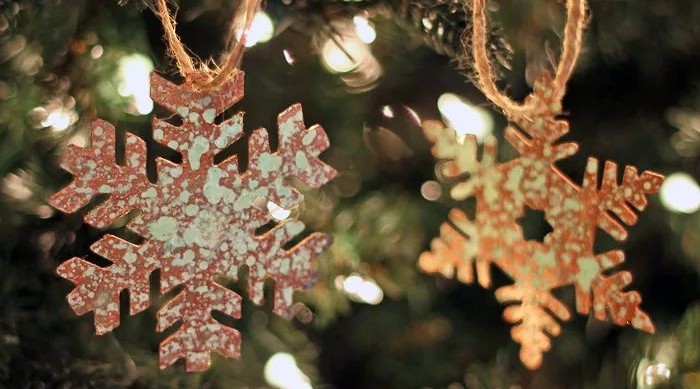
Cardboard cereal boxes are a staple in many craft projects, and for good reason – they’re versatile, accessible, and can be transformed into a wide range of creative pieces. Take, for instance, the snowflake ornaments that have been aged to perfection with a copper finish. It’s impressive how well the natural texture of the cardboard blends seamlessly with the metallic sheen, right?
With just a few simple tools – including a Silhouette cameo, cutting mat, painter’s tape, and metallic copper paint – you can recreate these stunning ornaments for yourself. And if you’re looking to add some variety to your holiday decor, consider pairing them with DIY salt dough ornaments. The combination would create a visually appealing tree that showcases the beauty of upcycling. For more winter craft inspiration, be sure to check out our collection.
Portrait
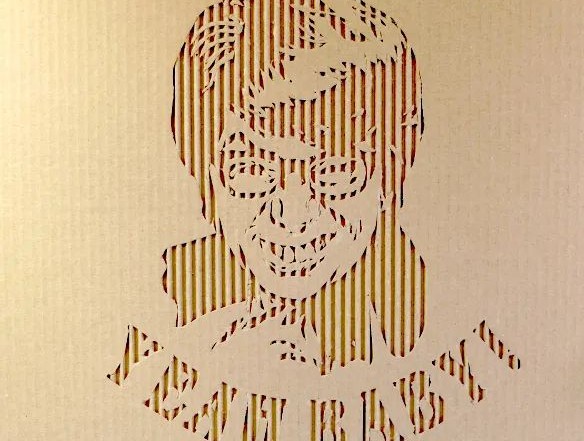
Transforming a headshot into a portrait is easier than you think, thanks to the world of cardboard art. The resulting piece is not only a statement in home decor, but it’s also a testament to your creativity. By mastering this technique, you can recreate any portrait that strikes your fancy, or take it to the next level with a two-tone effect. So, what are you waiting for? Take on the challenge and turn a simple headshot into a work of art.
Ladybug Toilet Roll Craft
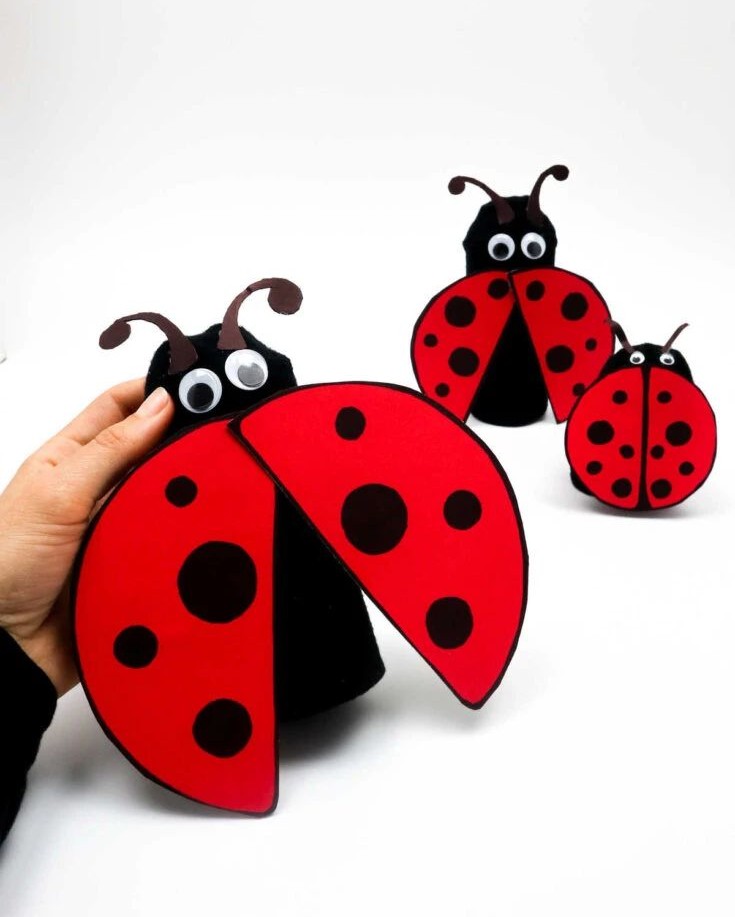
There’s no denying the magic of toilet paper crafts – a hobby that requires minimal effort yet yields maximum results. One of their biggest advantages is the fact that you likely already have most of the necessary materials on hand, making them an incredibly budget-friendly option. This charming ladybug toilet roll project is a perfect example of this, with its stunning appearance leaving little room for doubt.
So, grab your supplies and get creative – it’s time to bring this beautiful insect to life!
Dragon Shield Craft
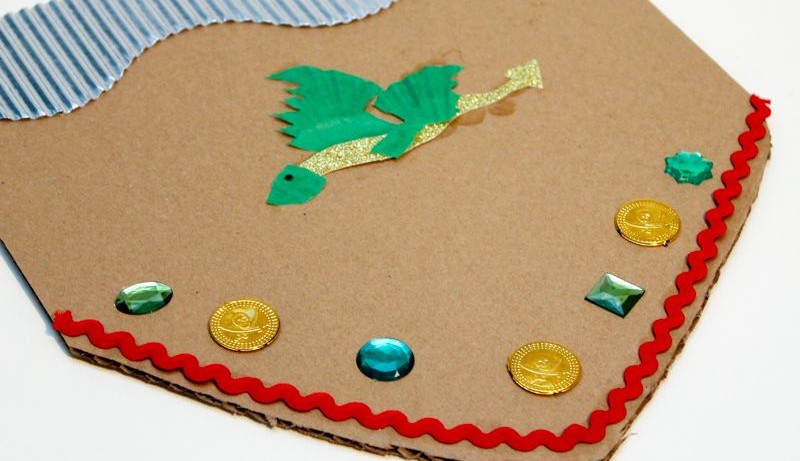
Protect your little adventurer’s hide with a DIY dragon shield! This fun project requires just a few recycled materials and some cardboard. To add an extra touch of excitement, consider decorating the shield with ribbon, glittery card paper for the dragon’s body, craft gems, and colorful stones. Use double-sided tape or hot glue to secure everything in place.
Bumble Bee Tube
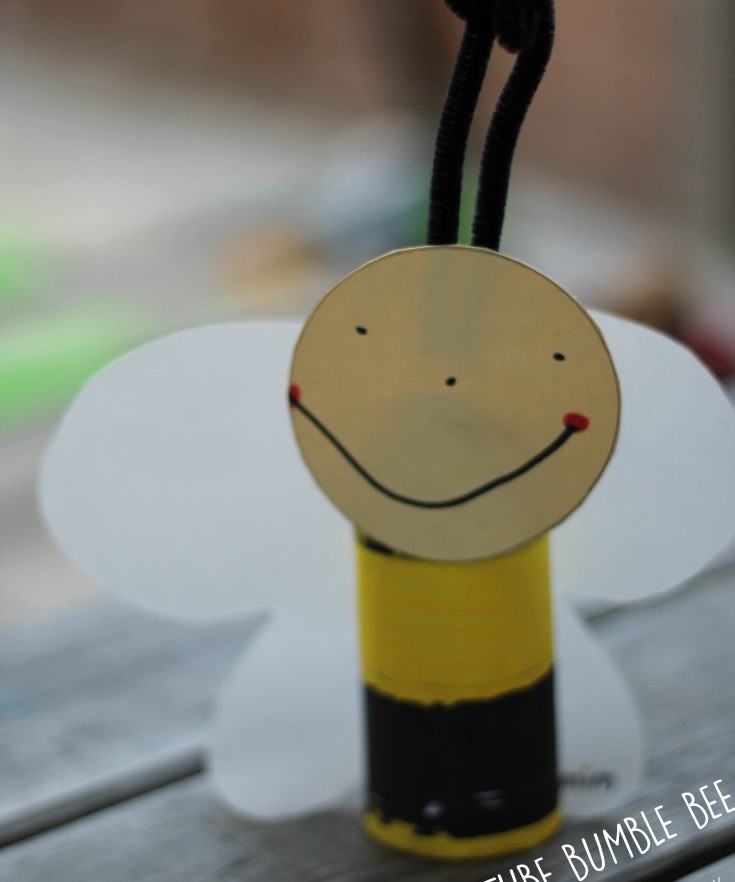
A creative and eco-friendly project is born from the humble toilet roll. Who would have thought that this everyday item could be transformed into a charming bumblebee? The versatility of cardboard rolls is truly impressive, making them an ideal material for crafty endeavors.
To bring your cardboard bee to life, you’ll need a few basic supplies: black paint, yellow paper, tracing paper, red and black pens, two black pipe cleaners, and a reliable adhesive like tape or glue.
If you’re eager to explore more creative possibilities with toilet rolls, you might enjoy perusing our collection of 20 toilet paper roll crafts. Additionally, if you have any extra pipe cleaners lying around, be sure to check out these 27 pipe cleaner crafts for inspiration.
Toy Car Wash
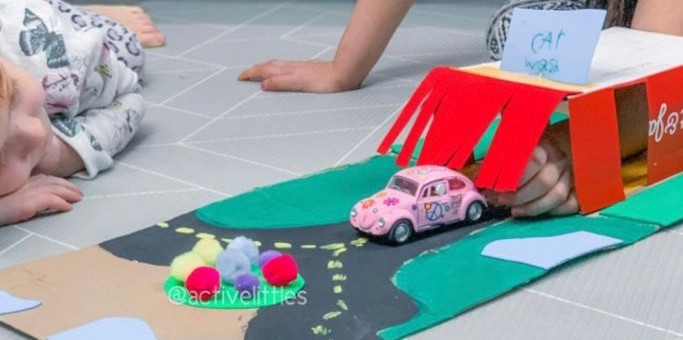
As a kid, I had a blast going to the car wash with my parents – it was like stepping into a mini-world of its own. If your little ones share this enthusiasm, then get them excited about this DIY car wash craft project that’s packed with details, from the driveway leading in to the fringed mats at the entrance.
Valentine Box Love Train
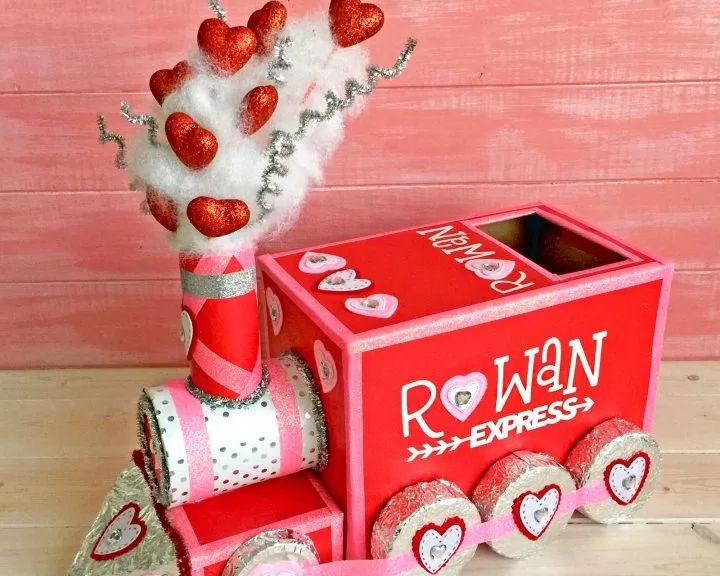
This Valentine’s Day train is a masterclass in thematic execution, boasting a vibrant palette of reds, pinks, silvers, and whites. The sheer abundance of colors demands attention, inviting you to take your time and carefully curate your own unique creation. Amidst the visual feast, a showstopping tuft of cotton smoke steals the spotlight, filled with silvery pipe cleaners and heart-shaped treasures. Meanwhile, the wheels of the train are adorned with hearts, adding an extra layer of whimsy.
The pièce de résistance? A side dedicated to personalized touch – simply print out your name using your Silhouette Cameo and watch as your Valentine’s Day train takes shape.
Minion
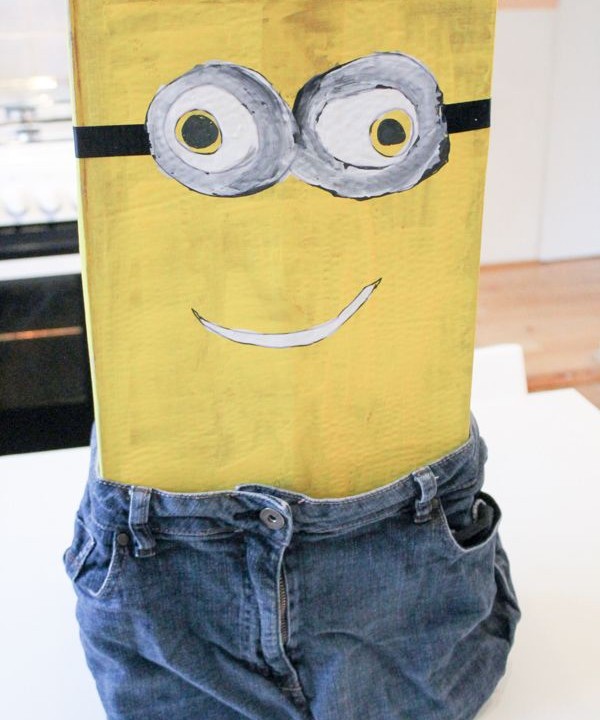
The cardboard box minion’s impressive design has left me astonished. Its scale is so convincing that I believe a larger box could potentially replicate a life-sized Minion. These DIY decorations would be perfect for themed parties, allowing you to creatively arrange them around your home. To take it to the next level, simply stuff an old pair of jeans or shorts with crumpled fabric and place the box inside, just as depicted here!
With paints and brushes at the ready, get creative and bring your Minions to life.
Bigfoot Cardboard Feet
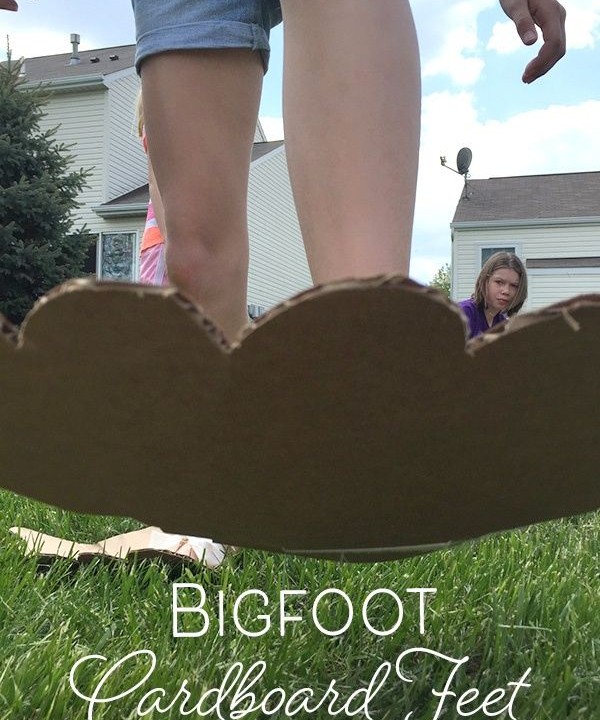
As fascination with Bigfoot and Yeti continues to grow since the release of ‘Abominable’, it’s no surprise that crafting our own versions of these mythical creatures has become a fun and creative activity for many. The allure of these enigmatic beings, shrouded in mystery and magic, is undeniable. To create your very own Bigfoot cardboard feet, start by sketching out a rough shape with a pencil on a poster board. Use this template to cut out the actual foot shapes from the cardboard.
For more fun and creative activities for kids, be sure to check out our craft section.
Giant Christmas Tree Ornaments
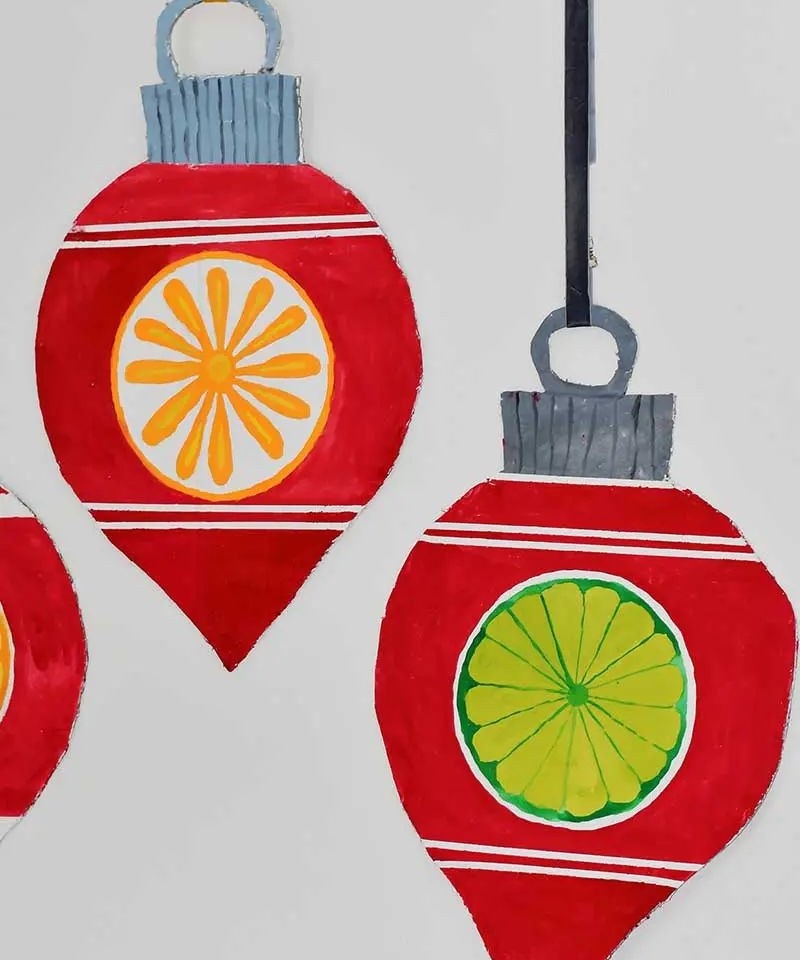
Start by preparing your cardboard as the base material for this creative project. Assuming you have all the necessary craft supplies at hand, flatten out the cardboard and get started. To create the ornament’s shape, place a large plate on top of the cardboard and use a marker to draw around it, effectively creating a stencil. Next, extend the circular design towards one edge to form a tear-drop shape.
At the opposite end of the circle, draw a rounded cap to serve as the bauble’s finishing touch. With your design complete, you can now cut out the ornament and get creative with paint and decorations. If you’re looking for more inspiration, check out our collection of Christmas tree decorations.
Pink Flamingo Feet Craft
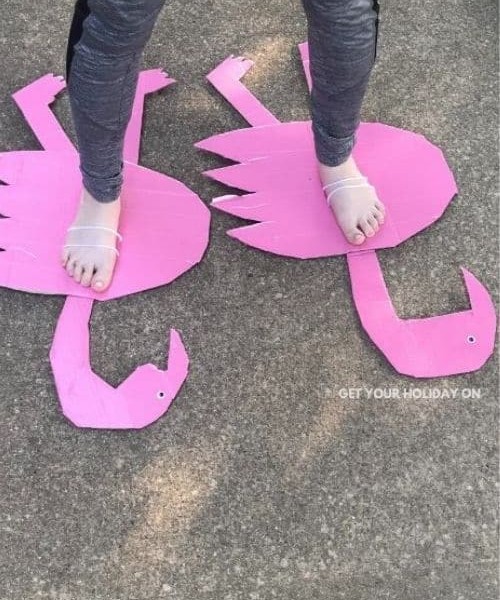
Building on the creative momentum from the Bigfoot craft project, why not try creating something equally fun and quirky? Take inspiration from pink flamingos with this unique feet craft. To get started, gather materials such as pink duct tape, googly eyes, scissors, yarn, and cardboard sheets. Consider stenciling your design onto paper first to create a template for cutting out the cardboard pieces. Who knows, you might just start a new trend in big-footed animal crafts!
Kids Fort
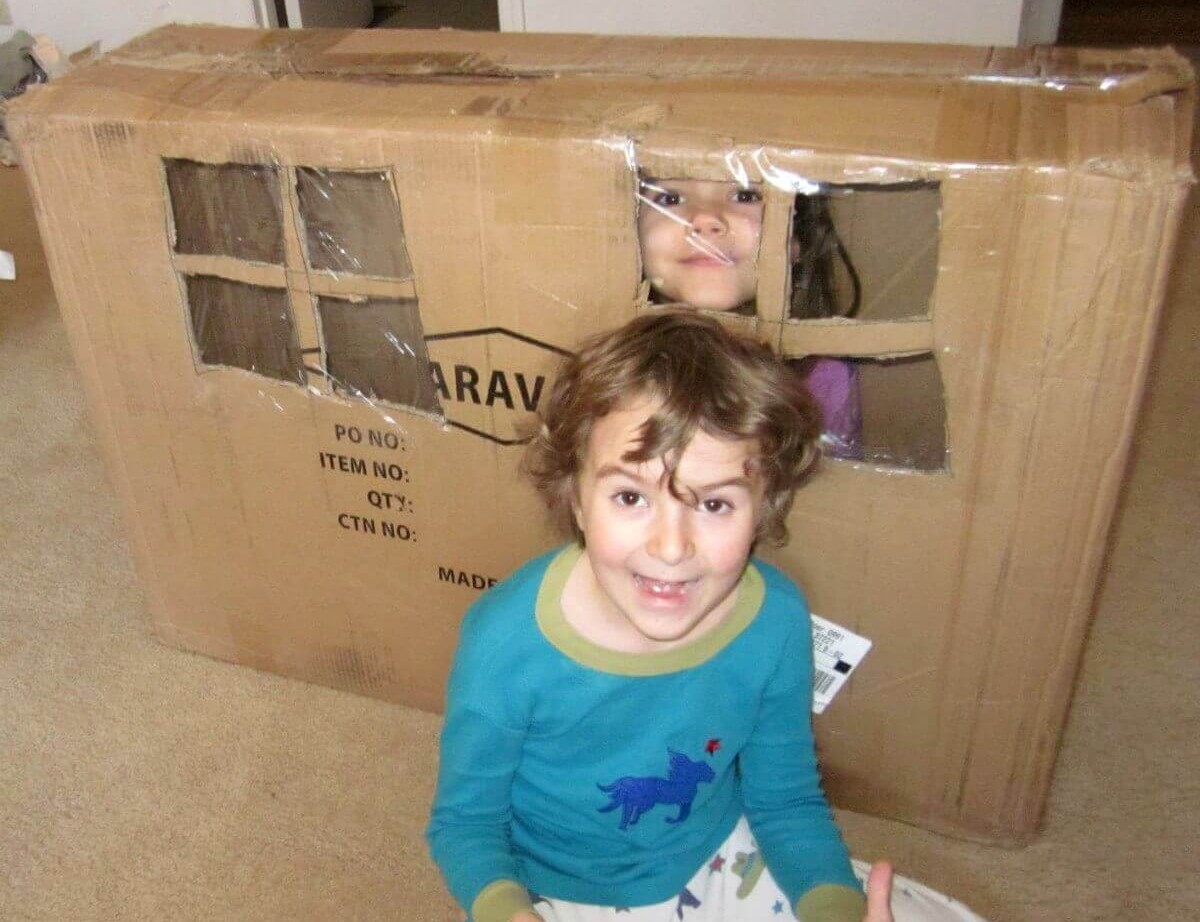
Who wouldn’t yearn for carefree childhood days when creativity knew no bounds? I vividly recall constructing intricate forts from cardboard boxes in our living room. Those were truly unforgettable experiences. The next time the weather’s uncooperative or a chilly day forces you to seek indoor entertainment, why not gather your little ones and embark on an adventure of building your own forts? Begin by conceptualizing your masterpiece – imagine what wonders you can create with cardboard!
Once you have a clear vision in mind, it’s time to bring that imagination to life. And, let’s be honest, having some warm cookies and hot cocoa nearby wouldn’t make the experience any less delightful.
Fabric Birdhouses
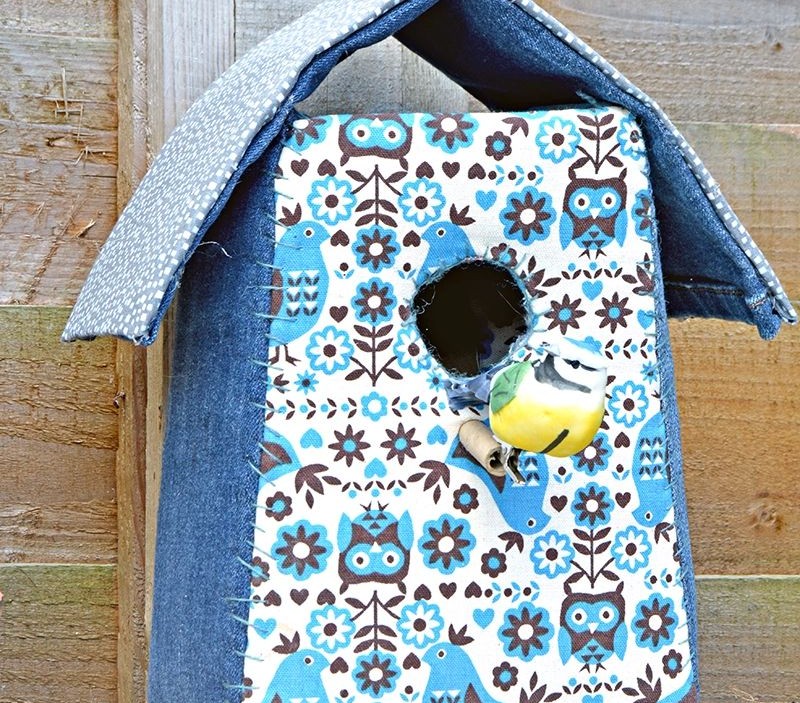
Transforming nature’s charm into indoor decor is as easy as creating these fabric birdhouses! Not only do they eliminate the hassle of cleaning up after feathered friends, but they’re also an innovative way to repurpose old clothes and scrap cloth. And if you’ve already mastered upcycling cardboard sheets, why not take it a step further by combining it with your fabric skills?
Simply cut out your cardboard base, line it with your chosen fabric, and secure the two together using your preferred adhesive method. To add an extra layer of comfort and protection for any small birds that might visit their new home, consider incorporating batting to pad the fabric.
Alphabet Board
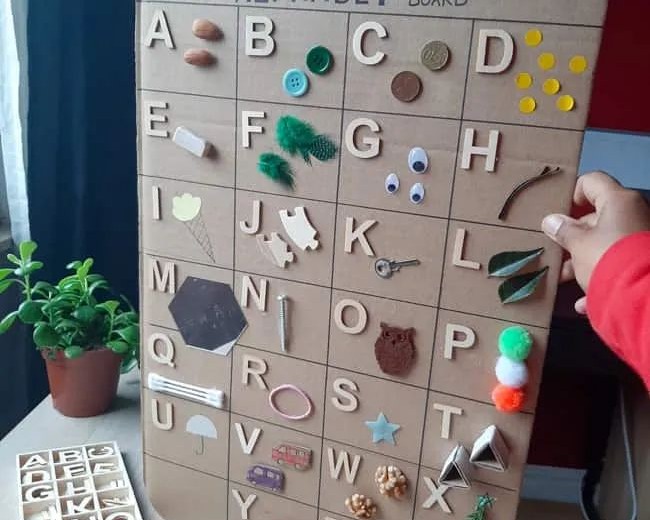
Teaching the alphabet to young children is a milestone in their educational journey. It’s a significant step that holds the same importance as taking their first steps or uttering their first words. To make this experience even more impactful for both of you, let’s create an engaging and personalized A to Z alphabet board. This innovative approach can spark your child’s curiosity and enthusiasm.
Imagine a visual representation where letters come alive with vibrant colors and creative illustrations that reflect your child’s interests. The possibilities are endless!
Pressed Flower Bookmarks
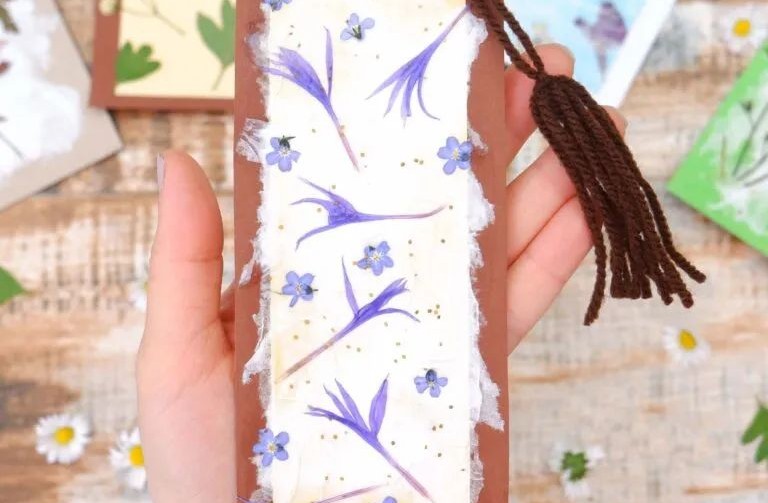
Pressing flowers has always held a special place in my heart as a project. It requires some patience and practice to master, especially when you’re just starting out. However, once you’ve got the hang of it, you’ll be left with an abundance of beautifully preserved blooms at your fingertips.
One of the many wonderful things about having these pressed flowers is that they can be used to create all sorts of unique and thoughtful gifts. Take this bookmark, for example.
To make one, start by cutting a piece of cardboard into a suitable shape or use a cereal box top as a base. Line it with a colorful sheet of paper to give your bookmark some visual appeal.
From there, simply arrange the pressed flowers and leaves in a way that looks visually appealing to you. The beauty of this project is that you can customize it however you like, making each one a truly unique reflection of your personal style.
If you’re as enthusiastic about DIY bookmarks for kids as I am, then you might also enjoy exploring the world of handmade bookmarks.
Pool Noodle Flower Wreath
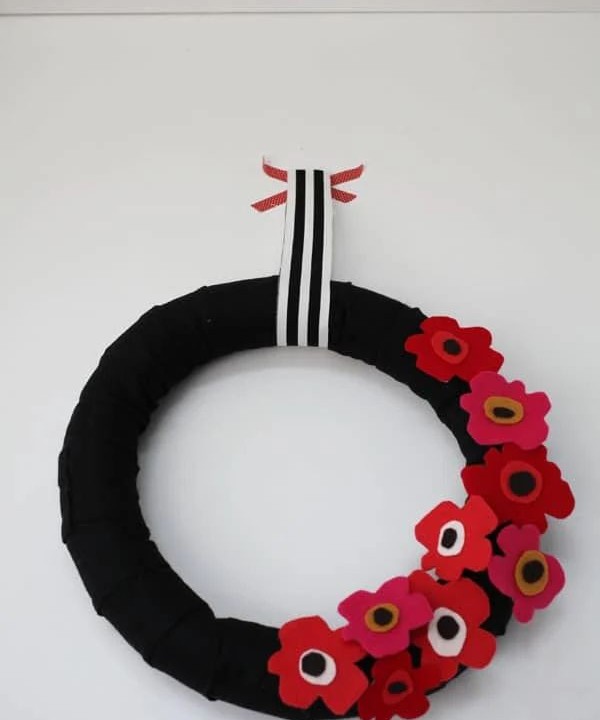
At first glance, the concept of creating a flower wreath using a pool noodle might seem absurd. However, once you behold the end result, you’ll be impressed by its uniqueness. To create this unconventional yet charming piece, start by obtaining a foam pool noodle, which can be found at most retailers. Once you have it, shape the pool noodle into a circular form and secure the ends together using duct tape.
Next, use colored felt sheets, toothpicks, a hot glue gun, and some ribbon to bring your wreath to life.
Pirate Boat
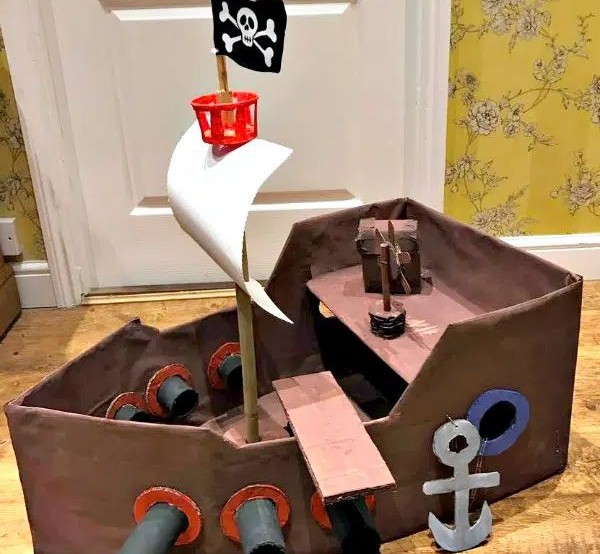
Pirates are a timeless favorite among kids, and creating a pirate ship is the perfect way to spark their imagination and sense of adventure. To build this ultimate pirate haven, gather a treasure trove of materials: cardboard, masking tape, newspapers, scissors, paint, a hot glue gun, two sticks for the masts, and some scrap fabric.
While you can use any type of paper for layering papier-mâché, incorporating newspapers adds an extra layer of stability to your pirate ship, making it perfect for rough-and-tumble play.
Chick Craft
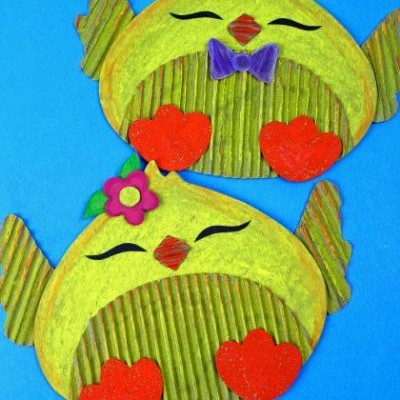
Get creative with your little one and craft a delightful Easter-themed project – an adorable little chick! This fun activity is perfect for your next crafting session together. You’ll need some basic supplies, including cardboard (don’t worry if it’s corrugated – the yellow paint will cover any imperfections). Additionally, grab some sandpaper, safety scissors, and a chick template to complete the project.
Once you have all the necessary materials, use the template to trace the design onto the cardboard, then cut it out to bring your little chick to life.
Owl Pinata
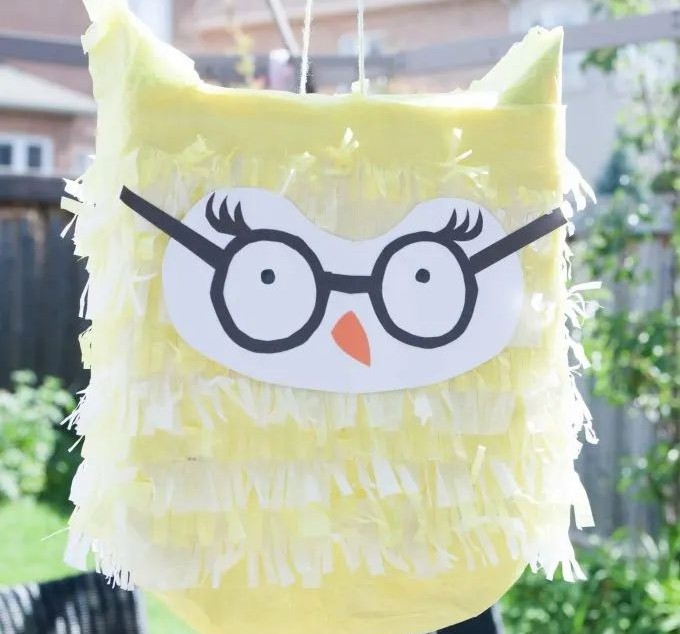
There’s a certain joy in breaking open a piñata, and it’s not just limited to parties. The therapeutic benefits are undeniable, and let’s be honest, the candy inside is a definite bonus. But for now, let’s focus on creating this stunning owl piñata. With its intricate design and vibrant colors, you’ll have a hard time bringing yourself to break it open – but that’s all part of the fun! If you’re wondering why an owl piñata, the answer is simple: why not?
It’s a unique and playful twist on a classic party favor. Here’s what you’ll need to get started:A large cereal box as the baseA variety of colored paper – including white and bright, bold huesTissue paper in matching colors for added flairScissors and tape to bring your design to lifeA printable owl piñata template to guide your creative process
Kids Pencil Case
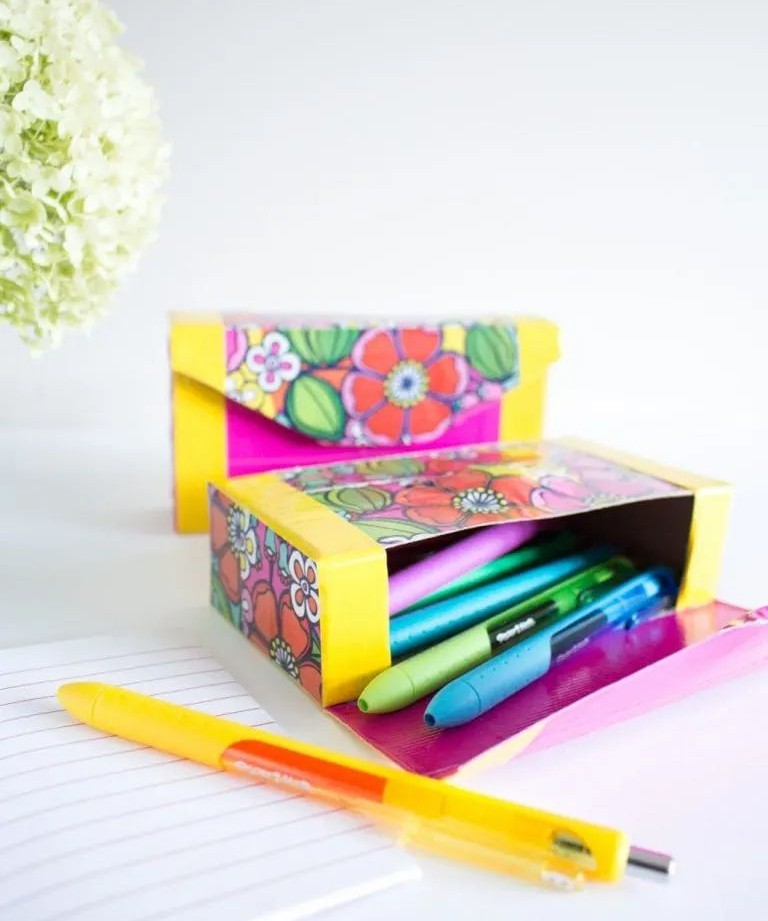
Transforming ordinary cardboard and duct tape into an upcycled pencil case is a great way to get creative when ideas are running dry or fancy supplies aren’t available. This project also happens to be perfect for back-to-school season, as it allows you to create a one-of-a-kind accessory that’s sure to turn heads. For another unique take on the traditional pencil case, consider checking out this DIY tutorial that repurposes toilet rolls.
If you’re looking for more inspiration, why not explore some of our favorite back-to-school crafts?
Storage Organizer Cubes
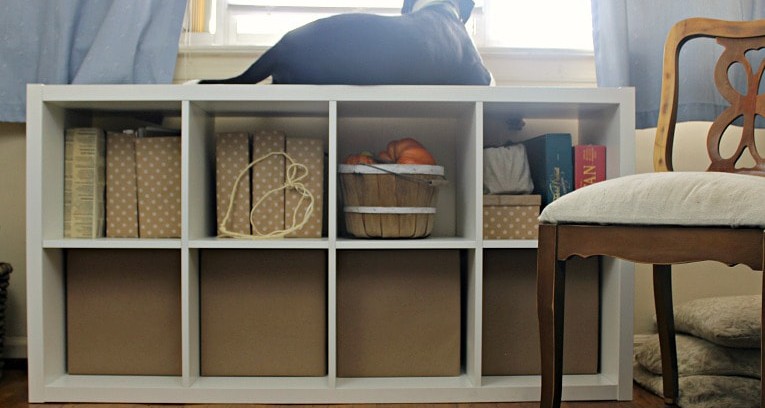
In today’s fast-paced world, having multiple storage systems is not just about being organized, but also about being practical and cost-effective. Take for instance the humble cardboard storage cupboard that can be easily set up to keep your belongings tidy. What makes it particularly useful is its cubed design that allows you to divide and categorize items with ease.
Whether you’re storing office supplies, craft materials or even shoes, this simple yet effective solution will have your space looking shipshape in no time. So why not start by grabbing a roll of brown paper and get creative? With a little bit of effort, you’ll be enjoying the benefits of your new storage system in no time!
Kid’s Box Satchel
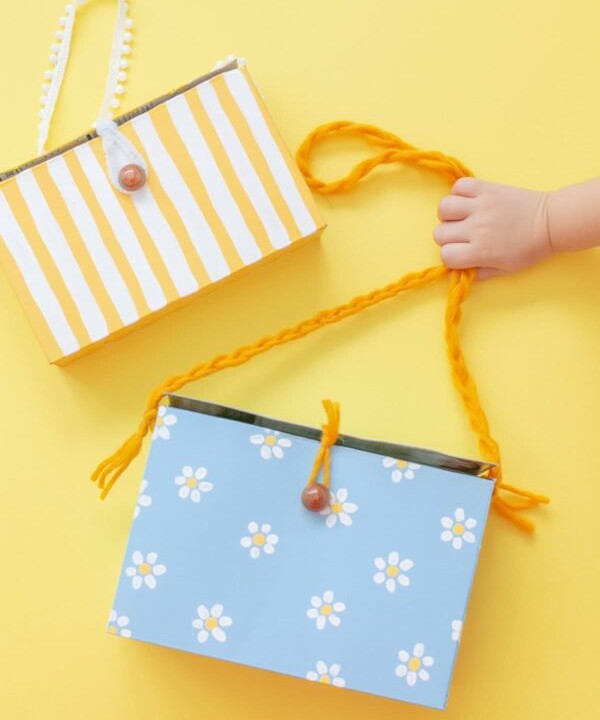
Imagine a versatile and eco-friendly accessory that combines the practicality of a box with the style of a satchel, crafted from humble cardboard materials. The result is a unique and fun DIY project perfect for kids. To create these box satchels, gather a few essential items: empty cereal boxes or cardboard sheets, yarn for the shoulder strap, and a decorative button to add a finishing touch.
Once you have your supplies ready, get creative with colorful paint patterns on the cardboard, seal the ends with glue, and let your child’s imagination run wild!
Trinket Box Craft
I have a special fondness for collecting small mementos from the places I visit. Whether it’s a humble seashell or a more elaborate piece of jewelry, I delight in bringing back little trinkets that hold memories of my adventures.
Organizing and storing these treasures is just as enjoyable. It’s an activity that can be shared with children too – simply provide them with a beautiful trinket box like this one.
For those who prefer a more DIY approach, grab an old shoebox and get creative with paint, glue, embroidery thread, and even polymer clay to transform it into a personalized storage solution.
Decorative Framed Mirror
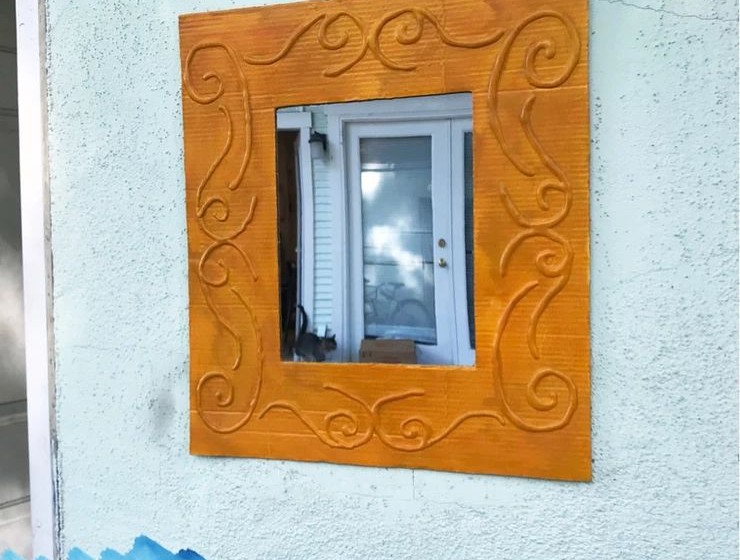
A foyer mirror is an essential element in any home, serving as a convenient spot for last-minute touch-ups before heading out the door. When time is of the essence, a well-placed mirror can be a lifesaver, helping you achieve that effortless look in no time. If you’re looking to elevate your foyer’s style without breaking the bank or investing too much time, consider crafting a decorative framed mirror that can be completed in under an hour.
Once dry, simply hang it on a command hook for instant gratification. To get started, gather two key supplies: a hot glue gun and some cardboard. With these essentials at your fingertips, you’ll be ready to roll out the perfect DIY project. And if you’re craving more adult crafts like this one, explore our collection of creative endeavors here.
Reindeer Lollipop
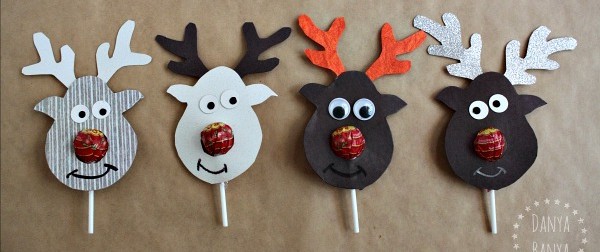
The idea of reindeer lollipops may seem unusual at first, but trust me, they’re a tasty treat that’s perfect for the holiday season. The key is to use a regular lollipop and add some festive flair with cardboard cutouts of reindeer. It’s a simple yet effective way to create a fun and edible gift or decoration. To make it work, you’ll need a candy lollipop as the base, and then attach a circle punch or hole punch to create a hole for the candy.
The result is a unique and enjoyable treat that’s sure to bring a smile to anyone’s face.
Knights Shield
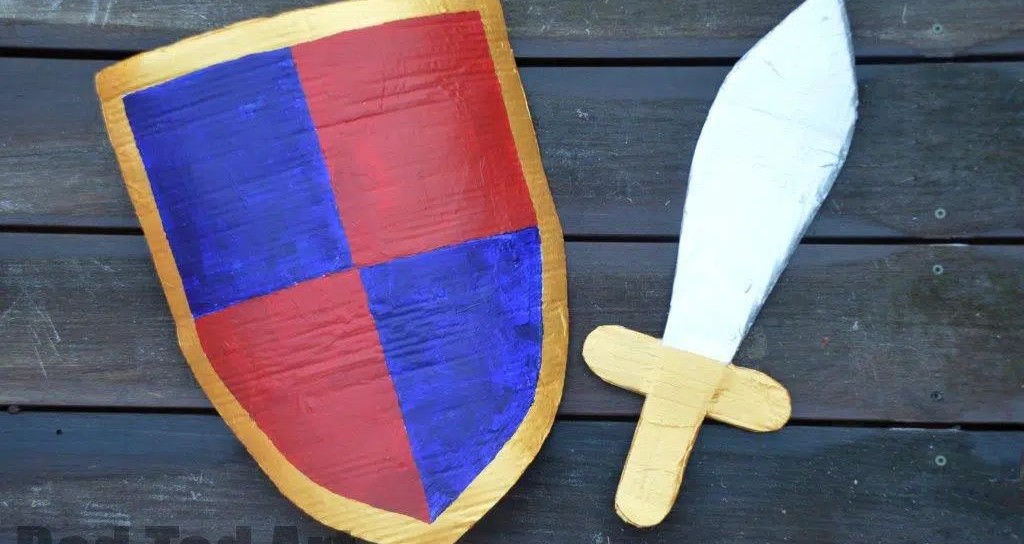
As we previously explored the art of crafting a dragon shield, it’s only natural to expand on our collection with a knight’s shield. While creating a sword is an exciting prospect for another day, let’s dive into this project and make some creative magic happen.
Gather your materials and enlist the help of your little ones – they’ll have an absolute blast painting their own unique designs onto the shield.
To add an extra layer of excitement, take some time to research the symbolism behind various colors and emblems, which will allow you to personalize your shield even further.
For a more streamlined approach, feel free to download and print out templates to serve as a guide for your design. Alternatively, let your imagination run wild and create your own custom templates before tracing them onto your cardboard shield.
Looking for more DIY inspiration?
Head over to our blog’s project archive for plenty of creative ideas to get you started.
Yarn Wall Art
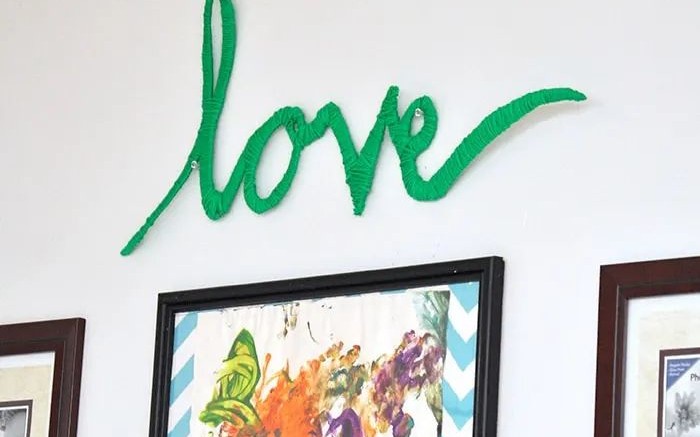
Working with yarn is a true passion of mine, and I’ve had the pleasure of exploring its versatility through various creative outlets – from crochet and knitting to even using it as a unique material for decorative pieces like vases. This yarn wall art project holds a special place in my heart, not just because of its undeniable charm, but also due to its affordability and ease of execution.
To create this beautiful piece, you can opt for medium-weight yarn or something lighter, ensuring that the individual strands blend together harmoniously. A quick glance at our collection of yarn-based projects will give you a sense of the endless possibilities this versatile material has to offer.
String Instrument
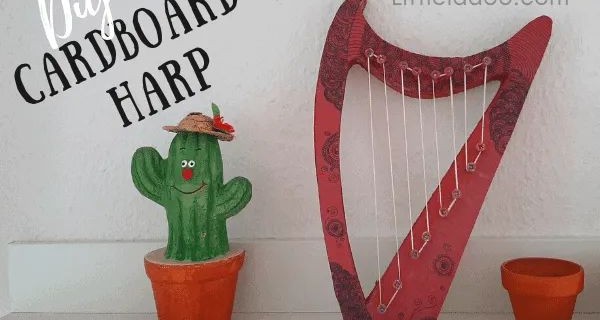
Imagine playing a musical instrument that’s both a fun craft project and an engaging toy. The cardboard harp instrument is exactly that. With its unique harp-shaped silhouette, it’s an exciting creation process, and once complete, it produces music just like a store-bought toy would. To get started, print out the template, cut out the cardboard into the desired shape, and then unleash your creativity by painting and decorating it any way you like.
Once you’re satisfied with its appearance, it’s time to add some string or rubber bands to bring it to life. Make sure to stretch either material taut to get the best sound quality, and you’ll be ready to strum and enjoy the harmonious sounds of your very own cardboard harp.
Gingerbread Garland
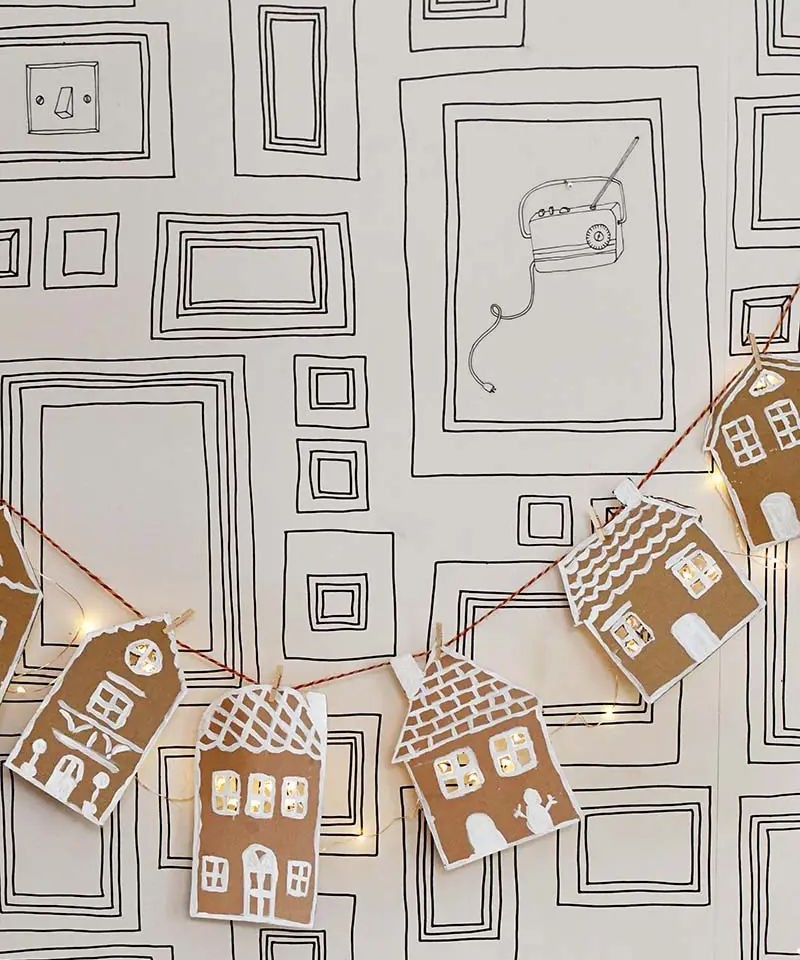
Imagine a stunning garland featuring intricately crafted gingerbread houses. Sounds delightful? Unfortunately, it’s not meant for snacking. Instead, why not gather your family or friends for a fun-filled afternoon of creativity and bonding? Start by baking some scrumptious gingerbread cookies, and don’t forget to brew a refreshing pot of lemonade. Once you’re all settled in, grab the necessary materials: twine, wooden pegs, copper string lights, and a marker.
Let your imagination run wild as you craft this enchanting garland. If you enjoy this project, be sure to check out these Dollar Tree crafts for even more creative adventures!
Christmas Tree Craft
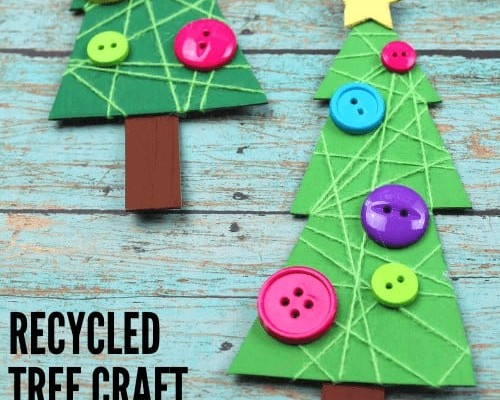
Another creative project for the holiday season is transforming cardboard into an actual Christmas tree ornament – and this one’s a bit more ambitious than just a simple decoration. To create this unique piece, start by using a template or stencil to draw and cut out tree-shaped pieces from your cardboard material. Once you have your tree forms ready, it’s time to add some festive flair.
Paint the trees to give them some color and texture, then embellish with buttons, sequins, or other decorations that catch your eye.
Parking Garage
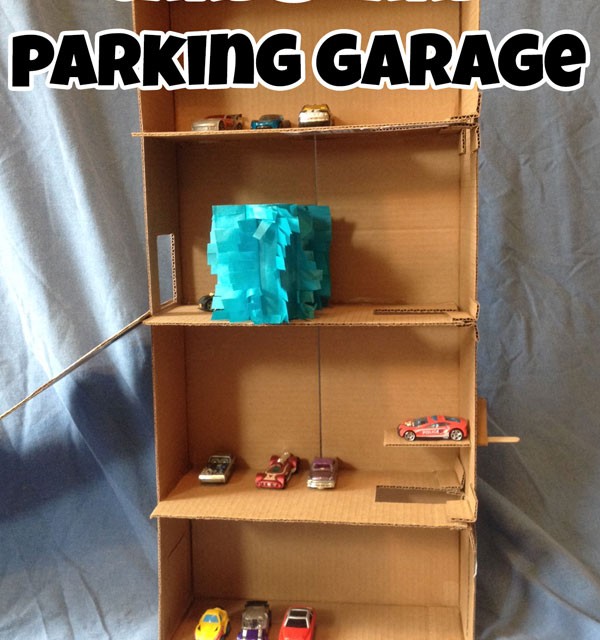
As you’ve previously designed a car wash structure, why not consider building a multi-level car park for your Hot Wheels collection? This project offers an opportunity to combine creativity with responsibility by involving kids in the process. By working together, you can teach them valuable lessons about organization and the importance of putting away toys.
The end result will be a functional storage solution that’s also a fun play area, allowing children to engage in imaginative play while learning essential life skills.
